Database table partitioning in SQL Server
What is a database table partitioning?
Partitioning is the database process where very large tables are divided
into multiple smaller parts. By splitting a large table into smaller,
individual tables, queries that access only a fraction of the data can
run faster because there is less data to scan. The main of goal of
partitioning is to aid in maintenance of large tables and to reduce the
overall response time to read and load data for particular SQL
operations.
Vertical Partitioning on SQL Server tables
Vertical table partitioning is mostly used to increase SQL Server
performance especially in cases where a query retrieves all columns
from a table that contains a number of very wide text or BLOB columns.
In this case to reduce access times the BLOB columns can be split to its
own table. Another example is to restrict access to sensitive data e.g.
passwords, salary information etc. Vertical partitioning splits a table
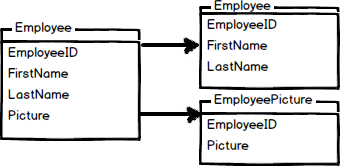
into two or more tables containing different columns:
Example of vertical partitioning
An example for vertical partitioning can be a large table with
reports for employees containing basic information, such as report name,
id, number of report and a large column with report description.
Assuming that ~95% of users are searching on the part of the report
name, number, etc. and that only ~5% of requests are opening the reports
description field and looking to the description. Let’s assume that all
those searches will lead to the clustered index scans and since the
index scan reads all rows in the table the cost of the query is
proportional to the total number of rows in the table and our goal is to
minimize the number of IO operations and reduce the cost of the search.
Let’s see the example on the
EmployeeReports table:
1
2
3
4
5
6
7
8
9
10
11
12
13
14
15
16
17
18
19
20
21
22
23
24
25
26
27
28
29
30
31
|
CREATE TABLE EmployeeReports
(
ReportID int IDENTITY (1,1) NOT NULL,
ReportName varchar (100),
ReportNumber varchar (20),
ReportDescription varchar (max)
CONSTRAINT EReport_PK PRIMARY KEY CLUSTERED (ReportID)
)
DECLARE @i int
SET @i = 1
BEGIN TRAN
WHILE @i<100000
BEGIN
INSERT INTO EmployeeReports
(
ReportName,
ReportNumber,
ReportDescription
)
VALUES
(
'ReportName',
CONVERT (varchar (20), @i),
REPLICATE ('Report', 1000)
)
SET @i=@i+1
END
COMMIT TRAN
GO
|
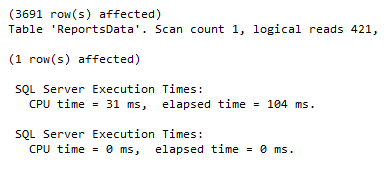
If we run a SQL query to pull
ReportID,
ReportName,
ReportNumber data from the
EmployeeReports
table the result set that a scan count is 5 and represents a number of
times that the table was accessed during the query, and that we had
113,288 logical reads that represent the total number of page accesses
needed to process the query:
|
|
SET STATISTICS IO ON
SET STATISTICS TIME ON
SELECT er.ReportID, er.ReportName, er.ReportNumber
FROM dbo.EmployeeReports er
WHERE er.ReportNumber LIKE '%33%'
SET STATISTICS IO OFF
SET STATISTICS TIME OFF
|
As indicated, every page is read from the data cache, whether or
not it was necessary to bring that page from disk into the cache for any
given read. To reduce the cost of the query we will change the SQL
Server database schema and split the
EmployeeReports table vertically.
Next we’ll create the
ReportsDesc table and move the large
ReportDescription column, and the
ReportsData table and move all data from the
EmployeeReports table except the
ReportDescription column:
1
2
3
4
5
6
7
8
9
10
11
12
13
14
15
16
17
18
19
20
21
22
23
24
|
CREATE TABLE ReportsDesc
( ReportID int FOREIGN KEY REFERENCES EmployeeReports (ReportID),
ReportDescription varchar(max)
CONSTRAINT PK_ReportDesc PRIMARY KEY CLUSTERED (ReportID)
)
CREATE TABLE ReportsData
(
ReportID int NOT NULL,
ReportName varchar (100),
ReportNumber varchar (20),
CONSTRAINT DReport_PK PRIMARY KEY CLUSTERED (ReportID)
)
INSERT INTO dbo.ReportsData
(
ReportID,
ReportName,
ReportNumber
)
SELECT er.ReportID,
er.ReportName,
er.ReportNumber
FROM dbo.EmployeeReports er
|
The same search query will now give different results:
|
|
SET STATISTICS IO ON
SET STATISTICS TIME ON
SELECT er.ReportID, er.ReportName, er.ReportNumber
FROM ReportsData er
WHERE er.ReportNumber LIKE '%33%'
SET STATISTICS IO OFF
SET STATISTICS TIME OFF
|
Vertical partitioning on SQL Server tables may not be the right
method in every case. However, if you have, for example, a table with a
lot of data that is not accessed equally, tables with data you want to
restrict access to, or scans that return a lot of data, vertical
partitioning can help.
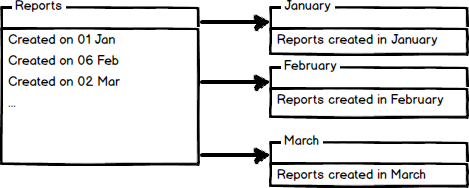
Horizontal Partitioning on SQL Server tables
Horizontal partitioning divides a table into multiple tables that
contain the same number of columns, but fewer rows. For example, if a
table contains a large number of rows that represent monthly reports it
could be partitioned horizontally into tables by years, with each table
representing all monthly reports for a specific year. This way queries
requiring data for a specific year will only reference the appropriate
table. Tables should be partitioned in a way that queries reference as
few tables as possible.
Tables are horizontally partitioned based on a column which will
be used for partitioning and the ranges associated to each partition.
Partitioning column is usually a datetime column but all data types that
are valid for use as index columns can be used as a partitioning
column, except a timestamp column. The ntext, text, image, xml,
varchar(max), nvarchar(max), or varbinary(max), Microsoft .NET Framework
common language runtime (CLR) user-defined type, and alias data type
columns cannot be specified.
There are two different approaches we could use to accomplish
table partitioning. The first is to create a new partitioned table and
then simply copy the data from your existing table into the new table
and do a table rename. The second approach is to partition an existing
table by rebuilding or creating a clustered index on the table
Example of horizontal partitioning with creating a new partitioned table
SQL Server 2005 introduced a built-in partitioning feature to
horizontally partition a table with up to 1000 partitions in SQL Server
2008, and 15000 partitions in SQL Server 2012, and the data placement is
handled automatically by SQL Server. This feature is available only in
the Enterprise Edition of SQL Server.
To create a partitioned table for storing monthly reports we will
first create additional filegroups. A filegroup is a logical storage
unit. Every database has a primary filegroup that contains the primary
data file (.mdf). An additional, user-defined, filegrups can be created
to contain secondary files (.ndf). We will create 12 filegroups for
every month:
1
2
3
4
5
6
7
8
9
10
11
12
13
14
15
16
17
18
19
20
21
22
23
24
25
26
27
28
29
30
31
32
33
34
35
36
|
ALTER DATABASE PartitioningDB
ADD FILEGROUP January
GO
ALTER DATABASE PartitioningDB
ADD FILEGROUP February
GO
ALTER DATABASE PartitioningDB
ADD FILEGROUP March
GO
ALTER DATABASE PartitioningDB
ADD FILEGROUP April
GO
ALTER DATABASE PartitioningDB
ADD FILEGROUP May
GO
ALTER DATABASE PartitioningDB
ADD FILEGROUP June
GO
ALTER DATABASE PartitioningDB
ADD FILEGROUP July
GO
ALTER DATABASE PartitioningDB
ADD FILEGROUP Avgust
GO
ALTER DATABASE PartitioningDB
ADD FILEGROUP September
GO
ALTER DATABASE PartitioningDB
ADD FILEGROUP October
GO
ALTER DATABASE PartitioningDB
ADD FILEGROUP November
GO
ALTER DATABASE PartitioningDB
ADD FILEGROUP December
GO
|
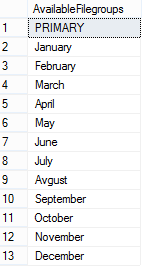
To check created and available file groups in the current database run the following query:
|
|
SELECT name AS AvailableFilegroups
FROM sys.filegroups
WHERE type = 'FG'
|
When filegrups are created we will add .ndf file to every filegroup:
|
|
ALTER DATABASE [PartitioningDB]
ADD FILE
(
NAME = [PartJan],
FILENAME = 'C:\Program Files\Microsoft SQL Server\MSSQL11.LENOVO\MSSQL\DATA\PartitioningDB.ndf',
SIZE = 3072 KB,
MAXSIZE = UNLIMITED,
FILEGROWTH = 1024 KB
) TO FILEGROUP [January]
|
The same way files to all created filegroups with specifying the
logical name of the file and the operating system (physical) file name
for each filegroup e.g.:
|
|
ALTER DATABASE [PartitioningDB]
ADD FILE
(
NAME = [PartFeb],
FILENAME = 'C:\Program Files\Microsoft SQL Server\MSSQL11.LENOVO\MSSQL\DATA\PartitioningDB2.ndf',
SIZE = 3072 KB,
MAXSIZE = UNLIMITED,
FILEGROWTH = 1024 KB
) TO FILEGROUP [February]
|
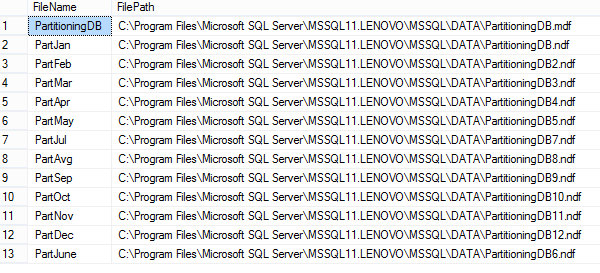
To check files created added to the filegroups run the following query:
|
|
SELECT
name as [FileName],
physical_name as [FilePath]
FROM sys.database_files
where type_desc = 'ROWS'
GO
|
After creating additional filegroups for storing data we’ll
create a partition function. A partition function is a function that
maps the rows of a partitioned table into partitions based on the values
of a partitioning column. In this example we will create a partitioning
function that partitions a table into 12 partitions, one for each month
of a year’s worth of values in a datetime column:
|
|
CREATE PARTITION FUNCTION [PartitioningByMonth] (datetime)
AS RANGE RIGHT FOR VALUES ('20140201', '20140301', '20140401',
'20140501', '20140601', '20140701', '20140801',
'20140901', '20141001', '20141101', '20141201');
|
To map the partitions of a partitioned table to filegroups and
determine the number and domain of the partitions of a partitioned table
we will create a partition scheme:
|
|
CREATE PARTITION SCHEME PartitionBymonth
AS PARTITION PartitioningBymonth
TO (January, February, March,
April, May, June, July,
Avgust, September, October,
November, December);
|
Now we’re going to create the table using the
PartitionBymonth partition scheme, and fill it with the test data:
1
2
3
4
5
6
7
8
9
10
11
12
13
14
15
16
17
18
19
|
CREATE TABLE Reports
(ReportDate datetime PRIMARY KEY,
MonthlyReport varchar(max))
ON PartitionBymonth (ReportDate);
GO
INSERT INTO Reports (ReportDate,MonthlyReport)
SELECT '20140105', 'ReportJanuary' UNION ALL
SELECT '20140205', 'ReportFebryary' UNION ALL
SELECT '20140308', 'ReportMarch' UNION ALL
SELECT '20140409', 'ReportApril' UNION ALL
SELECT '20140509', 'ReportMay' UNION ALL
SELECT '20140609', 'ReportJune' UNION ALL
SELECT '20140709', 'ReportJuly' UNION ALL
SELECT '20140809', 'ReportAugust' UNION ALL
SELECT '20140909', 'ReportSeptember' UNION ALL
SELECT '20141009', 'ReportOctober' UNION ALL
SELECT '20141109', 'ReportNovember' UNION ALL
SELECT '20141209', 'ReportDecember'
|
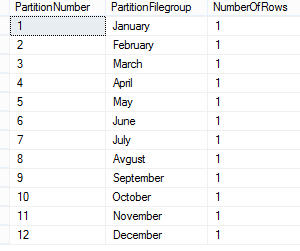
We will now verify the rows in the different partitions:
|
|
SELECT
p.partition_number AS PartitionNumber,
f.name AS PartitionFilegroup,
p.rows AS NumberOfRows
FROM sys.partitions p
JOIN sys.destination_data_spaces dds ON p.partition_number = dds.destination_id
JOIN sys.filegroups f ON dds.data_space_id = f.data_space_id
WHERE OBJECT_NAME(OBJECT_ID) = 'Reports'
|
Now just copy data from your table and rename a partitioned table.
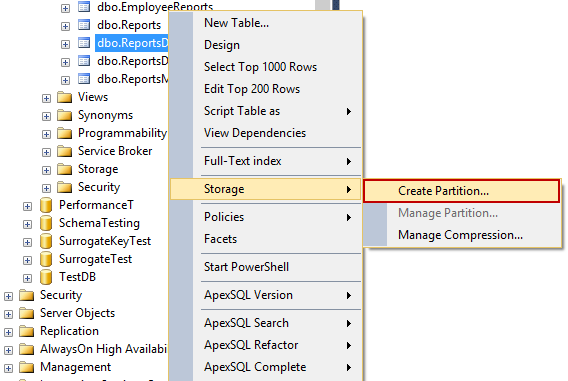
Partitioning a table using the SQL Server Management Studio Partitioning wizard
SQL Server 2008 introduced a table partitioning wizard in SQL Server Management Studio.
Right click on a table in the
Object Explorer pane and in the
Storage context menu choose the
Create Partition command:
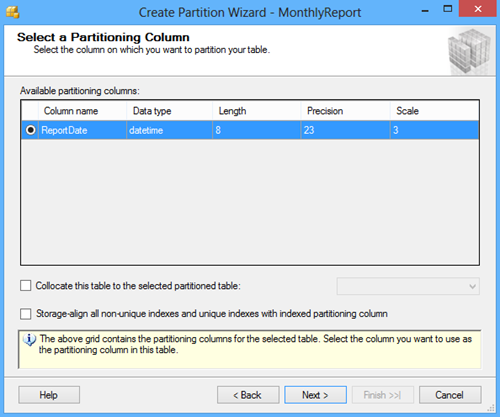
In the
Select a Partitioning Column window, select a column which will be used to partition a table from available partitioning columns:
Other options in the
Create Partition Wizard dialog include the
Collocate this table to the selected partition table option used to display related data to join with the partitioned column and the
Storage Align Non Unique Indexes and Unique Indexes with an Indexed Partition Column option that aligns all indexes of the partitioned table with the same partition scheme.
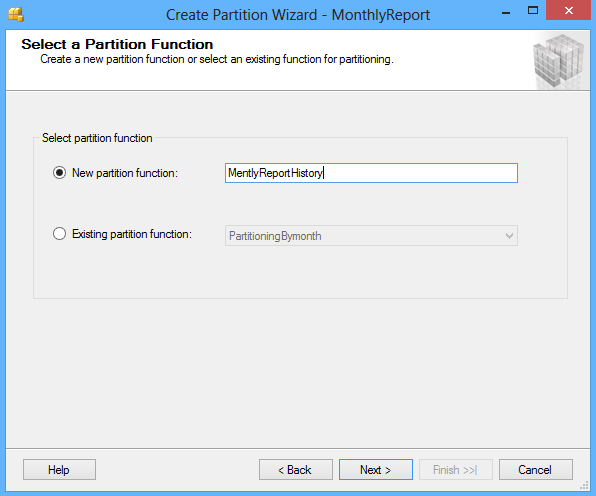
After selecting a column for partitioning click the Next button. In the
Select a Partition Function
window enter the name of a partition function to map the rows of the
table or index into partitions based on the values of the ReportDate
column, or choose the existing partition function:
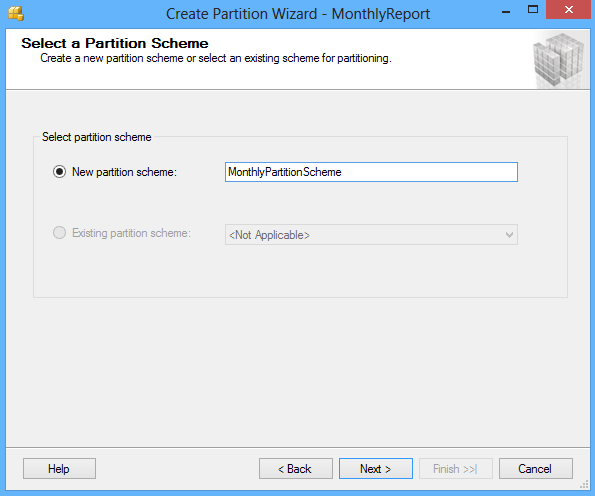
Click the Next button and in the
Select a Partition Scheme window create the partition scheme to map the partitions of the MonthlyReport table to different filegroups:
Click the Next button and in the
Map Partitions window
choose the rage of partitioning and select the available filegroups and
the range boundary. The Left boundary is based on Value <= Boundary
and the Right boundary is based on Value < Boundary.
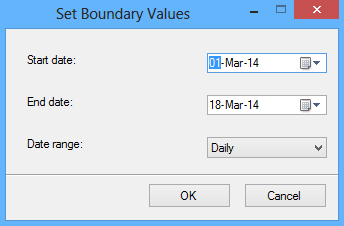
By clicking the
Set boundaries button you can customize the date range and set the start and the end date for each partition:
The
Estimate storage option determines the Rowcount, the
Required space, and the Available space columns that displays an
estimate on required space and available space based on number of
records in the table.
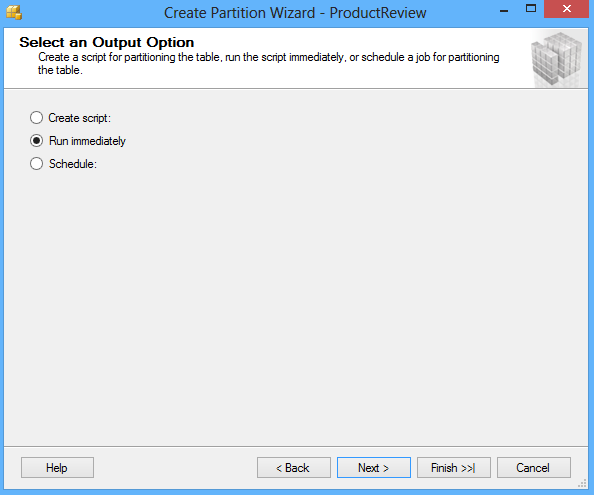
The next screen of the wizard offers to choose the option to
whether to execute the script immediately by the wizard to create
objects and a partition table, or to create a script and save it. A
schedule for executing the script to perform the operations
automatically can also be specified:
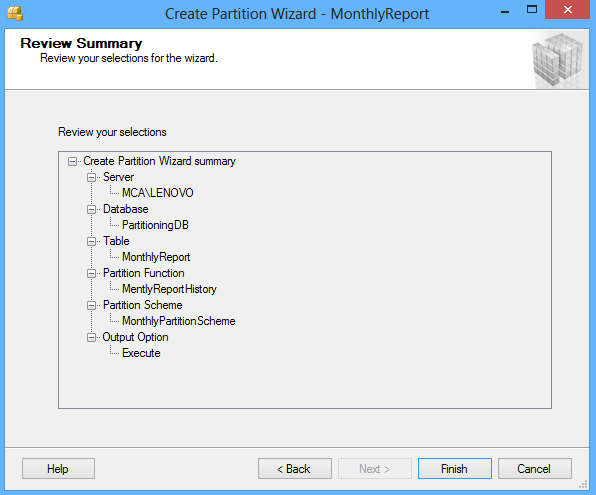
The next screen of the wizard shows a review of selections made in the wizard:
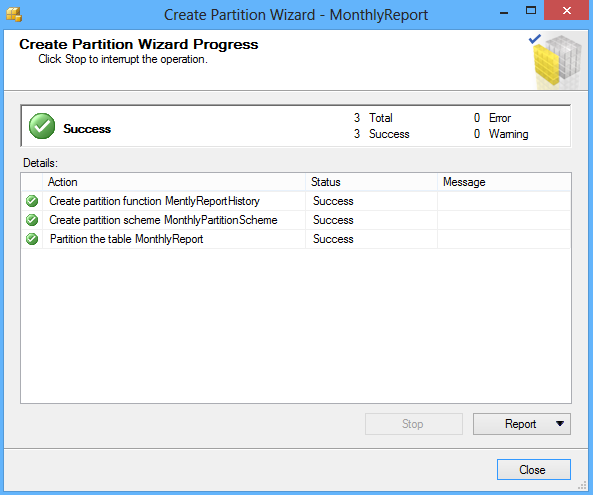
Click the Finish button to complete the process:
http://www.sqlshack.com/database-table-partitioning-sql-server/
How to Partition an existing SQL Server Table
Solution
There are two different approaches we could use to accomplish this
task. The first would be to create a brand new partitioned table (you
can do this by following this tip)
and then simply copy the data from your existing table into the new
table and do a table rename. Alternatively, as I will outline below, we
can partition the table in place simply by rebuilding or creating a
clustered index on the table.
Sample SQL Server Table and Data to Partition
--Table/Index creation
CREATE TABLE [dbo].[TABLE1]
([pkcol] [int] NOT NULL,
 [datacol1] [int] NULL,
 [datacol2] [int] NULL,
 [datacol3] [varchar](50) NULL,
 [partitioncol] datetime)
GO
ALTER TABLE dbo.TABLE1 ADD CONSTRAINT PK_TABLE1 PRIMARY KEY CLUSTERED (pkcol)
GO
CREATE NONCLUSTERED INDEX IX_TABLE1_col2col3 ON dbo.TABLE1 (datacol1,datacol2)
  WITH (STATISTICS_NORECOMPUTE = OFF, IGNORE_DUP_KEY = OFF,
        ALLOW_ROW_LOCKS = ON, ALLOW_PAGE_LOCKS = ON)
  ON [PRIMARY]
GO
-- Populate table data
DECLARE @val INT
SELECT @val=1
WHILE @val < 1000
BEGIN
   INSERT INTO dbo.Table1(pkcol, datacol1, datacol2, datacol3, partitioncol)
      VALUES (@val,@val,@val,'TEST',getdate()-@val)
   SELECT @val=@val+1
END
GO
Looking at the sys.partitions system view we can see we have created a regular single partition table.
SELECT o.name objectname,i.name indexname, partition_id, partition_number, [rows]
FROM sys.partitions p
INNER JOIN sys.objects o ON o.object_id=p.object_id
INNER JOIN sys.indexes i ON i.object_id=p.object_id and p.index_id=i.index_id
WHERE o.name LIKE '%TABLE1%'
|
objectname
|
indexname
|
partition_id
|
partition_number
|
rows
|
| TABLE1 |
PK_TABLE1 |
72057594042712064 |
1 |
999 |
| TABLE1 |
IX_TABLE1_col2col3 |
72057594042777600 |
1 |
999 |
SQL Server Partitioned Table Creation
In order to create a partitioned table we'll need to first create a partition function and partition scheme.
For our example we are going to partition the table based on the
datetime column. Here is the code to create these objects and check some
of their metadata in the system views.
CREATE PARTITION FUNCTION myDateRangePF (datetime)
AS RANGE RIGHT FOR VALUES ('20110101', '20120101','20130101')
GO
CREATE PARTITION SCHEME myPartitionScheme
AS PARTITION myDateRangePF ALL TO ([PRIMARY])
GO
SELECT ps.name,pf.name,boundary_id,value
FROM sys.partition_schemes ps
INNER JOIN sys.partition_functions pf ON pf.function_id=ps.function_id
INNER JOIN sys.partition_range_values prf ON pf.function_id=prf.function_id
Now that we have a partition scheme we can go ahead and partition our
table. Since we are going to partition the table using a clustered
index and our table already has a clustered index defined we'll need to
drop this index first and recreate the constraint using a non-clustered
index. If our table did not have a clustered index we could omit this
step and just run the CREATE CLUSTERED INDEX
statement. Similarly, if our table had a clustered index defined, but
it was defined on same column that we plan to partition the table on we
could run the CREATE CLUSTERED INDEX
statement with the DROP_EXISTING clause. Finally, if you are concerned
about the downtime required to perform this task and you are using SQL
Server Enterprise Edition you could use the ONLINE=ON option of the CREATE INDEX
statement to minimize any downtime for your application. Keep in mind
that you may see some performance degradation while the index is being
rebuilt using the ONLINE option. Here is the script that we can use in
our scenario.
ALTER TABLE dbo.TABLE1 DROP CONSTRAINT PK_TABLE1
GO
ALTER TABLE dbo.TABLE1 ADD CONSTRAINT PK_TABLE1 PRIMARY KEY NONCLUSTERED  (pkcol)
   WITH (STATISTICS_NORECOMPUTE = OFF, IGNORE_DUP_KEY = OFF,
         ALLOW_ROW_LOCKS = ON, ALLOW_PAGE_LOCKS = ON) ON [PRIMARY]
GO
CREATE CLUSTERED INDEX IX_TABLE1_partitioncol ON dbo.TABLE1 (partitioncol)
  WITH (STATISTICS_NORECOMPUTE = OFF, IGNORE_DUP_KEY = OFF,
        ALLOW_ROW_LOCKS = ON, ALLOW_PAGE_LOCKS = ON)
  ON myPartitionScheme(partitioncol)
GO
Once this statements completes we can again take a look at the
sys.partitions system view (see code above) and confirm our table now
has 4 partitions.
|
objectname
|
indexname
|
partition_id
|
partition_number
|
rows
|
| TABLE1 |
IX_TABLE1_partitioncol |
72057594043039744 |
1 |
233 |
| TABLE1 |
IX_TABLE1_partitioncol |
72057594043105280 |
2 |
365 |
| TABLE1 |
IX_TABLE1_partitioncol |
72057594043170816 |
3 |
366 |
| TABLE1 |
IX_TABLE1_partitioncol |
72057594043236352 |
4 |
35 |
| TABLE1 |
IX_TABLE1_col2col3 |
72057594043301888 |
1 |
999 |
| TABLE1 |
PK_TABLE1 |
72057594043367424 |
1 |
999 |
Sample SQL Server Table and Data Cleanup
--cleanup
DROP TABLE TABLE1
DROP PARTITION SCHEME myPartitionScheme
DROP PARTITION FUNCTION myDateRangePF
Creating a table with horizontal partitioning in SQL Server
In SQL Server 2000 and prior there was option for partitioned views,
but this had several limitations and there were several things to
consider before implementing. With SQL Server 2005 and onwards we now
have an option to horizontally partition a table with up to 1000
partitions and the data placement is handled automatically by SQL
Server. Horizontal partitioning is the process of dividing the rows of a
table in a given number of partitions. The number of columns is the
same in each partition.
Although you can have multiple partitions of a horizontally
partitioned table on just one filegroup it makes more sense to break
these out into separate filegroups, so you can also get some performance
benefits. Some of the benefits include an I/O performance boost,
because all partitions can reside on different disks. Another reason is
the advantage of being able to separately backup a partition through
filegroup backups. Also, the SQL Server database engine intelligently
determines the partition to be accessed for certain data. And if more
than one partition is to be accessed the database engine may use
multiple processors in parallel for data retrieval. Such design aspects
are very important to get the full advantages of table partitioning.
Before running this script, create the following folders for this
example. You can use different folders, but you will need to adjust the
scripts below accordingly.
- D:\PartitionDB\FG1
- D:\PartitionDB\FG2
- D:\PartitionDB\FG3
Now run following script to create a new database with three data files on three filegroups.
| Script # 1: Create a table with two data files |
USE Master
GO
CREATE DATABASE DBForPartitioning
ON PRIMARY
(NAME='DBForPartitioning_1',
FILENAME=
'D:\PartitionDB\FG1\DBForPartitioning_1.mdf',
SIZE=2,
MAXSIZE=100,
FILEGROWTH=1 ),
FILEGROUP FG2
(NAME = 'DBForPartitioning_2',
FILENAME =
'D:\PartitionDB\FG2\DBForPartitioning_2.ndf',
SIZE = 2,
MAXSIZE=100,
FILEGROWTH=1 ),
FILEGROUP FG3
(NAME = 'DBForPartitioning_3',
FILENAME =
'D:\PartitionDB\FG3\DBForPartitioning_3.ndf',
SIZE = 2,
MAXSIZE=100,
FILEGROWTH=1 )
GO |
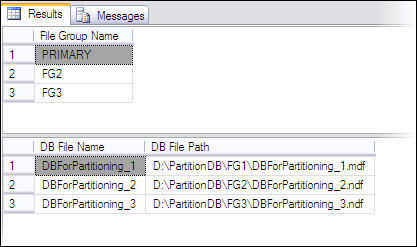
Now we have a database DBForPartitioning with three data files
created in three file groups. This may be confirmed using the following
script.
| Script # 2: Confirm number of file groups and files in DBForPartitioning |
Use DBFOrPartitioning
GO
-- Confirm Filegroups
SELECT name as [File Group Name]
FROM sys.filegroups
WHERE type = 'FG'
GO -- Confirm Datafiles
SELECT name as [DB File Name],physical_name as [DB File Path]
FROM sys.database_files
where type_desc = 'ROWS'
GO
|
Broad plan
In a broad plan there are three major steps for implementing horizontal partitioning in SQL Server
- Create a partitioning function. It will have criteria to partition the data in the partitions.
- Create partition schemes to map the created partition function
to file groups. It is related to the physical storage of data on disk.
- Create the table by linking it to the partition scheme and also
to the partition function. A partition column will be used for this
purpose.
At this point before implementation of these three steps we should
have a clear idea about the structure of the table that we are going to
create with horizontal partitioning. As mentioned earlier we have to
implement horizontal partitioning on a table where sales data will be
archived. For simplicity we will assume that the structure of our
partitioned archival table will be SalesArchival (saleTime dateTime,
item varchar(50)). The column on which data will be referred to
partitions is called the partition column and it will be used in the
partition function as the partition key. The partition column is
important and should have the following conditions fulfilled:
- Partition column is always a single column or computed column or persisted computed column by combining more than one columns.
- Any data type that may be used for index key is eligible for partition column except TIMESTAMP data type.
Create partition function
In our example we have sales data for 2007, 2008 and 2009. So here we
will create three partitions by providing two partition ranges in our
partitioning function. The function will create data boundaries. In our
case we are required to place all the data before 2009 in the first
partition, data for 2009 will be placed in the second partition and data
after 2009 will be placed in the third partition.
| Script # 3: Create partition function |
Use DBForPartitioning
GO
CREATE PARTITION FUNCTION salesYearPartitions (datetime)
AS RANGE RIGHT FOR VALUES ( '2009-01-01', '2010-01-01')
GO |
The partition key provided in the function is of type that will be
the primary key in our partitioned table and partition ranges are based
on this column. In our table this column is
saleTime with a data type
of DATETIME. The range defined may be RIGHT or LEFT. Here we have used a range RIGHT. As a rule of thumb ranges can be translated as
- RIGHT means < or >=
- LEFT can be translated as <= and >.
In our case we have used RIGHT with following values.
|
Range RIGHT translation
|
| Record with saleTime |
Destination partition |
| < 2009-01-01 |
DBForPartitioning_1 |
| >=2009-01-01 and < 2010-01-01 |
DBForPartitioning_2 |
| >=2010-01-01 |
DBForPartitioning_3 |
If we had used range LEFT then partitioning criteria would be as follows:
|
Range LEFT translation
|
| Record with saleTime |
Destination partition |
| <= 2009-01-01 |
DBForPartitioning_1 |
| >2009-01-01 and <= 2010-01-01 |
DBForPartitioning_2 |
| > 2010-01-01 |
DBForPartitioning_3 |
As
you can see from these two examples there is not a big difference on
where the data would reside when using date, but it could be significant
based on some other data that may be used.
Create partition scheme
To get optimized file structure, we have already created three file
groups for this database and a partition function is created with three
partitions defined with certain criteria. Now it is time to link file
groups and partition functions. We have to define the physical storage
of records partitioned on the basis of ranges defined in the partition
function. In our design each partition will go to separate file group.
This approach will also allow us achieve benefits of performance for
data load or delete operations along with utilization of filegroup
backups.
| Script # 4: Create partitioning scheme |
Use DBForPartitioning
GO
CREATE PARTITION SCHEME Test_PartitionScheme
AS PARTITION salesYearPartitions
TO ([PRIMARY], FG2, FG3 )
GO |
Mapping partitions to filegroups is flexible. Multiple partitions may
exist on a single filegroup and single partition may be allotted to a
single filegroup.
Create partitioned table
Now we may create a horizontal partitioned table by using the
partitioned scheme and partition column. And for performance
optimization we will make the
SaleTime column the primary key hence a cluster index for this table.
| Script # 5: Create table with horizontal partitioning |
Use DBFOrPartitioning
GO
CREATE TABLE SalesArchival
(SaleTime datetime PRIMARY KEY,
ItemName varchar(50))
ON Test_PartitionScheme (SaleTime);
GO |
Insert data to check the partitioned table functionality
Now it is time to insert data to verify our required functionality for partitioned table.
| Script # 6: Insert sample in horizontally partitioned table |
Use DBFOrPartitioning
GO
INSERT INTO SalesArchival (SaleTime, ItemName)
SELECT '2007-03-25','Item1' UNION ALL
SELECT '2008-10-01','Item2' UNION ALL
SELECT '2009-01-01','Item1' UNION ALL
SELECT '2009-08-09','Item3' UNION ALL
SELECT '2009-12-30','Item2' UNION ALL
SELECT '2010-01-01','Item1' UNION ALL
SELECT '2010-05-24','Item3'
GO |
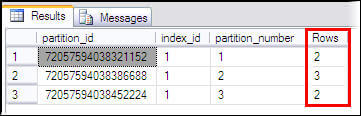
Lastly , we can verify the rows in the different partitions
| Script # 7: Verify data distribution in horizontally partitioned table |
Use DBFOrPartitioning
GO
select partition_id, index_id, partition_number, Rows
FROM sys.partitions
WHERE OBJECT_NAME(OBJECT_ID)='SalesArchival'
GO |
We have created and verified a horizontal partitioned table for archival. Now data may be loaded in this table by any means.
There are some further considerations that are necessary to keep in mind while implementing horizontal partitioning:.
Considerations while planning
- In a clustered table, partition column should be part of primary key or clustered key.
- By default, indexes created on a partitioned table will also
use the same partitioning scheme and partitioning column that is being
used by the table
- If data in a partition is not required to be modified that partition may be marked READ ONLY
- Entire table will be locked during an index rebuild operation
so you can not rebuild indexes on a single partition with the ONLINE
option.
- If you ever require to change partition key then you will be
required to recreate the table, reload the data and rebuild the indexes.
- Partition column and partition key both should match in terms of data type, length and precision.
- Only available in Enterprise and Developer editions
- All partitions must reside in the same database
- You can rebuild indexes based on a partition instead of rebuilding the entire index.
Some enhancements for SQL Server 2008
- Data compression can be implemented on specified or all partitions.
- When appropriate use the date data type for a partition column and partition key which can cut down the storage needs and improve performance..
- Lock settings may be implemented at partition level rather than at table level.