What is Database Snapshot in SQL Server? Explanation
A database snapshot is a read-only, static view of a SQL Server database (the source database). The database snapshot is transactionally consistent with the source database as of the moment of the snapshot's creation. A database snapshot always resides on the same server instance as its source database. As the source database is updated, the database snapshot is updated. Therefore, the longer a database snapshot exists, the more likely it is to use up its available disk space.
Multiple snapshots can exist on a given source database. Each database snapshot persists until it is explicitly dropped by the database owner.
Database snapshots are unrelated to snapshot backups, snapshot isolation of transactions, or snapshot replication.
Benefits of Database Snapshots
- Snapshots can be used for reporting purposes.Clients can query a database snapshot, which makes it useful for writing reports based on the data at the time of snapshot creation.
- Maintaining historical data for report generation.A snapshot can extend user access to data from a particular point in time. For example, you can create a database snapshot at the end of a given time period (such as a financial quarter) for later reporting. You can then run end-of-period reports on the snapshot. If disk space permits, you can also maintain end-of-period snapshots indefinitely, allowing queries against the results from these periods; for example, to investigate organizational performance.
- Using a mirror database that you are maintaining for availability purposes to offload reporting.Using database snapshots with database mirroring permits you to make the data on the mirror server accessible for reporting. Additionally, running queries on the mirror database can free up resources on the principal. For more information, see Database Mirroring and Database Snapshots (SQL Server).
- Safeguarding data against administrative error.
- In the event of a user error on a source database, you can revert the source database to the state it was in when a given database snapshot was created. Data loss is confined to updates to the database since the snapshot's creation.For example, before doing major updates, such as a bulk update or a schema change, create a database snapshot on the database protects data. If you make a mistake, you can use the snapshot to recover by reverting the database to the snapshot. Reverting is potentially much faster for this purpose than restoring from a backup; however, you cannot roll forward afterward.
Important
Reverting does not work in an offline or corrupted database. Therefore, taking regular backups and testing your restore plan are necessary to protect a database.Note
Database snapshots are dependent on the source database. Therefore, using database snapshots for reverting a database is not a substitute for your backup and restore strategy. Performing all your scheduled backups remains essential. If you must restore the source database to the point in time at which you created a database snapshot, implement a backup policy that enables you to do that. - Safeguarding data against user error.By creating database snapshots on a regular basis, you can mitigate the impact of a major user error, such as a dropped table. For a high level of protection, you can create a series of database snapshots spanning enough time to recognize and respond to most user errors. For instance, you might maintain 6 to 12 rolling snapshots spanning a 24-hour interval, depending on your disk resources. Then, each time a new snapshot is created, the earliest snapshot can be deleted.
- To recover from a user error, you can revert the database to the snapshot immediately before the error. Reverting is potentially much faster for this purpose than restoring from a backup; however, you cannot roll forward afterward.
- Alternatively, you may be able to manually reconstruct a dropped table or other lost data from the information in a snapshot. For instance, you could bulk copy the data out of the snapshot into the database and manually merge the data back into the database.
Note
Your reasons for using database snapshots determine how many concurrent snapshots you need on a database, how frequently to create a new snapshot, and how long to keep it. - Managing a test databaseIn a testing environment, it can be useful when repeatedly running a test protocol for the database to contain identical data at the start of each round of testing. Before running the first round, an application developer or tester can create a database snapshot on the test database. After each test run, the database can be quickly returned to its prior state by reverting the database snapshot.
Prerequisites
The source database, which can use any recovery model, must meet the following prerequisites:
- The server instance must be running on an edition of SQL Server that supports database snapshots. For more information, see Features Supported by the Editions of SQL Server 2016.
- The source database must be online, unless the database is a mirror database within a database mirroring session.
- You can create a database snapshot on any primary or secondary database in an availability group. The replica role must be either PRIMARY or SECONDARY, not in the RESOLVING state.We recommend that the database synchronization state be SYNCHRONIZING or SYNCHRONIZED when you create a database snapshot. However, database snapshots can be created when the database synchronization state is NOT SYNCHRONIZING.For more information, see Database Snapshots with Always On Availability Groups (SQL Server).
- To create a database snapshot on a mirror database, the database must be in the SYNCHRONIZED mirroring state.
- The source database cannot be configured as a scalable shared database.
- The source database must not contain a MEMORY_OPTIMIZED_DATA filegroup. For more information
Limitations on the Source Database
As long as a database snapshot exists, the following limitations exist on the snapshot's source database:
- The database cannot be dropped, detached, or restored.
Note
Backing up the source database works normally; it is unaffected by database snapshots. - Performance is reduced, due to increased I/O on the source database resulting from a copy-on-write operation to the snapshot every time a page is updated.
- Files cannot be dropped from the source database or from any snapshots.
Limitations on Database Snapshots
The following limitations apply to database snapshots:
- A database snapshot must be created and remain on the same server instance as the source database.
- Database snapshots always work on an entire database.
- Database snapshots are dependent on the source database and are not redundant storage. They do not protect against disk errors or other types of corruption. Therefore, using database snapshots for reverting a database is not a substitute for your backup and restore strategy. Performing all your scheduled backups remains essential. If you must restore the source database to the point in time at which you created a database snapshot, implement a backup policy that enables you to do that.
- When a page getting updated on the source database is pushed to a snapshot, if the snapshot runs out of disk space or encounters some other error, the snapshot becomes suspect and must be deleted.
- Snapshots are read-only. Since they are read only, they cannot be upgraded. Therefore, database snapshots are not expected to be viable after an upgrade.
- Snapshots of the model, master, and tempdb databases are prohibited.
- You cannot change any of the specifications of the database snapshot files.
- You cannot drop files from a database snapshot.
- You cannot back up or restore database snapshots.
- You cannot attach or detach database snapshots.
- You cannot create database snapshots on FAT32 file system or RAW partitions. The sparse files used by database snapshots are provided by the NTFS file system.
- Full-text indexing is not supported on database snapshots. Full-text catalogs are not propagated from the source database.
- A database snapshot inherits the security constraints of its source database at the time of snapshot creation. Because snapshots are read-only, inherited permissions cannot be changed and permission changes made to the source will not be reflected in existing snapshots.
- A snapshot always reflects the state of filegroups at the time of snapshot creation: online filegroups remain online, and offline filegroups remain offline. For more information, see "Database Snapshots with Offline Filegroups" later in this topic.
- If a source database becomes RECOVERY_PENDING, its database snapshots may become inaccessible. After the issue on the source database is resolved, however, its snapshots should become available again.
- Reverting is unsupported for any NTFS read-only or NTFS compressed files in the database. Attempts to revert a database containing either of these types of filegroups will fail.
- In a log shipping configuration, database snapshots can be created only on the primary database, not on a secondary database. If you switch roles between the primary server instance and a secondary server instance, you must drop all the database snapshots before you can set the primary database up as a secondary database.
- A database snapshot cannot be configured as a scalable shared database.
- FILESTREAM filegroups are not supported by database snapshots. If FILESTREAM filegroups exist in a source database, they are marked as offline in its database snapshots, and the database snapshots cannot be used for reverting the database.
Note
A SELECT statement that is executed on a database snapshot must not specify a FILESTREAM column; otherwise, the following error message will be returned:Could not continue scan with NOLOCK due to data movement. - When statistics on a read-only snapshot are missing or stale, the Database Engine creates and maintains temporary statistics in tempdb. For more information, see Statistics.
Disk Space Requirements
Database snapshots consume disk space. If a database snapshot runs out of disk space, it is marked as suspect and must be dropped. (The source database, however, is not affected; actions on it continue normally.) Compared to a full copy of a database, however, snapshots are highly space efficient. A snapshot requires only enough storage for the pages that change during its lifetime. Generally, snapshots are kept for a limited time, so their size is not a major concern.
The longer you keep a snapshot, however, the more likely it is to use up available space. The maximum size to which a sparse file can grow is the size of the corresponding source database file at the time of the snapshot creation. If a database snapshot runs out of disk space, it must be deleted (dropped).
Note
Except for file space, a database snapshot consumes roughly as many resources as a database.
Database Snapshots with Offline Filegroups
Offline filegroups in the source database affect database snapshots when you try to do any of the following:
- Create a snapshotWhen a source database has one or more offline filegroups, snapshot creation succeeds with the filegroups offline. Sparse files are not created for the offline filegroups.
- Take a filegroup offlineYou can take a file offline in the source database. However, the filegroup remains online in database snapshots if it was online when the snapshot was created. If the queried data has changed since snapshot creation, the original data page will be accessible in the snapshot. However, queries that use the snapshot to access unmodified data in the filegroup are likely to fail with input/output (I/O) errors.
- Bring a filegroup onlineYou cannot bring a filegroup online in a database that has any database snapshots. If a filegroup is offline at the time of snapshot creation or is taken offline while a database snapshot exists, the filegroup remains offline. This is because bringing a file back online involves restoring it, which is not possible if a database snapshot exists on the database.
- Revert the source database to the snapshotReverting a source database to a database snapshot requires that all of the filegroups are online except for filegroups that were offline when the snapshot was created.
TSQL Script to Create Database Snapshot
CREATE DATABASE database_snapshot_name
ON
(
NAME =logical_file_name,
FILENAME ='os_file_name'
) [ ,...n ]
AS SNAPSHOT OF source_database_name
Create Database Snpshot_withdbName ON
(Name=MDFlogicalname,FileName='MDFlogicalfilelocation.ss')
AS snapshot of db_name
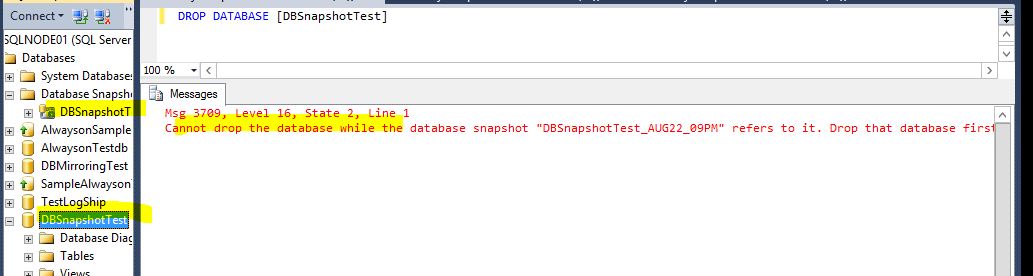
Here you can see we have create DB snspshot on DBsnapshotest db

we can not update Snapshot

Snapshot file info

Can not Restore Database is having Snapshot with backup

Can not Drop database is having Snapshot
Now i am generating some records insert into database table

you can see DB only having some size increased not in Snapshot

you can see table info @ db

You can see table info @ snapshot which taken before insert on db

we cant restore because we should must choose as master on db dropdown

we can restore database from Snapshot
TSQL Script to Restore database from Snapshot
Restore database dbname From Database_Snapshot ='Snapshot_name'


Database snapshot is a great feature that offers virtual read only consistent database copy. When we create the database snapshot in the live operational database, it takes a database point in time static view and Rollback all uncommitted transactions in the snapshot database so we will not be having any inconsistent data that is yet to be committed. Database snapshot always exists on the Source database server.
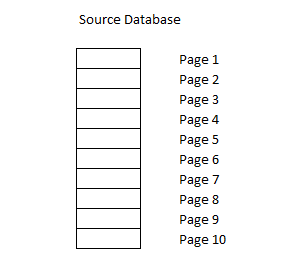
Database snapshot works on the pages (the fundamental unit of data storage in SQL server is the page). The disk space allocated to a data file in a database is logically divided into pages numbered contiguously from 0 to n. Disk I/O operations are performed at the page level. That is, SQL server reads or writes whole data pages.
Basically, it creates a sparse file and will be pointing to the original databases, written only in case of any insert, update and delete statement is in the source database.
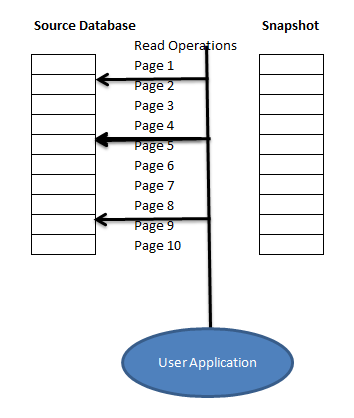
Suppose there is no operation going into the server when we created a database snapshot so snapshot will look like
Source Database
Snapshot Database (Sparse File)
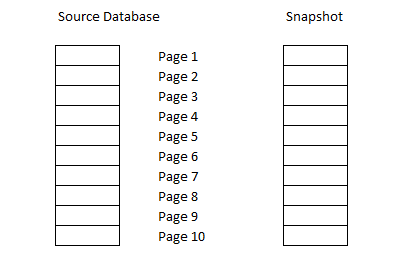
So we have the blank copy of the database here. Now, if any Read Operation occurs ,it will be pointing to the original database only as no page modification is done since snapshot creation.
Now suppose due to a DML operation (insert\update\delete) Page 2, 5, and 8 has been modified and user operation requires page 1,2, 4 and page 8 so below picture shows how the snapshot will be and how the read operation will be performed.
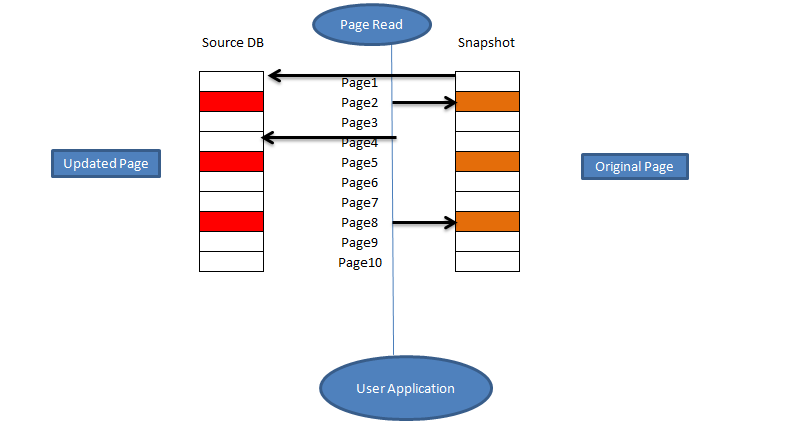
We can see here whichever page gets changed due to any operation, its original page (before modification) is copied into the sparse file (snapshot), so if user operation request to read the snapshot database it works in below ways
- If a page is modified, read operation occurs on sparse File
- If the page is not modified it still points to the source database page
This is the concept behind the snapshot, thus, its size is small compared to the original database but it all depends on the operation if there are too many operations in the database which gets page modified so the snapshot size will be kept increasing.
So whenever we create the snapshot following operation will be done
- 1. It creates an empty file, i.e. sparse file for each source database data file
- Uncommitted transactions are rolled back, thus having a consistent copy of the database
- All dirty pages will be returned to the disk
- The user can query the snapshot database now
Now let’s say there are many database pages being updated so now the snapshot will look like
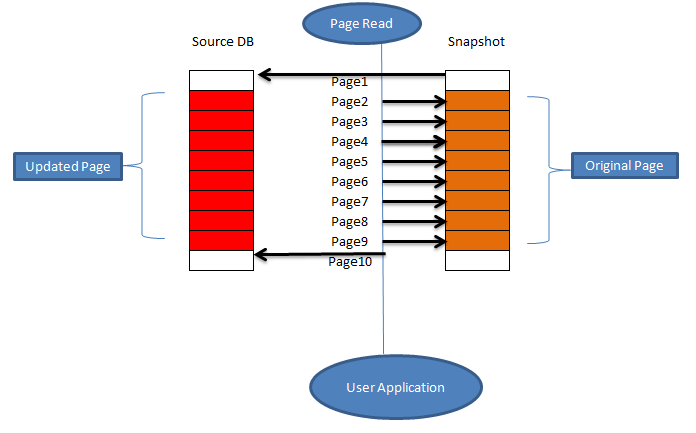
Here we can see the as there are many operations being performed all pages shown above are modified, thus the snapshot size will be increased. We should always keep an eye on the growth of the snapshot database.
The best use of Database snapshot can be during production changes\ upgrades\releases. Normally, database backup is taken and if the database size is big it is really time and space consuming since we will have to keep the backup copy apart from our regular backups. So instead of backup we can create the Database snapshot which is really quick and can perform the release, and once we have verified the changes are good we can easily drop the snapshot and also in some cases we require to see the values before changes we can view that as well.
Database snapshot and High availability
Database snapshot works well with the log shipping and database mirroring too. Normally log shipping databases are maintained in the no recovery model means no database connections can be made and it will be useful only when failover is made.
We can create a database snapshot for log shipping secondary database and use the database to run the queries.
In database mirroring, mirror database is always in no recovery mode, whether it is synchronous and asynchronous mode. By creating snapshots of the mirror database, we can easily query the mirror database so it is quite a useful feature to offload and use it for reporting purposes.
But there is some overhead if we are using synchronous mirror mode. As in synchronous mode, transactions have to be committed on both Principal and mirror servers before marking it complete so for a snapshot as it requires original page, it will add an extra task as copy database page from the mirror database to mirror Snapshot.
Benefits of Database snapshot
- A database snapshot is convenient, reliable, Read- only, point-in-time copy of the database.
- It is very beneficial when doing critical updates to the database as if anything goes wrong database can be restored to that point without any hassle.
- If we want to view database suppose at 7 pm, we can create database snapshot and easily query the database, however, without snapshot we have the option to take the database backup and restore using some different name but it requires considerable system resources especially disk space.
- Sparse file (snapshot) is small and easy to create however the size of snapshot depends upon the amount of operation and page updated.
- Multiple database snapshots are possible for a single database.
- There is no dependency for the recovery model, it works with full, bulk-logged and simple also.
- Snapshot creation is really quick, it takes a few seconds only for big databases too.
Limitations and cons of Database snapshot
- A database snapshot can be created onto the source server only. It cannot be moved to another server
- We can’t drop an Original Source Database as long as a referring snapshot exists in that database
- It cannot be Backed up and also detach \attach doesn’t work with database snapshots
- Snapshots can be created for only user databases, not for the master, model and msdb
- If we revert to a snapshot log Chain will get broken, thus we have to take a full or differential backup to bridge the log chain sequence
- Both the source DB and the snapshot will be unavailable when the actual reversion process is in progress
- If the source database is unavailable or corrupted we cannot use the database snapshot to revert it to the original state
- We cannot add new users for database since it is a read-only copy
- There is no graphical user interface for creating and reverting back the snapshot, this need to be done from query only
- There is some overhead for every DML operation as before operation page needs to be moved out
- If the drive in which snapshot exists is out of space which causes any DML to fail the snapshot will be in suspect mode and non-recoverable
- The full-text index is not available with a snapshot
- It is available with enterprise edition only
- Database files that were online during snapshot creation should be online during the snapshot revert also
Conditions where Database snapshot is not recommended
- It does not substitute for high availability solution such as mirroring, log shipping etc.
- Very high user based activity as it might have extra overhead
- Replacement of database backup as it is fully dependent on the source database

How to revert a Database Snapshot to recover a SQL Server database
Here is a step by step process to create a snapshot, delete some data and then recover the database using a database snapshot.
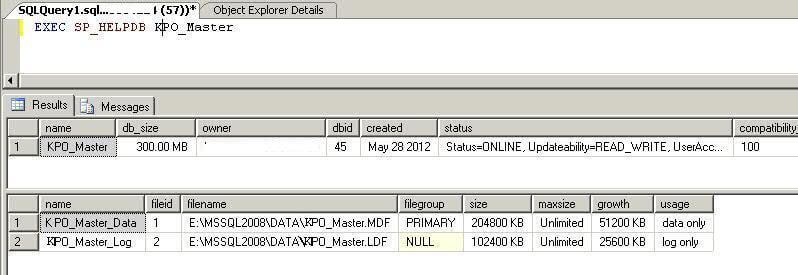
Step 1 - Get Information About The Database
First we will check how many data files we have in our source database. Make sure to create a separate sparse file for each data file.
EXEC SP_HELPDB KPO_MASTER
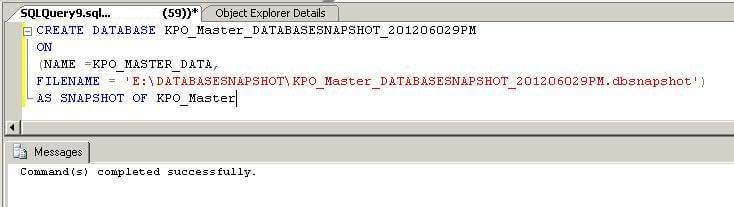
Step 2 - Create New Database Snapshot
Since we have only have one data file, we will need to create the database snapshot with one sparse file. This command creates the database snapshot for the database.
CREATE DATABASE KPO_Master_DATABASESNAPSHOT_201206029PM
ON
(NAME =KPO_MASTER_DATA,
FILENAME = 'E:\DATABASESNAPSHOT\KPO_Master_DATABASESNAPSHOT_201206029PM.dbsnapshot')
AS SNAPSHOT OF KPO_Master
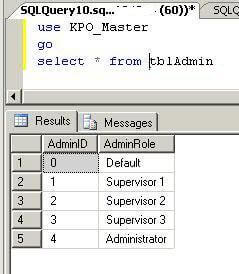
Here we can see we have 5 rows in this table.

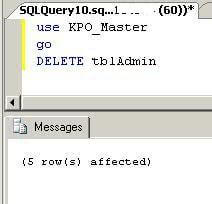
Step 3 - Delete Data From a Table
Now I will delete all rows from a table, so that we can revert the database snapshot to recover the deleted rows.
Delete all rows from this table.
USE KPO_Master
go
DELETE tbladmin
Let's again run a SELECT statement to see the table contents. We can see we have no data in this table.
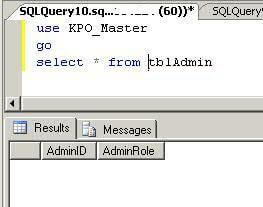
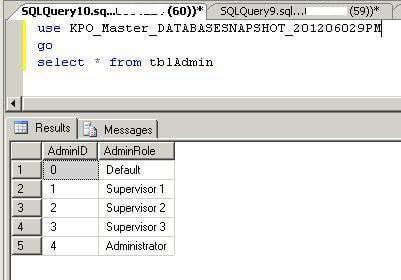
Step 4 - Check To See If Data Still Exists In Snapshot
As you can see, all rows from tbladmin table have been deleted from the source database in the query above. Now you can run the same SELECT statement on the database snapshot. Here you can see that all of the data which we have deleted in the source database still exists. This is what we will recover using the database snapshot.
Step 5 - Drop All Other Snapshots For Database
If you have multiple database snapshots created then you must first drop all unwanted database snapshots before reverting it to the source database. To test this step, create another database snapshot using Step 2. I have created a separate database snapshot at 12 PM named "KPO_Master_DATABASESNAPSHOT_2012060212PM".
Now suppose you have multiple database snapshots from multiple source databases on your SQL Server Instance. First you have to find the correct database snapshots for your source database. As you can see the database ID is 45 for our source database which we can get in Step 1. Run the below command to get a list of all database snapshots for your source database.
SELECT name,database_id,source_database_id FROM sys.databases
WHERE source_database_id=45
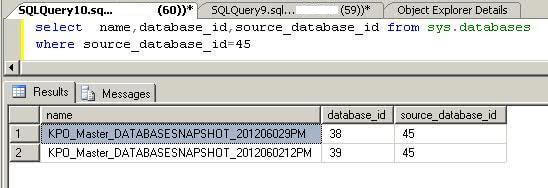
Here you can see that two database snapshots are created for our source database. We must drop the unwanted database snapshot. As we have to recover our database from the first database snapshot that was created before dropping all rows from the above table. To drop a database snapshot run a normal drop database statement using the database snapshot name as shown below.
DROP DATABASE KPO_Master_DATABASESNAPSHOT_2012060212PM
Step 6 - Restore Snapshot
The final step is to restore a database snapshot to our source database to recover all data. It is a simple restore statement using the with DATABASE_SNAPSHOT option.
RESTORE DATABASE KPO_Master
FROM DATABASE_SNAPSHOT='KPO_Master_DATABASESNAPSHOT_201206029PM'
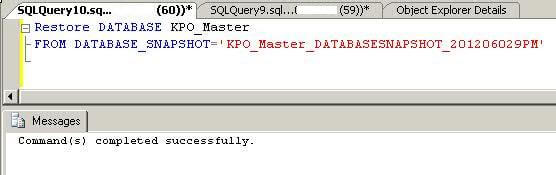
Now you can run the SELECT statement again to check that the data was recovered.
Script:
TSQL Script to Restore database from Snapshot
Restore database dbname From Database_Snapshot ='Snapshot_name'
TSQL Script to Create Database Snapshot
CREATE DATABASE database_snapshot_name
ON
(
NAME =logical_file_name,
FILENAME ='os_file_name'
) [ ,...n ]
AS SNAPSHOT OF source_database_name
Create Database Snpshot_withdbName ON
(Name=MDFlogicalname,FileName='MDFlogicalfilelocation.ss')
AS snapshot of db_name
Example:
Create Database db1 ON
(Name=db1_data,FileName='C:/MSSQL/DATA/db1snapshot.ss')
AS snapshot of db_name
SELECT name,database_id,source_database_id FROM sys.databases
WHERE source_database_id=id
Ref:
https://www.sqlshack.com/database-snapshot-in-sql-server/
https://docs.microsoft.com/en-us/sql/relational-databases/databases/database-snapshots-sql-server
https://www.mssqltips.com/sqlservertip/2721/how-to-revert-a-database-snapshot-to-recover-a-sql-
server-database/