
Step by Step Downgrade Enterprise Edition to Standard Edition in SQL Server 2012
Pre check
Step1
take the edition info from enterprise edition with screen shot

Step2
kindly create sp_help_revlogin script in source (enterprise edition) if not exists

Step3
Need to take login script out using sp_help_revlogin logins from source

Step 4:
Need to take logins info (server level and database level with privileges) and save it in notepad

Step 5:
Need to take script out Linked servers,Jobs, Full Text Index,login screen shot etc

Step 6:
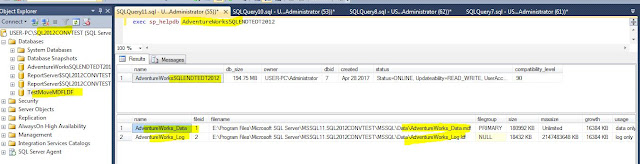
Need to take logical name and physical name and save it to excel/screenshot using this query
Exec SP_HELPDB dbname
Select sd.name as DatabaseName,sm.Name as logicalname,physical_name from sys.master_files sm
join sys.databases sd on sm.database_id=sd.database_id
WHERE sd.name='dbname'

Step 7:
Need to take sp_configure output to excel and save it in excel from source

Step 8:
Need to take services running info in screenshot with db owner info along with default path of data
also take it from configuration manager ipaddress and service status


Step9:
Take the full backup of the all database from Source

Step 10:
Need to take user db and system db with temp db in screen shot for refer
user db info

temp db info

system db info

Process
Step 1:
Stop the SQL Services

SQL Services stopped status as see below

Step 2:
Need to copy all system source(enterprise) of system db of master,model,m s db,temp db to new location

Step 3:
Need to uninstall Enterprise Edition (we should need to restart system after this uninstall)

You only need to uninstall the Instance (includes S S I S, S S A S, S S R S, S S D T). There is no need to uninstall the Shared Components (S S M S, Client Tools, and Connectivity)


Step 4:
After System restart
Need to Install SQL Standard Edition

you can some of features are already selected as we did not remove in enterprise edition removal

We should need to give same Instance name ( if it should be named instance) for default instance it should be MS SQL SERVER only

Step 5:
Need to give user database directory from old path while installation

You can see system data files are removed(that is why we backed up system db) after uninstall of enterprise edition also DATA folder is missing in Drive. it will automatically create that folder
User database will not be removed from this uninstall method


now we need to remove existing temp db (enterprise) from location (we already copied to new
location)


to solve this issue kindly use install only option
now you can see errors are passed by see below

SQL Standard Edition Installed Successfully

Step 6:
Before start we should need to change in SQL startup parameter for master it will avoid error to start
SQL Server due to we change master,model location from system default path
after complete installation login to server verify server and edition info


Step 7:
Stopping SQL Services and copy system db to other location

Step 7:
Apply patches to latest Service Pack S P 3 for SQL 2012

it provides updates of SQL 2012

Now you can option to apply service pack all existing server at a time or particular server

It is updating one by one as see below


Step 8:
after complete installation patches login to server verify server and edition info

Step 9:
stop SQL Services from configuration manager
Step 10:
after applied patch we have to copy standard edition system db to new path

Step 11:
Now replace model, ms db (enterprise from old path) to new Standard original model, ms db

Step 12:
we need to verify user database m d f / l d f point to new standard original location if not we have to move

Step 13:
Start the services

Step 14:
apply login scripts,linked servers,jobs we took out from source


Step 15:
solve the orphan users and create system level permissions from script(sysadmin privileges)


user db bring method
Method 1
attach method


Method 2
we can create dummy database and then modify query to replace it
create dummy db on same name

we should consider logical and physical name should be same as per original db with dummy path

now we alter with our original db path


now we remove dummy db data and log file from drive
 now we move original data and log file to original path

now we took db online

that is it now we original user db online

Method 3:
backup/restore method
Method 4:
copy and replace existing enterprise master, model ,ms db to new system data file to get all system and user databases
Note
we should need to take current system db file to backup to other location as safety purpose
i replaced all system db from enterprise to standard as see below

I put all user database M D F / L D F to user path as see below

now you can see all system and user database come online

Post check:
Step 1:
Need to configure memory as per 80% of TOTAL RAM

Step 2:
configure temp db secondary files as per core


Step 3:
configure error log files


Step 4:
set the history from SQL Agent, db mail configuration

Step 5:
Need to check application connectivity
Post Installation check list

Pre check
Step1
take the edition info from enterprise edition with screen shot
Step2
kindly create sp_help_revlogin script in source (enterprise edition) if not exists

Step3
Need to take login script out using sp_help_revlogin logins from source

Step 4:
Need to take logins info (server level and database level with privileges) and save it in notepad

Step 5:
Need to take script out Linked servers,Jobs, Full Text Index,login screen shot etc

Step 6:
Need to take logical name and physical name and save it to excel/screenshot using this query
Exec SP_HELPDB dbname
Select sd.name as DatabaseName,sm.Name as logicalname,physical_name from sys.master_files sm
join sys.databases sd on sm.database_id=sd.database_id
WHERE sd.name='dbname'

Step 7:
Need to take sp_configure output to excel and save it in excel from source

Step 8:
Need to take services running info in screenshot with db owner info along with default path of data
also take it from configuration manager ipaddress and service status
Step9:
Take the full backup of the all database from Source
Step 10:
Need to take user db and system db with temp db in screen shot for refer
user db info
temp db info
system db info
Process
Step 1:
Stop the SQL Services
SQL Services stopped status as see below
Step 2:
Need to copy all system source(enterprise) of system db of master,model,m s db,temp db to new location
Step 3:
Need to uninstall Enterprise Edition (we should need to restart system after this uninstall)
You only need to uninstall the Instance (includes S S I S, S S A S, S S R S, S S D T). There is no need to uninstall the Shared Components (S S M S, Client Tools, and Connectivity)
Contd from Picture above as see below
SQL Enterprise Edition Removal succeeded
Reboot
Reboot the server. After rebooting, browse to the location of the data files and you will notice that the user databases weren't removed with the uninstall, but the system databases were. This is why we copied them in the step above
Step 4:
After System restart
Need to Install SQL Standard Edition
you can some of features are already selected as we did not remove in enterprise edition removal

We should need to give same Instance name ( if it should be named instance) for default instance it should be MS SQL SERVER only
Step 5:
Need to give user database directory from old path while installation
You can see system data files are removed(that is why we backed up system db) after uninstall of enterprise edition also DATA folder is missing in Drive. it will automatically create that folder
User database will not be removed from this uninstall method
now we need to remove existing temp db (enterprise) from location (we already copied to new
location)
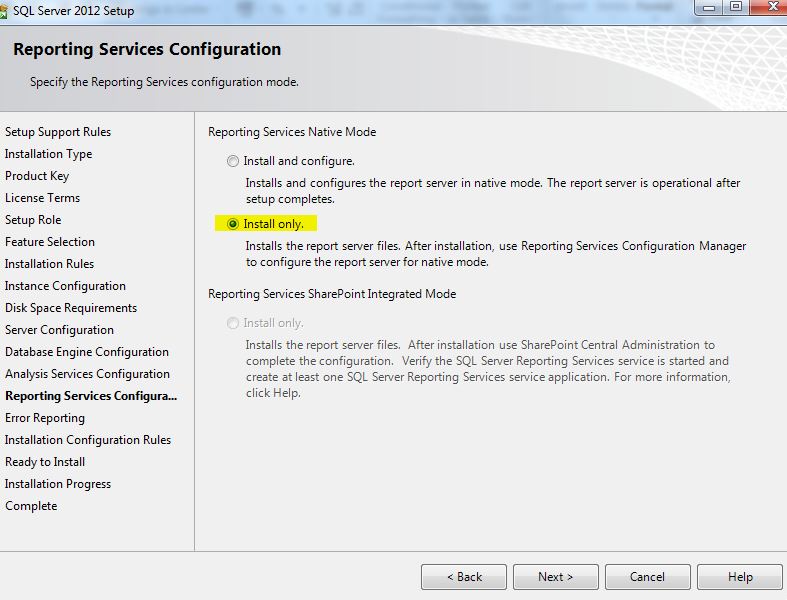
if you choose Install and configure option in reporting services you will get error as see below
to solve this issue kindly use install only option
now you can see errors are passed by see below
SQL Standard Edition Installed Successfully
Step 6:
Before start we should need to change in SQL startup parameter for master it will avoid error to start
SQL Server due to we change master,model location from system default path
after complete installation login to server verify server and edition info
Step 7:
Stopping SQL Services and copy system db to other location
Step 7:
Apply patches to latest Service Pack S P 3 for SQL 2012
it provides updates of SQL 2012
Now you can option to apply service pack all existing server at a time or particular server
It is updating one by one as see below
Step 8:
after complete installation patches login to server verify server and edition info
Step 9:
stop SQL Services from configuration manager
Step 10:
after applied patch we have to copy standard edition system db to new path
Step 11:
Now replace model, ms db (enterprise from old path) to new Standard original model, ms db
Step 12:
we need to verify user database m d f / l d f point to new standard original location if not we have to move
Step 13:
Start the services

Step 14:
apply login scripts,linked servers,jobs we took out from source
Step 15:
solve the orphan users and create system level permissions from script(sysadmin privileges)
user db bring method
Method 1
attach method

Method 2
we can create dummy database and then modify query to replace it
create dummy db on same name
we should consider logical and physical name should be same as per original db with dummy path
now we alter with our original db path
we took offline of dummy db
now we remove dummy db data and log file from drive
now we took db online
that is it now we original user db online
Method 3:
backup/restore method
Method 4:
copy and replace existing enterprise master, model ,ms db to new system data file to get all system and user databases
Note
we should need to take current system db file to backup to other location as safety purpose
i replaced all system db from enterprise to standard as see below
I put all user database M D F / L D F to user path as see below
Post check:
Step 1:
Need to configure memory as per 80% of TOTAL RAM
Step 2:
configure temp db secondary files as per core
There is a special feature in MS SQL from SQL 2005 version on wards,
Configure no. of Temp DB database data files as per available C.P.U. Cores. If no of cores =< 8 then use the same number of data files as logical processors.
select @@servername ServerName,scheduler_id, cpu_id, status, is_online
from sys.dm_os_schedulers
where status = 'VISIBLE ONLINE'-------------core usage
select cpu_count from sys.dm_os_sys_info-------total CPU count
Step 3:
configure error log files

Step 4:
set the history from SQL Agent, db mail configuration
Step 5:
Need to check application connectivity
Post Installation check list