
SSIS Basics: Setting Up Your Initial Package:
I started using SQL Server Integration Services (SSIS)
when I had a job that required me to move and manipulate data between
files and other data sources. I did a bit of research using the
resources available—Twitter, Simple-Talk, SQL Server Central, etc.—and
concluded that SSIS was the right way to go. I had to get my head around
it quite rapidly, but I couldn’t find help at the level I required. For
that reason, I noted the points where I had struggled so that, once I’d
learned more, I could help others who might otherwise struggle as I
did.What can you use SSIS for?
Essentially, SSIS can be used for any task related to files or data. You can, for example,- Move and rename files
- Delete, update or insert data
- Execute SQL scripts or stored procedures
- Import and export data between different file types, such as Access, Excel, or any data source that supports an ODBC connection
Getting Started
SSIS is available only in SQL Server 2005 onwards. You create and develop SSIS in SQL Server Business Intelligence Development Studio (BIDS), a visual development tool based on Microsoft Visual Studio. (BIDS has morphed into SQL Server Data Tools (SSDT) in SQL Server 2012.)Before going further, there is some terminology that’s important to understand. SSIS files are organized into packages, projects and solutions. The package is at the bottom of the hierarchy and contains the tasks necessary to perform the actual extract, transform, and load (ETL) operations. Each package is saved as a .dtsx file and is part of a project. You can include one or more packages in a project. That project, in turn, is part of a solution, which is at the top of the hierarchy. You can include one or more projects within a solution.
When you first open BIDS, you’re presented with the interface shown in Figure 1.

Figure 1: The SSIS interface in BIDS
To create an SSIS package, point to the File menu, point to New, and click Project. This launches the New Project dialog box, shown in Figure 2.
Figure 2: The New Project dialog box in BIDS
In the New Project dialog box, select the Integration Services Project template. Then, provide a name for the project in the Name text box. Next, in the Location text box, specify the folder where your project files should be saved, and then provide a name for the solution in the Solution Name text box.After you’ve entered the project and solution information, click OK. Your new package will open in the SSIS window, as shown in Figure 3.

Figure 3: Creating a new SSIS package in BIDS
Notice that the SSIS interface is divided into the following five sections (windows): - Control Flow Items: The components necessary to control a package’s workflow. For example, the section includes components that let you move or copy data, run SQL statements, or send emails. (The components will be explained in more detail in this article and in articles that will follow.)
- Connection Managers: The connections to your data sources (whether retrieving or loading data). Your data sources can include SQL Server databases, CSV files, Excel spreadsheets, and a variety of other sources.
- Solution Explorer: A hierarchical view of the data sources, data source views, packages, and other components included within the current solution.
- Properties: The properties and their values for the package or the selected component within that package.
- SSIS Designer: The main working area for developing your SSIS package. SSIS Designer is broken into four tabs: Control Flow, Data Flow, Event Handlers, and Package Explorer. We’ll look at each of these in greater detail as we progress through this series.
Control Flow Items
In this article, I focus on setting up the SSIS package and defining the data connections. I do not cover all the components in the Control Flow Items window. In the next article, I will demonstrate using, what I think is, the most important of these components—the Data Flow Task—and cover other control flow tasks in subsequent articles.Connection Managers
I will now explain how to create connection managers that connect to both Excel files and a SQL Server database. However, it is important to note that any connection created through the Connection Manager window is available only to the package it is created in.Connecting to an Excel File
One of the first steps you’ll often take when developing an SSIS package is to create the connection managers necessary to retrieve data from or load data into your data sources. You can also set up connections “on the fly,” so if you miss creating one here it can be done as part of other tasks. This approach is most commonly used when you wish to create a connection based on the source. For example, if you wish to copy data out of a SQL Server database and export it to an Excel spreadsheet, you can create the connection manager when you set up your data flow.To add a connection manager, right-click the blank area in the Connection Manager window, where it says Right-click here to add a new connection manager to the SSIS package, as shown in Figure 4.

Figure 4: Adding a connection manager to your SSIS package
This will launch a context menu that provides a number of
options for creating various types of connections, as Figure 5
illustrates.
Figure 5: Selecting which type of connection manager to create
Notice you can create connections for such sources as OLE DB,
ADO.NET, Analysis Services, and different types of files. In this case,
we want to create a connection to an Excel file, so click the New File Connection option. This will launch the File Connection Manager Editor dialog box, shown in Figure 6.
Figure 6: The File Connection Manager Editor dialog box
For this example, we’ll be connecting to an Excel file I
created for demonstration purposes. Figure 7 shows the worksheet I set
up in this file.
Figure 7: Excel worksheet used for demonstration purposes
I named the Excel file Employees.xlsx and saved it in the C:\Users\Annette\Documents folder.In the Usage type drop-down list in the File Connection Manager Editor dialog box, select Existing file. Next, click the Browse button, navigate to the folder that contains the Excel file, and select the file. The dialog box should now look like the one shown in Figure 8.

Figure 8: Configuring the File Connection Manager Editor dialog box
Once you’ve selected the file, click OK. The new connection manager will be added to the Connection Managers window and will be assigned the name of the file, as shown in Figure 9.
Figure 9: Viewing the new connection manager in the Connection Managers window
It is very easy to rename the connection manager to something
that may be more appropriate. To do so, right-click the new connection
manager and select Rename from the context menu, as show in Figure 10
Figure 10: Renaming a connection manager
The name then becomes updateable and you can rename it to whatever you like. In this case, I renamed the connection manager Employees (Excel), as shown in Figure 11.
Figure 11: Viewing the new connection manager name
When you view a connection manager in the Connection Managers window, you’ll see that each connection type is associated with a different icon. If you created an Excel connection from here, it is displayed with the same icon used for any flat file connection. However if you create an Excel connection when adding a component to the Data Flow tab, the connection manager will display an Excel Icon. Connecting to a SQL Server Table
Because our example will retrieve data from a SQL Server database, you’ll also need to create a connection manager for that database. To do so, you should again right-click the Connection Managers window to open the context menu, but this time, click the New OLE DB Connection option. The Configure OLE DB Connection Manager dialog box will appear, as shown in Figure 12.
Figure 12: Creating an OLE DB connection manager
If any OLE DB connections have already been defined on the package, they will appear in Data connections list. You can use one of these, if it fits your needs, or you can create a new one. To create a new connection, click the New button to launch the Connection Manager dialog box, shown in Figure 13.
Figure 13: Configuring an OLE DB connection manager
To configure the connection manager, select the SQL Server instance from the Server name drop-down list, and then select the authentication type. In this case, I selected the Use SQL Server Authentication option and provided a username and password. You might decide to select the Use Windows Authentication
option, in which case your current Windows credentials will be used to
establish the connection with SQL Server. In a later article, when we
look at deploying the package, we will look at how the connections can
be altered at run time and therefore how the login details can be
changed then. For now, ensure that you set up the login the way you need
it to run the package while you’re developing it.From the Select or enter a database name drop-down list, select the name of the AdventureWorks database. Your Connection Manager dialog box should now look similar to the one shown in Figure 14.

Figure 14: Configuring an OLE DB connection manager
Be sure to click the Test Connection
button to verify that you can connect to the target database. The
system will display a message similar to the one in Figure 15 to confirm
whether you’ve successfully connected to the database.
Figure 15: Testing your database connection
After you’ve confirmed your connection, click OK to close the message box, and then click OK to close the Connection Manager dialog box. You will be returned to the Configure OLE DB Connection Manager dialog box, shown in Figure 16.
Figure 16: Finalizing your OLE DB connection manager
Notice that your new connection has been added to the Data connections list. Click OK to close the dialog box. The Connection Managers window will show your two connections. You’re now ready to start working with them.Solution Explorer
Within Solution Explorer, you can view all projects, packages, data sources and data source views that make up the solution.Adding New Projects
If you wish to add an additional project to a package, point to File on the menu bar, point to Add, and click New Project, as shown in Figure 17.
Figure 17: Adding a new project to a solution
The Add New Project window opens. Select Integration Services Project and in the Name box enter the name you wish to call the new project as shown in Figure 18.
Figure 18: Add New Project Wizard
As you can see in Figure 19 a new project is added to the solution named “Dev” and will appear in Solution Explorer. The project will contain three empty folders named Data Sources, Data Source Views and Miscellaneous. The project will also contain a folder named SSIS Packages and within the folder a file named Package.dtsx, which is an empty SSIS package created automatically when the project is created. Figure 19 shows the new project and its folders in Solution Explorer.
Figure 19: The folders and package created in a new SSIS project
Data Sources
Earlier I showed you how to create connections in the Connection Managers window. As I mentioned, if a connection is created in the Connection Managers window, it is available only to the package it was created in. However, you can also create connections known as data sources, which are available to all packages in a project.To create a new data source, right-click Data Sources in Solution Explorer to open the Connection Manager dialog box (shown in Figure 20). Then fill in the options as you did when you created an OLE DB connection manager. Be sure to click Test Connection to confirm the connection has been created successfully.

Figure 20: Creating a new data source connection
The Data Source Wizard will appear, with the new data connection highlighted, as shown in Figure 21. After you review the settings, click Next.
Figure 21: The data connection in the Data Source Wizard
When the next
page of the wizard appears, type in a name for the data source. As this
is project wide, I would recommend you fully describe the source using
the server and database name. I have renamed my data source RGTest_AdventureWorks2008, as shown in Figure 22. I try to set up and follow consistent naming conventions.
Figure 22: Renaming the data source
After you’ve renamed the data source, click Finish. Your Data Source should now be listed under Data Sources in Solution Explorer,
as shown in Figure 23. Notice that the data source is saved with the
.ds file extension to indicate that it is indeed a data source.
Figure 23: Creating a data source in Solution Explorer
Initially, the new data source is not listed in your package’s Connection Managers
window; however, it is available to your package. Once you have made
use of the data source in the package it will be visible in the Connection Managers window.Data Source ViewsData source views, like data sources, are available to all packages in a project. A data source view is used to define a subset of a data from a data source. The data source view can include only some of the tables or it can be used to define relationships or calculated columns.
Because a data source view is based on a data source, you would normally create the data source before starting to create the data source view. However, this is not compulsory because you can create the data source when you’re creating the data source view. To create a data source view, right-click the Data Source Views folder and click New Data Source View, as shown in Figure 24.

Figure 24: Creating a data source view in Solution Explorer
When the Data Source View Wizard appears, click Next. The next page shows the data sources available to the project, as shown in Figure 25. (In this case, there’s only one.)
Figure 25: Available data sources
As you can see, the page shows the name of the data source in the Relational data sources list. The properties for the selected data source appear to the right, in the Data source properties
window. A data source must be selected before you can continue with the
wizard. If you haven’t created the data source you need, you can create
one now by clicking the New Data Source button.Once you’ve selected the necessary data source, click Next. The new page provides a list of the tables and views available through the selected data source. If you wish to filter the list, type the filter criteria in the Filter text box below the Available Objects list, and then click the filter icon to the right of the text box. For example, I typed Emp in the Filter text box, which reduced the list of available objects to those that contain “Emp” in their name, as shown in Figure 26.

Figure 26: Filtering tables and views in the data source
The next step is
to determine which tables and views you want to include in your data
source view. From the filtered list of tables and views in the Available Objects
list, select the objects you want to include. You can select more than
one object by clicking the first one, holding down the Ctrl key, and
then clicking the additional objects. Once you’ve selected the objects,
click the single right arrow button to move those objects to the Included Objects window. If you want to move all the listed objects, simply click the double right arrow button.Once an object has been moved to the Included Objects list, the single left arrow button and double left arrow button become active. These work the same as the right arrows. The single left arrow moves a single selected object or multiple selected objects from the Included objects list back to the Available objects list. The double left arrow moves all objects in the Included objects list back to the Available objects list.
Figure 27 shows the full list of available objects (without filters), minus the two objects that have been moved to the Included objects list. Notice that two additional objects are selected in the Available objects window. As you would expect, you can move the files to the Included objects list by clicking the single right arrow button.
If you click the Add Related Tables button beneath the Included objects list, all tables related to the objects in the Included objects list will be automatically added.

Figure 27: Adding tables and views to a data source view
Once all required objects have been selected, click Next.
You can now see a preview of what you have selected, and you can rename
the data source view to something more appropriate. If you have missed
an object, click the Back button to return to the previous page. For this example, I renamed my data source view AW2008-Employees. As you’re changing the name in the Name textbox, the name is also updated in the Preview window, as shown in Figure 28.

Figure 28: Renaming the data source view
If you are happy with the configuration, click Finish. The data source view is saved with the .dsv file extension and is added to the Data Source Views folder in Solution Explorer. A new window appears in SSIS Designer and shows the data source view in design mode, as shown in Figure 29.
Figure 29: Data source view in design mode
Amending a Data Source View
SSIS provides a number of options for modifying a data source view. Most of those options are at the table level. If you right-click the table name either on the design surface or in the Tables pane (on the left side of the screen), you can choose from the following options:- Adding a calculation
- Adding a relationship
- Replacing a table
- Deleting a table
- Reviewing data
Deleting an object
Suppose I added the Store table in error. I can delete from table from my data source view by right-clicking the table name and selecting the Delete table from DSV option, as shown in Figure 30.
Figure 30: Deleting a table from a data source view
You’ll then be prompted to confirm your deletion. When the Delete Objects message box appears, click OK, as shown in Figure 31.
Figure 31: Deleting objects from a data source view
When you click OK, the object is permanently removed from the data source view.
Adding a new column
To add a calculated column to a data source view, right-click the table name and select New Named Calculation to open the Create Named Calculation dialog box. Enter the new column name in the Column name text box, add an appropriate description in the Description text box, if required, and then create the calculation in the Expression text box. For this example, I’ve assigned the name Age to the column and added the description Current Age based on Birth Date. For the expression, I added the one shown in Figure 32. Note that, at this stage, there is no way to test whether your code is correct!
Figure 32: Creating a calculated column
Figure 33 shows us that the Age column has been added to our table. The icon next to the column shows that it is a calculated column.
Figure 33: Verifying that the calculated column has been added
To view the data
in the table and verify that the new column has been created correctly,
right-click one of the columns and then click Explore Data, as shown in Figure 34.
Figure 34: Viewing the data in the table
The Explore Employee Table window appears, as shown in Figure 35. We can now view all the data in the Employee table. Notice that the Age column has been added to the table (on the far right side) and displays the data returned by our expression.
Figure 35: Viewing data in the Employee table
Once you have
made all the necessary changes, save the data source view. It will then
be available for you to use in any of your packages in the project.Summary
In this article, I’ve shown you how to create an SSIS package and set up connection managers, data sources, and data source views. In the next article, I will show you how to set up a package that retrieves data from a SQL Server database and loads it into an Excel file. I will also show you how to add a derived column that calculates the data to be inserted into the file. In addition, I will demonstrate how to run the package.In future articles, I plan to show you how to deploy the package so it can be run as part of a scheduled job or called in other ways. I also plan to cover how to use variables and how they can be passed between tasks. I also aim to cover more control flow tasks and data flow components, including those that address conditional flow logic and for-each looping logic. There is much much more that can be done using SSIS, and I hope over the course of this series to cover as much information as possible.
SSIS BASICS:Foreach Loop Container:
In this article, we look at another control flow component: the Foreach Loop container. You can use the container to loop through a set of enumerated items such files in a directory or rows in a table. The container points to whatever you wish to loop through and provides the mechanism necessary to carry out the looping.
Within the container, you can add one or more control flow tasks (or other containers). For example, you might add an ExecuteSQL task to run a T-SQL statement for each enumerator or a DataFlow task to process data related to each item.
In this article, I show you how to use the Foreach Loop container to copy files from one folder to another. We will start with a new SSIS package, so you don’t have to try to work with a previous setup. However, before configuring the package, you’ll need a set of samples files to copy. Select a drive on your local system and then create four text files. On my system, I created the following four files in the C:\Desktop\Annette\Articles\Demo folder:
- File1.txt
- File2.txt
- File3.txt
- Test1.txt
Once you’ve created your files, you’re ready to start building your package.
Setting up the Foreach Loop Container
Our first step is to drag the Foreach Loop container from the Toolbox to the control flow design surface, as shown in Figure 1.
Figure 1: Getting started with the Foreach Loop container
When adding the container to the control flow, you’ll see that it looks different from control flow tasks, such as ExecuteSQL. The Foreach Loop container will display the name of the container at the top with an empty box beneath it, as shown in Figure 2. 
Figure 2: The Foreach Loop Container
To configure the Foreach Loop container, double-click the container to launch the Foreach Loop Editor. The editor includes the following four pages: - General
- Collection
- Variable Mappings
- Expressions
General Page
The General page includes the Name and Description properties, which you should define as you see fit. I’ve named my container MoveFiles and given it the description Containertomovefiles, as you can see in Figure 3.
Figure 3: Configuring the General page in the Foreach Loop Editor
That’s all there is to the General
page. The important point to remember is to provide a meaningful name
and description so that other developers can understand what’s going on.
Collection Page
Next, we move to the Collection page, which is where we select the enumerator type and configure any properties associated with that type. Figure 4 shows what the page looks like when you first access it.
Figure 4: Configuring the Collection page in the Foreach Loop Editor
The enumerator determines the type of objects that we plan to
enumerate. (Enumerate refers to the process of going through a
collection of items one-by-one.) The ForeachLoop container supports the following enumerator types: - Foreach File Enumerator: Enumerates files in a folder
- Foreach Item Enumerator: Enumerates items in a collection, such as the executables specified in an Execute Process task.
- Foreach ADO Enumerator: Enumerates rows in a table, such as the rows in an ADO recordset.
- Foreach ADO.NET Schema Rowset Enumerator: Enumerates schema information about a data source.
- Foreach From Variable Enumerator: Enumerates a list of objects in a variable, such as an array or ADO.NET DataTable.
- ForeachNodeList Enumerator: Enumerates the result set of an XML Path Language (XPath) expression.
- Foreach SMO Enumerator: Enumerates a list of SQL Server Management Objects (SMO) objects, such as a list of views in a database.
So the first thing we must do is to click in the Foreach File Enumerator listing. When the drop-down arrow appears to the right of the row, re-select Foreach File Enumerator. The options we must configure are then displayed on the Collection page, as shown in Figure 5.

Figure 5: Selecting the Foreach File Enumerator type
For this exercise, we don’t need to define an expression, so we can leave the Expressions text box empty. The next step, then, is to configure the properties in the Enumeratorconfiguration section. The first property we’ll configure is the Folder property. Click the Browse button to the right of the property. When the BrowseForFolder dialog box appears, navigate to the folder that contains the sample files you created for this exercise. On my system, I saved those files to the Desktop\Annette\Articles\Demo folder, as shown in Figure 6.

Figure 6: Navigating to the folder that contains your files
Once you have found the correct folder, select it and click on OK. When you’re returned to the ForeachLoopEditor, the folder will be listed in the Folder property. Next, we need to configure the Files property. This is where we specify which files to include in our list of enumerated files. For this exercise, we’ll copy only those files whose names start with “File.” In the Files text box, enter File*.txt. The asterisk wildcard (*) let’s us include any text file that starts with “File,” without having to specify each file. If our files had instead been Word files, we would have entered File*.doc. If we were moving multiple file types, we would have used File*.* as our property value.
Next, we need to select one of the following options in the Retrieve file name section:
- Fully qualified: The fully qualified file name should be returned when a file in the enumerated list is being referenced.
- Name and extension: The file name with its extension should be returned when a file in the enumerated list is being referenced.
- Name only: The file name without its extension should be returned when a file in the enumerated list is being referenced.
The only other option on the Collection page is Traverse subfolders. If there were subfolders that we wanted to include in our collection, we would select this option. But for now, we can leave it deselected. The Collection page should not look similar to the one shown in Figure 7.

Figure 7: Configuring the properties on the Collection page
Once we’ve defined our collection (the list of files), we’re ready to configure the VariablesMappings page. Variable Mappings Page
On the Variable Mappings page, we map our collection to a user-defined variable. The variable will point to a specific file each time the Foreach Loop container loops through a collection. Figure 8 shows what the VariableMappings page looks like when you first access it.
Figure 8: The Variables Mapping page in the Foreach Loop Editor
Because we have not yet created a variable to map to our collection,
we need to create one now. For this exercise, we’ll create the variable
from the VariableMappings page. In the Variable column of the first row of the grid, click <New Variable…> to launch the Add Variable dialog box, shown in Figure 9. 
Figure 9: Adding a variable to associate with our collection
Configure each property in the AddVariable dialog box as follows: - Container: Select the name of the current SSIS package. You want the variable to be created at the package scope.
- Name: Type a name for your variable. I used FileName.
- Namespace: Stick with the default: User.
- Value Type: Select String if it’s not already selected.
- Value: Leave this blank. It will be populated with the name of the current file each time the Foreach Loop container loops through your collection of files.
- Read only: Do not select this checkbox. SSIS must be able to write to the variable.
The Variable Mappings page should now look similar to the one shown in Figure 9. Notice that the value User::FileName appears in the Variable column and the value 0 in the Index column. The Index value is specific to the ForeachItem enumerator and does not apply in this case. So we’ll stick with 0, the default value. Click OK to close the ForeachLoopEditor.

Figure 10: Configuring the Variables Mapping page
You can verify that the FileName variable has been created by viewing it in the Variables window. If the window is not visible, right-click the control flow design surface and then click Variables. The variable should be listed as one of the user variables. Adding a Variable
By creating the FileName variable, we have provided a way to identify our source file each time the ForeachLoop container iterates through our collection. We now need to create a variable that identifies our destination folder. In the Variables window, click the AddVariable button. In the new row that is added to the grid, configure each column as follows:- Name: Type a name for your variable. I used DestinationFolder.
- Scope: This should be the name of your package. You want the variable to be at the package scope.
- Data Type: Select String.
- Value: Type the name of the destination folder where you want to copy your files. I used C:\Users\Annette\Articles\Archive.

Figure 11: Adding a variable to the Variables window
We have now set up the files we want to enumerate and the variable
that will hold the path name of each source file. Our next step is to
set up the connection manager necessary to connect to our source files
in order to copy them to our destination folder. Adding the Connection Manager
To connect to our source files, we must set up a File connection manager that points to those files. Right-click the ConnectionManagers window, and then click New File Connection. When the File Connection Manager Editor appears, verify that Existingfile is selected in the Usage type drop-down list. For the File option, enter the full path name to the first text file (File1.txt) or click the Browse button, navigate to the file, and select it from the source folder. When you’re finished, the FileConnectionManagerEditor should look similar to the one shown in Figure 12.
Figure 12: Configuring the File Connection Manager Editor
Click OK to close the FileConnectionManagerEditor. The new connection manager should now be displayed in Connection Managers window. If you want, you can rename your connection manager. I renamed mine SourceFile. We now need to configure the SourceFile connection manager to use with our ForeachLoop container. To do so, we must add a property expression to the connection manager that uses the FileName variable to connect to our file. A property expression is an expression that defines a property value in place of a hard-coded value.
Right-click the SourceFile connection manager, and then click Properties. The Properties window should now be visible and should look similar to the one shown in Figure 13. The Properties window displays the properties and their values for the selected object. Because we opened the Properties window from the SourceFile connection manager, the displayed properties are specific to that connection manager.

Figure 13: The SourceFile connection manager properties
Click the Expressions property so that the browse button (the ellipses) appears on the right-hand side, then click the browse button to open the Property Expressions Editor, as shown in Figure 14: 
Figure 14: Creating a property expression on the Connection String property
In the first row of the grid, select Connection String in the Property column. Then click the browse button at the far right of that row (to the right of the Expression column). This launches the Expression Builder dialog box. In the top-left window, expand the Variables node and drag the User::FileName variable to the Expression text box, as shown in Figure 15. 
Figure 15: Defining a property expression
That’s all there is to it. Click OK to close the Expression Builder dialog box. The Property Expressions Editor should now look similar to the one shown in Figure 16. Click OK to close the editor.

Figure 16: Defining a property expression on the Connection String property
Once we’ve configured our File connection manager, we’re ready to run the ForeachLoop
container. However, as it stands now, the container won’t do anything
but loop through the list of files, without taking any actions on those
files. To actually copy the files to the destination folder, we need to
add a FileSystem task to the container. Adding a File System Task
To add the FileSystem task to the Foreach Loop container, drag the task from the Toolboxinto the container, as shown in Figure 17.
Figure 17: Adding the File System task to the Foreach Loop container
Notice that, on the FileSystem
task, there is a red circle with a white X. This indicates that the
task has not yet been set up, so we need to take care of that. Double-click the task to open the File System Task Editor. The editor includes a number of configurable properties, as shown in Figure 18.

Figure 18: Configuring the File System task
For each property in the File System Task Editor, set the value as follows: - IsDestinationPathVariable: Because we’ll be using a variable to specify the destination folder, set this property to True.
- DestinationVariable: This property is activated when you set the IsDestinationPathVariable property to True. From the drop-down list, select User::DestinationFolder variable—or whatever variable you created for the destination folder.
- OverwriteDestination: If there is already a file in the destination folder with the same name as the file you’re copying, the copy operation will fail if this property is set to False. Set the property to True if you want to overwrite the file in the destination folder. For the purposes of this example, I set my system to False. That way you can rerun the package multiple times without having to worry about deleting the files from the destination folder.
- Name: This property lets you specify the name you want to assign to this task. I used Copy Demo file.
- Description: This property lets you specify the description you want to assign to this task. I used Copying a file from the Demo folder.
- Operation: This property determines the operation you want the task to perform. The Operation property lets you choose from the following options:
- CopyFile
- CreateDirectory
- DeleteDirectory
- DeleteDirectoryContent
- DeleteFile
- MoveDirectory
- MoveFile
- RenameFile
- SetAttributes
- IsSourcePathVariable: If you use a variable to specify the source file, you should set this property to True. However, in our case, the ForeachLoop container uses the variable to specify the source file, not the FileSystem task itself, so we will stick with False.
- SourceConnection: This property identifies the connection manager used to connect to the source files. Select the File connection manager you set up previously. On my system, it’s SourceFile.

Figure 19: The File System Task Editor
Now click on OK. Your package is now ready. To test it click on the
green execute arrow. Once this is complete you should be able to see the
files have now been copied into the folder specified in the
destination. Summary
In this article, we used the Foreach Loop container to iterate through a set of files in a folder and move them one-at-a-time to another folder. To make that possible, we configured a property expression on out File connection manager to identify each file as we looped through the folder. Note, however, that the Foreach Loop container is not limited to files. For example, we could have used the container to process rows in a table one-by-one or other items that can be listed and grouped together. In the future articles, we’ll look at how to use the Foreach Loop container to run other tasks in a loop, such as the Script task.
SSIS Basics: Using the Execute SQL Task to Generate Result Sets:
The Execute SQL Task of SSIS is extraordinarily
useful, but it can cause a lot of difficulty for developers learning
SSIS, or only using it occasionally. What it needed, we felt, was a
clear step-by-step guide that showed the basics of how to use it
effectively. Annette has once again cleared the fog of confusion.
The Execute SQL
task is one of the handier components in SQL Server Integration
Services (SSIS) because it lets you run Transact-SQL statements from
within your control flow. The task is especially useful for returning
result sets that can then be used by other components in your SSIS
package.
When using the Execute SQL
task to return a result set, you must also implement the necessary
variables and parameters to pass data into and out of the T-SQL
statement called by the task. In this article, we look at how to use
those variables and parameters in conjunction with the Execute SQL task in order to transfer that data. (In the previous article in this series, “Introducing Variables,” I explained how to work with variables, so refer back to that article if you need help.) This article walks you through two different scenarios for working with variables, parameters, and result sets. In the first scenario, we’ll use two Execute SQL tasks. The first task retrieves a single value from a table in the AdventureWorks2008 database. That value is returned by the task as a single-row result set. The second Execute SQL task will pass that value into a stored procedure that inserts the row into a different table.
The second scenario uses a single Execute SQL task to retrieve a multi-row result set, also known as a full result set. This represents the third Execute SQL task we’ll be adding to our control flow. For now, all we’ll do is use this task to save the result set to variable. In articles to follow, you’ll see how you can use that variable in other SSIS components, such as the Foreach Loop container.
Setting Up Your Environment
Before adding components to your SSIS package, you should first add a table and two stored procedures to the AdventureWorks2008 database. The table will store the value that’s returned by the first Execute SQL task. Listing 1 shows the T-SQL necessary to create the SSISLog table.
CREATE TABLE SSISLog(ID INT IDENTITY,DateRun DATETIME,Result INT)
Listing 1: Creating the SSISLog table
Next, we will add a stored procedure to insert data into the SSISLog table. Listing 2 provides the T-SQL script necessary to create the UpdateSSISLog stored procedure. Notice that it includes an input parameter. The input will be the data that will be retrieved via the first Execute SQL task.
CREATE PROCEDURE UpdateSSISLog @EmpNum INT
AS
INSERT INTO SSISLog(DateRun, Result)SELECT GETDATE(),EmpNum
AS
INSERT INTO SSISLog(DateRun, Result)SELECT GETDATE(),EmpNum
Listing 2: Creating a stored procedure that inserts data into the SSISLog table
Once you’ve set up the table and stored procedures, you can create
your SSIS package, if you haven’t already done so. We’ll perform both
exercises in a single package. Our next step, then, is to add a couple
variables to our package. Adding Two Variables to the SSIS Package
The first variable we’ll create is the EmpNum variable. If the Variables window is not open, right-click the Control Flow workspace, and then click V ariables. In the Variables window, add a new variable by clicking on the Add Variable icon.Name the new variable EmpNum, and ensure that the scope is set at the package level, as indicated by the package name. (In my case, I’ve stuck with the default name, which is Package.) Next, set the data type to Int32 and the value to 0, as shown in Figure 1. The Execute SQL task will use the variable to store the value it retrieves from the database.

Figure 1: The new EmpNum variable
Now create a second variable named EmployeeList. This variable should also be at the package scope. However, set the data type to Object.
We will be using this variable to store the full result set that we
retrieve in our second scenario, and SSIS requires that the variable use
the Object type to accommodate the multiple rows and columns. Adding a Connection Manager to the SSIS Package
The next step is to create a connection manager that points to the AdventureWorks2008 database. Right-click the Connection Manager s window, and then click New OLE DB Connection, as shown in Figure 2.
Figure 2: Creating a new OLE DB connection manager
When the Configur e OLE DB Connection Manager dialog box appears, click the New button to launch the Connection Manager dialog box, shown in Figure 3. From the Server name drop-down list, select the name of your SQL Server instance, and then select an authentication type. From the Select or enter a database name drop-down list, select your database. As you can see in Figure 3, I’m using 192.168.1.19/ Cambridge as my SQL Server instance, SQL Server Authentication as my authentication type, and the AdventureWorks2008 as my database. 
Figure 3: Configuring an OLE DB connection manager
Be sure to test the connection by clicking the Test Connection button. If the connection is good, click OK to close the Connection Manager dialog box. When you’re returned to the Configure OLE DB Connection Manager dialog box, you’ll see that your new connection has been added to the Data connections section. Click OK to close the dialog box. Your connection should now be listed in Connection Managers window.
If you want, you can rename your connection manager to something more appropriate. To do so, right-click the connection, click R ename, and type in the new name. I renamed mine to AW2008, as shown in Figure 4.

Figure 4: Renaming a connection manager
Returning a Single-Row Result Set
As mentioned above, our first example uses two instances of the Execute SQL task. The first Execute SQL task will return a single-row result set, which in this case, will contain only one value. Note, however, that this is not a real-world example. I simply want to show you how to get the result set and use it.In this example, we’ll retrieve the highest BusinessEntityID value from the HumanResources.Employee table and insert it into the SSISLog table, along with the current date and time. We’ll start by using the first Execute SQL task to retrieve the value and pass it to the EmpNum variable.
To get started, drag the Execute SQL task onto the Control Flow design surface. Then double-click the task to open the Execute SQL Task Editor. The editor opens to the General page, as shown in Figure 5.

Figure 5: The General page of the Execute SQL Task Editor
Notice that the General section contains the Name property and the Description property. The Name property refers to the task name. You should name the task something suitable. On my system, I named the task Get ResultSet. I then added a description to the Description property to explain what the task does. In the Options section, I stuck with the default property values.
The next section on the General page is Result Set. Notice that this section includes only the ResultSet property. The property lets you select one of the following four options:
- None: The query returns no result set.
- Singlerow: The query returns a single-row result set.
- Fullresultset: The query returns a result set that can contain multiple rows.
- XML: The query returns a result set in an XML format.
Next, we need to configure the properties in the SQL Statement section. Table 1 shows the values you should use to configure these properties.
| Property | Value |
| Connection | AW2008 (or whatever you named the connection manager you created earlier) |
| SQLSourceType | Direct input This means we’ll type the code straight in and not use a stored procedure. |
| SQLStatement | Because we’ve selected the Direct input option, we need to enter a
T-SQL statement for this option. I’ve used the following statement,
which returns a single value: SELECT MAX(EmployeeID) AS [MaxEmpID] FROM HumanResources.Employee |
| IsQueryStoredProcedure | This option is greyed out because we selected Direct input for the SQLSourceType property. Had we selected Stored Procedure, this property would be available and the SQLStatement property would be greyed out. |
| BypassPrepare | The property defaults to False. If you change the value to True, you can click the Parse Query button to verify that your T-SQL statement is valid. |
Table 1: Configuring the properties in the SQL Statement section
Our next step is to associate our result set value with a variable
that will store the value we retrieve from the database. To do this, go
to the Result Set page of the Execute SQL Task Editor. The main grid of the Result Set page contains two columns: Result Name and Variable Name. Click the Add button to add a row to the grid. In the Result Name column, enter the column name returned by your query (MaxEmpID). In the Variable Name column, select the User:: EmpNum variable. Your Result Set page should now look similar to the one shown in Figure 6.

Figure 6: Associating your result set value with a variable
If our single-row result set contains multiple columns, we would have
had to map a variable to each column. However, because we returned only
one value, we needed only one mapping. Once you’ve associated your result set value with a variable, click OK to close the Execute SQL Task Editor. You task should now be set up to return a single-row result set. Now we need to do something with that result set!
Working with a Single-Row Result Set
Our next step is to drag a new Execute SQL task onto our design surface so we can use the result set returned by the first Execute SQL task. So add the task, and then connect the precedence constraint (the green arrow) from the first task to the new one. Next, right-click the second task and click Edit to open the Execute SQL Task Editor, shown in Figure 7.
Figure 7: Configuring the Execute SQL Task Editor
In the General section, provide a name and description for the task. (I named the task Using Result Set.) For the ResultSet property, stick with the default value, None. In this case, the task won’t be returning a result set. Instead, we’ll be using the results returned by the previous task. Now let’s look at the SQL Statement section shown in Figure 8. Notice that, for the SQLStatement property, I entered the following T-SQL code:
exec UpdateSSISLog ?
As you can see, we’re executing the UpdateSSISLog stored procedure. Notice, however, that we follow the name of the stored procedure with a question mark (?).
The question mark serves as a placeholder for the parameter value that
the stored procedure requires. You cannot name parameters within the
actual query, so we have to take another step to provide our value. Go to the Parameter Mapping page of the Execute SQL Task Editor. On this page, you map the parameters referenced in your queries to variables. You create your mappings in the main grid, which contains the following five columns:
- Variable Name: The variable that contains the value to be used for the parameter. In this case, we’ll use the User:: EmpNum variable, which contains the result set value returned by the first Execute SQL task.
- Direction: Determines whether to pass a value into a parameter (input) or return a value through the parameter (output)
- Data Type: Determines the type of data provided from the variable. This will default to the type used when setting up the variable.
- Parameter Name: The name of the parameter. The way in which parameters are named depends on your connection type. When running a T-SQL statement against a SQL Server database through an OLE DB connection, as we’re doing here, we use numerical values to represent the statement’s parameters, in the order they appear in the statement, starting with 0. In this case, because there’s only one parameter, we use 0.
- Parameter Size: The size of the parameter if it can be a variable length. The default is -1, which lets SQL Server determine the correct size.

Figure 8: Mapping a variable to a parameter
When you’re finished configuring the Execute SQL task, click OK. Your package should now be ready to run. Click the green Execute button. When the package has completed running, query the SSISLog table and verify that a row has been added that contains the expected results.
Returning a Full Result Set
Using the Execute SQL task to return a full result set is similar to returning a single-row result set. The primary differences are that your target variable must be configured with the Object data type, and the task’s ResultSet property must be set to Full result set.Let’s run through an example to demonstrate how this works. This time, rather than retrieving a single value, we’re going to retrieve a result set that contains multiple rows and columns.
For this exercise, we can use the same SSIS package we used for the previous example, but keep in mind, if you execute the package, all components will run unless you specifically disable those that you don’t want to have run.
Drag an Execute SQ L task to the design surface. Open the task’s editor and configure the properties as necessary. Remember to set the ResultSet property to Full result set. For the SQLStatement property, use the SELECT statement shown in Listing 3. When entering a long SELECT statement into as the property’s value, it’s easier to click the ellipses button to the right of the property to open the Enter SQL Query dialog box and then entering the statement there.
SELECT DATEDIFF(YEAR, HireDate, GETDATE())E.BusinessEntityID,P.FirstName ,P.LastName ,E.JobTitle ,E.Gender FROM HumanResources.Employee EINNER JOIN Person.Person PON E.BusinessEntityID = P.BusinessEntityIDWHERE DATEDIFF(YEAR, HireDate, GETDATE()) >= 15
Listing 3: The SELECT statement used to return a full result set
After you enter your SELECT statement, close the Enter SQL Query dialog box. When you’re returned to the Execute SQL Task Editor, the General page should now look similar to the one shown in Figure 9. 
Figure 9: Configuring the Execute SQL task to return a full result set
Next, go to Result Set page and add a row to the main grid. Because we’re returning a full result set, you should enter 0 in the Result Name column. (The same is true if you’re returning an XML result set). Then, in the Variable Name column, select the User:: E mployeeList variable. Once this is complete, click OK. Your Execute SQL task will now return a full result set and save it to the E mployeeList variable. (You should execute the task to make sure it runs.) You can then use that variable in other SSIS components. However, to do so is a bit more complicated than what we saw for a single-row result set, so I’ll save that discussion for another time. But feel free to try using the variable if your up for it. You might want to start with a Foreach Loop container.
Summary
In this article, I demonstrated how to use an Execute SQL task to return a single-row result set with a single value and save that value to a variable. I then showed you how to use the variable in a second Execute SQL task to insert data into a table.In the second example, I demonstrated how to use an Execute SQL task to return a full result set and save it to a variable configured with the Object data type. Although I did not show you how to use the result set in other components, you should now have a good sense of the principles behind using the Execute SQL task to retrieve result sets and saving them to variables.
In future articles, I’ll demonstrate how you can use those result sets in other components, such as the Script task and the Foreach Loop container.
SSIS Basics: Introducing Variables:
In the third of her SSIS Basics articles, Annette Allen
shows you how to use Variables in your SSIS Packages, and explains the
functions of the system-defined variables.
In previous articles in the SSIS Basics series, I showed you how to set up a SQL Server Integration Services (SSIS) package. I also showed you how to add a Data Flow task
that contains the components necessary to extract data from a SQL
Server database, transform the data, and load it into an Excel
spreadsheet.
In this article, I will show you how to use variables in your SSIS
package. Variables are extremely important and are widely used in an
SSIS package. A variable is a named object that stores one or more
values and can be referenced by various SSIS components throughout the
package’s execution. You can configure a variable so its value is
updated at run time, or you can assign a value to the variable when you
create it.
There are two types of variables in an SSIS package: system and user-defined. SSIS automatically generates the system variables when you create your package. Components can then reference the system variables as necessary, usually for debugging and auditing purposes. You create user-defined variables as needed when you configure your package.
Setting Up Your SSIS Package
To try out the examples in this article all you need to do is to create
an Excel spreadsheet named Employee, for the purposes of this article
it can be an empty file. This does follow on from the previous article
in this series “SSIS Basics: Adding Data Flow to Your Package” however it is adviseable to start from a new package.
Creating Variables
In the following sections, I will show you how to create a user-defined variable and reference it within your package. Then I will show you how to create an expression that dynamically updates the variable value at run time. Our starting point is where my previous article left off; however, all you need to do is create an Excel spreadsheet named Employee, I have saved it in the root of my d:\ drive but you can save it wherever appropriate, once this is created you should have no problems working through these examples.The Variables Window
The easiest way to create a user-defined variable is by using the Variables window. When you create a variable, you specify a name, data type, and scope.The scope controls which package elements can use the variable. You can define a variable’s scope at the package level or at the level of a specific container, task, or event handler. For example, if you configure a variable at the scope of a ForeachLoop container, only that container and any tasks within the container can use the variable. However, if you configure the variable at the package level, any component within the package can reference the variable. One of the most common issues to arise when working with variables is for them to have been inadvertently created at the scope of a container or task, when they should have been created at the scope of the package.
To view the Variableswindow, right-click the design surface on the ControlFlow tab, and clickVariables. By default, the Variables window appears to the left of the design surface, as shown in Figure 1.

Figure 1: Variables window in SSIS Designer
At the top of the Variables window, you’ll find five buttons (shown in Figure 2) and, beneath those, column headings.

Figure 2: Buttons at the top of the Variables window
From left-to-right, the buttons let you perform the following tasks:
- Adding a user-defined variable
- Deleting a user-defined variable (available when a variable has been created)
- Showing system variables
- Showing all variables
- Choosing the variable columns to display
- Name: The name assigned to the variable. When you first create your variable, the value Variable is used. If there is already a variable named Variable, a number is added to the name.
- Scope: The scope at which the variable should be set. The majority of the time, you can go with a package-level scope, which means the scope should be the name of the package. To select a different scope, you must select the applicable task or container when you create your variable. It is very easy to inadvertently create a variable at an unintended scope. Before creating a variable, be certain that the correct task or container is selected or, if you want a package-level scope, that no components are selected.
- DataType: The type of data that the variable can store. SSIS supports the following variable types:
- Boolean
- Byte
- Char
- DateTime
- DBNull
- Double
- Int16
- Int32
- Object
- SByte
- String
- UInt32
- UInt64
- Value: The variable’s initial value. This can be populated here or left blank and populated at run time.

Figure 3: Additional columns available for variables
As you can see, the Scope, Data type, and Value columns are selected by default. You can also select one of the following columns to display:
- Namespace: Shows whether the variable is a system or user-defined variable.
- Raise event when variable value changes:Boolean (True/False) field that if selected will fire an OnVariableValueChanged event if the variable value is modified. This will be covered in more detail in a future article when looking at error handling and debugging.
Creating a User-Defined Variable
In this section, I demonstrate how to create a variable and assign a value to it, which in this case, will be a file path. Using the Excel spreadsheet created in the setup, I will save a copy of the spreadsheet to a new folder using a variable to re-name it.To create a variable, click the white space on the Control Flow design surface to ensure that no components are selected, and then click the Add Variable button in the Variables window. A variable is added to the first row of the window’s grid, as shown in Figure 4.

Figure 4: A new variable in the Variables window
Notice in Figure 4 the blue button with the black X to the left of the
variable name. You can use this button to delete the variable. Also
notice that the scope is set to the package name, SSISBasics, which is the scope we want to use for this exercise.
By default, the variable is configured with the Int32 data type. However, for this exercise, we’ll use String. To change the data type, select String from the drop-down list in the Data Type column. When the data type is updated, the value in the Value column changes from 0 to an empty string.
You now need to enter the variable value. Simply type in the path name you plan to use for your Excel file. In this case, I used d:\Demo. I also changed the variable name to DestinationFilePath, as shown in Figure 5.

Figure 5: Configuring the new variable in the Variables window
You’re variable should now be ready to go. Because you created it with a
package scope, any component in your package can use that variable.
Using the Variable
I am now going to show you how to reference the new variable from within a File System task. First, you must add the task to the control flow, as shown in Figure 6.
Figure 6: Adding a File System task to the control flow
Then double-click the File System task to open the File System Task Editor, as shown in Figure 7.

Figure 7: Accessing the File System Task Editor
You now need to configure the task’s properties. Table 1 describes how to configure each of these properties
| Property | Description |
| IsDestinationPathVariable | Change to True. |
| DestinationVariable | Select the variable you created earlier from the drop-down list associated with this property. When the variable is added to the property, it is preceded by the namespace name and two colons (User::). |
| OverwriteDestination | If you want to overwrite the destination every time the package runs, select True, otherwise leave it as False. However, if you select False and run the package more than once, SSIS will generate an error. As the name of the excel spreadsheet will not change, I suggest you select True. |
| Name | The default name is File System Task. You can rename the task to better reflect what it does. For this exercise, I renamed the task Copy to new folder. |
| Description | You can type a full description here. I used Copy the Employee’s excel spreadsheet to d:\Demo\. |
| Operation | The default option is Copy File. Because that’s what we’ll do in this exercise, you can leave this option selected. But note that other options are available, and I will cover some of them in future articles. |
| IsSourcePathVariable | Leave this option set at its default value, False. Although we’ll be setting the destination to a variable, the source path will directly reference the original Excel file. |
| SourceConnection | This is where you select the connection to the source file you want to copy. From the drop-down list associated with this property, select as currently we have no connections set up. The Usage type: defaults to Existing File which is correct, as we have already created the spreadsheet, select the Browse button and browse to the Excel spreadsheet created called Employee.xlsx and click OK to accept. |
Table 1: Configuring the File System task properties
Figure 8 shows what your File System Task Editor should look like after you’ve configured the properties. Review your settings, and then click OK.

Figure 8: Configuring properties in the File System Task Editor
The control flow should now show that the inverted red X has been removed from the FileSystem task and that the task has been renamed to Copy to new folder.
To verify whether the task works, run the package by clicking on the green arrow (the Run button) on the menu bar. Then open Windows Explorer and check that the file has been copied into the target folder correctly.
Using an expression to define a variable value
In some cases, you might want to generate a variable’s value at run time, rather than assign a specific value, as we did in the previous exercise. This can be useful if the variable value needs to change during the package’s execution or that value is derived from other sources or processes. For example, the Foreach Loop container might use a variable whose value must change each time the container loops through the targeted list of objects. (I’ll explain how to use a variable in this way in a future article.)In this section, I demonstrate how to create an expression that dynamically generates a value for a String variable named DestinationFileName. The exercise uses the same test environment as the one in the previous exercise. We will again copy the original Excel file to the destination folder, only this time we’ll use an expression to define the path and file name. The expression will rename the file by tagging the date to the end of the filename, as in Employee_201265.xlsx.
Your first step, then, is to create a variable named DestinationFileName, Follow the same steps you used to create the DestinationFilePath variable in the previous exercise, but leave the value blank, as shown in Figure 9.

Figure 9: Creating the DestinationFileName variable
To populate the value, you’ll create an expression in the variable’s
properties. An expression is a formula made up of elements such as
variables, functions, and string values. The expression returns a single
value that can then be used by the variable.
To create an expression for the DestinationFileName variable, open the Properties window to display the variable’s properties. You can open the window by clicking Properties Window on the View menu. You can also open the Properties window by pressing F4. The Properties window displays the properties for whatever component is selected in your SSIS package. To display the properties for the DestinationFileNamevariable, select the variable in the Variables window.
When the variable’s properties are displayed in the Properties window, you can create an expression that defines the variable’s value. To do so, first set the EvaluateAsExpression property to True. This enables the variable to use an expression to define its value. Then click the browse button (…) associated with the Expression property, as shown in Figure 10.

Figure 10: Launching the Expression Builder dialog box
Clicking the browse button opens the Expression Builder dialog box, which is divided into three sections, as shown in Figure 11.

Figure 11: The Expression Builder dialog box
Notice in Figure 11 that I’ve labeled the three sections of the ExpressionBuilder dialog box as 1, 2, and 3:
- The variables available to use in your expression
- The functions and operators available to use in your expression
- The workspace where you create your expression
In the previous section, we created the DestinationFilePath variable, which held the target folder into which we copied the Excel file. In this exercise, we’ll again copy the original Excel file to the new folder as described earlier. To do this, we’ll use the DestinationFilePath variable as part of our expression to provide the path name for the new DestinationFileName variable.
As a result, the first step you should take to create your expression is to drag the DestinationFilePath variable to the Expression section, as show in Figure 12. If you click the Evaluate Expression button after you add the variable, the Evaluatedvalue field should show the value assigned to that variable, which is the path d:\Demo.

Figure 12: Adding the DestinationFilePath variable to your expression
Next, you’ll need to add to your expression the elements necessary to name the file. First, add a concatenation operator (+), and then add the string value Employee, enclosed in double quotes, as shown in the following script:
@[User::DestinationFilePath] + "Employee"
You can evaluate your expression at any time by clicking on the EvaluateExpression button. For instance, if you evaluate your expression at this point, you should receive the following results:
d\Demo\Employee
I will now show you how to include the date and time in the expression
so that the variable can include them. To create this part of the
expression, we’ll use the following functions:
- GETDATE: Returns the current date and time.
- YEAR: Returns the year component (as an integer) of a date value.
- MONTH: Returns the month component (as an integer) of a date value.
- DAY: Returns the day component (as an integer) of a date value.
- RIGHT: Returns the number of characters specified counting from the right of the string.
Note:
There are many ways to build the expression I am about to explain, but this is the method I use and find easiest.
There are many ways to build the expression I am about to explain, but this is the method I use and find easiest.
After we add each component, we can use the EvaluateExpression button to see what the value looks like to ensure that we’re happy with it up to that point.
Because we want the year to appear before the other data parts, we’ll start with that element of the expression. To add the year, we’ll use the YEAR function along with the GETDATE function. This will return a four-digit integer, which we’ll convert to a string.
As noted above, the GETDATE function returns the current timestamp. But we can apply the YEAR function to that timestamp to extract only the year value, as shown in the following code fragment:
YEAR(GETDATE())
This will return only the year, but as an integer. However, because we
will be concatenating that value with a string value, which need to
convert the year to a string, as the following code shows:
(DT_WSTR,4)YEAR(GETDATE())
Notice that, to convert the year value to a string, we must precede the YEAR
function with the target data type and length in parentheses. We can
then append this code with our original code, as shown in the following
script:
@[User::DestinationFilePath] + "Employee"
+ (DT_WSTR,4)YEAR(GETDATE())
Now if we use the Evaluate Expression button, the results should look like the following:
+ (DT_WSTR,4)YEAR(GETDATE())
d:\Demo\Employee2012
Next, we need to add the month to our expression. We will use the MONTH function with the GETDATE function in similar to how we used the YEAR function above. However, we must take extra steps to accommodate the fact that the MONTH
function returns a single digit for months prior to October and returns
two digits from the other months. When the function returns a single
digit, we need to precede the returned value with a 0
to ensure we always return two characters. That way, dates such as 15
June 2012 will be returned as 20120615, rather than 2012615, which makes
it easier to manage files in such applications as Windows Explorer.
The trick in doing this is to add the 0 only when we need it. That’s where the RIGHT function comes in. The function takes two arguments. The first argument is an expression that returns a character value. The second argument is the number of characters we want to extract from that value. However, those characters are extracted from right-to-left.
Let’s look at a couple examples of the RIGHT function to demonstrate how it works. The first one includes a simple expression that concatenates 0 and 6:
RIGHT("0"+"6",2)
The expression comprises everything before the comma. In this case, it
concatenates the two values (rather than adding them) and returns the
value 06. The second argument, 2,
specifies that only the right two characters be returned by the
function. Because the expression returned only two characters, the
function will return both of them.
However, suppose your expression returns more than two characters. In the following example, a single digit is concatenated with two digits:
RIGHT("0"+"12",2)
The expression in this case returns the value 012. However, the second argument specifies that the RIGHT function should return only the right two characters, so the function will return only 12.
Now let’s return to the expression we’re creating to generate the file name. At this point, we’re trying to add the month components. First, we need to extract the month and convert it to a string value, just like we did with the year:
(DT_WSTR, 2) MONTH(GETDATE())
As you would expect, this part of the expression will return a
one-digit or two-digit integer that represents the month. We can then
use this code within the RIGHT function to ensure that we always extract two digits:
RIGHT("0"+(DT_WSTR, 2) MONTH(GETDATE()) ,2)
Notice that the first argument is an expression that concatenates a 0
with the month returned by the other part of the formula. That means
the expression will also return a two or three characters, depending on
the month. However, because 2 is specified as the second argument, the RIGHT
function will return only the right two characters, thus ensuring that
the outer expression always includes two characters for the month.
We can then concatenate this code with our original expression, as shown in the following script:
@[User::DestinationFilePath] + "Employee"
+ (DT_WSTR,4)YEAR(GETDATE())+ RIGHT("0"+(DT_WSTR, 2) MONTH(GETDATE()) ,2)
After the month is added to our outer expression, we use the Evaluate Expression button to view the current value.. The results should look similar to the following:
+ (DT_WSTR,4)YEAR(GETDATE())+ RIGHT("0"+(DT_WSTR, 2) MONTH(GETDATE()) ,2)
d:\Demo\Employee201207
Next, we will add the day to our expression. Adding the day is similar to what we did to add the month, except that we use the DAY function, as shown in the following code:
@[User::DestinationFilePath] + "Employee"
+ (DT_WSTR,4)YEAR(GETDATE())+ RIGHT("0"+(DT_WSTR, 2) MONTH(GETDATE()) ,2)+ RIGHT("0"+(DT_WSTR, 2) DAY(GETDATE()) ,2)
As you can see, we’ve concatenated the day information with the rest of our expression. When you click the Evaluate Expression button, it should now return results similar to the following:
+ (DT_WSTR,4)YEAR(GETDATE())+ RIGHT("0"+(DT_WSTR, 2) MONTH(GETDATE()) ,2)+ RIGHT("0"+(DT_WSTR, 2) DAY(GETDATE()) ,2)
d:\Demo\Employee20120715
All that’s left to do is to add the Excel file extension. Simply add another concatenate operator, followed by .XLSX enclosed in double quotes. Our full expression should now be complete:
@[User::DestinationFilePath] + "Employee"
+ (DT_WSTR,4)YEAR(GETDATE())+ RIGHT("0"+(DT_WSTR, 2) MONTH(GETDATE()) ,2)+ RIGHT("0"+(DT_WSTR, 2) DAY(GETDATE()) ,2)+ ".XLSX"
If we click the Evaluate Expression button one more time, we should see the results we’ve been looking for:
+ (DT_WSTR,4)YEAR(GETDATE())+ RIGHT("0"+(DT_WSTR, 2) MONTH(GETDATE()) ,2)+ RIGHT("0"+(DT_WSTR, 2) DAY(GETDATE()) ,2)+ ".XLSX"
d:\Demo\Employee20120623.XLSX
We’ve built this expression up in stages so you could better see how
all the pieces fit together. The expression, as it appears in the Expression Building dialog box on your system, should now look similar to the one shown in Figure 13.

Figure 13: Your final expression in the Expression Builder dialog box
After you’ve evaluated your expression, click OK to close the ExpressionBuilder dialog box. The Variables window should now show the value of the DestinationFileName variable as the one generated by the expression, as shown in Figure 14.

Figure 14: The new value for the DestinationFileName variable
Your final step is to update the File System task so it uses the DestinationFileName variable. To do this, open the File System Task Editor for the task named Copy to new folder. Change the value of the DestinationVariable property to the DestinationFileName variable, as shown in Figure 15.

Figure 15: Using the DestinationFileName variable
Click OK to close the File System Task Editor.
Then check that the new variable works correctly by running the
package. When you’re finished, open Windows Explorer and verify that the
new file has been created and that it uses the correct name.
System Variables
Each SSIS package includes a large number of system variables that you can use for debugging, error handling, change tracking, and other purposes. Figure 16 shows a list of system variables in our package.
Figure 16: System variables in our SSIS package
Like user-defined variables, system variables are scope-specific. In
other words, they are either related to a task, container, or package.
The top red block in Figure 16 are system variables linked to the DataFlow
task, and the bottom block are those related to the package as a whole.
The variable in the blue box is the user-defined variable DestinationFilePath.
Summary
In this article, we created two variables. For the first variable, we assigned a static value, which is used by the variable whenever it is referenced during package execution. For the second variable, we used an expression to define the value. This way, the variable’s value is generated automatically at run time. The article also demonstrated how to use the Copy File function in File System task to copy a file and rename it. We have also looked briefly at system variables. In future articles, I will show you how to use these for error handling and debugging and how to work with user-defined variables when setting up your package’s configuration and deployment. I will also show you how to use variables more extensively.
Working with SSIS Data Types:
Because SSIS types are independent from the other systems, each SSIS type can map to a variety of types in those systems. For example, SSIS does not include geospatial data types such as those you find in SQL Server. Instead, SSIS uses an image type that is specifically mapped to the geospatial types. Yet the image type is not limited to those geospatial types. It is also mapped to other data types in the various systems.
The data types supported by SSIS can be divided into the following categories:
- Numeric: Types that support numeric values formatted as currencies, decimals, and signed and unsigned integers. SSIS supports more numeric types than any other kind.
- String: Types that support ANSI and Unicode character strings.
- Date/Time: Types that support date values, time values, or both in various formats.
- Binary: Types that support binary and image values.
- Boolean: A type to handle Boolean values.
- Identifier: A type to handle globally unique identifiers (GUIDs).
USE AdventureWorks2012;GOIF OBJECT_ID('dbo.AWProducts') IS NOT NULLDROP TABLE dbo.AWProducts;GOCREATE TABLE dbo.AWProducts(
NewProdID NVARCHAR(40) NOT NULL PRIMARY KEY,
OldProdID INT NOT NULL,
ProdName NVARCHAR(50) NOT NULL,
MakeFlag BIT NOT NULL,
ReorderPoint SMALLINT NOT NULL,
ProdPrice MONEY NOT NULL,
Weight DECIMAL(8,2) NULL,
ProductLine NCHAR(2) NULL,
SellStartDate DATETIME NOT NULL,
EndDate DATE NULL,
OldProdGUID UNIQUEIDENTIFIER NOT NULL
);
The package I use to demonstrate the SSIS types is very basic and includes only the following components: NewProdID NVARCHAR(40) NOT NULL PRIMARY KEY,
OldProdID INT NOT NULL,
ProdName NVARCHAR(50) NOT NULL,
MakeFlag BIT NOT NULL,
ReorderPoint SMALLINT NOT NULL,
ProdPrice MONEY NOT NULL,
Weight DECIMAL(8,2) NULL,
ProductLine NCHAR(2) NULL,
SellStartDate DATETIME NOT NULL,
EndDate DATE NULL,
OldProdGUID UNIQUEIDENTIFIER NOT NULL
);
- An OLE DB connection manager to retrieve data from and insert data into the AdventureWorks2012 database.
- A Data Flow task that contains the components necessary to extract, transform, and load the product data.
- An OLE DB source that retrieves data from the Production.Product table in the AdventureWorks2012 database. The source uses the OLE DB connection manager to connect to the database.
- A Data Conversion transformation that converts two columns in the data flow.
- A Derived Column transformation that creates a column based on concatenated data from columns in the data flow.
- An OLE DB destination that inserts data into the dbo.AWProducts table. The destination uses the OLE DB connection manager to connect to the database.

Figure 1: Setting up your SSIS data flow
As you can see, there’s a single connection manager, which I’ve named AdventureWorks2012, and four data flow components, all included in a single Data Flow
task. Now let’s look at these components in more detail so we can
better understand how SSIS data types are used in each of them. Implicit Conversions from Source Data
When you retrieve data from a data source, the data enters the package’s data flow, at which time it is implicitly converted into SSIS types. Those conversions are defined in a set of XML data type mapping files that are located on the file system where SQL Server and SSIS are installed. In SQL Server 2012, the files are located by default in the C:\Program Files\Microsoft SQL Server\110\DTS\MappingFiles folder. It is well worth reviewing these files to get a sense of how data types are being mapped in order to facilitate data flowing in and out of an SSIS package.Each mapping file includes a set of XML elements that define the specific mappings between data source types and SSIS types. For example, the XML file that maps SQL Server data types to SSIS data types is MSSQLToSSIS10.XML. The file contains a set of mappings that each map a SQL Server type to an SSIS type. One of these mappings is for the SQL Server XML data type, which is mapped to the SSIS DT_WSTR data type, as shown in the following XML fragment:
<!-- xml -->
<dtm:DataTypeMapping >
  <dtm:SourceDataType>
    <dtm:DataTypeName>xml</dtm:DataTypeName>
  </dtm:SourceDataType>
  <dtm:DestinationDataType>
    <dtm:CharacterStringType>
      <dtm:DataTypeName>DT_WSTR</dtm:DataTypeName>
      <dtm:UseSourceLength/>
    </dtm:CharacterStringType>
  </dtm:DestinationDataType>
</dtm:DataTypeMapping>Now let’s look at the OLE DB source shown in Figure 1. The component uses the AdventureWorks2012 connection manager to connect to the AdventureWorks2012 database. In addition, it uses the following SELECT statement to retrieve data from the Production.Product table:
SELECT
ProductID,
Name,
MakeFlag,
ReorderPoint,
ListPrice,
Weight,
ProductLine,
SellStartDate,
CONVERT(DATE, SellEndDate, 22) AS EndDate,
rowguidFROM
Production.Product;
After you’ve set up your OLE DB
source, you can verify how the SQL Server types will be converted to
SSIS types by using the advanced editor associated with that component.
You launch the editor by right-clicking the component and then clicking Show Advanced Editor. This opens the Advanced Editor for OLE DB Source dialog box. Go to the Input and Output Properties tab and, in the Inputs and Outputs box, navigate to the Output Columns node, as shown in Figure 2. ProductID,
Name,
MakeFlag,
ReorderPoint,
ListPrice,
Weight,
ProductLine,
SellStartDate,
CONVERT(DATE, SellEndDate, 22) AS EndDate,
rowguidFROM
Production.Product;

Figure 2: Properties for the ProductID column
Expand the Output Columns node and select the ProductID
column. The properties for that column appear in the grid to the right.
These properties are specific to the SSIS data flow. As you can see in
Figure 2, one of those properties is DataType, and its value is four-byte signed integer [DT_I4]. The name of the type is DT_I4,
which is how it’s usually referenced in SSIS. However, in some cases,
as in here, a description is also provided, which makes it handy to
understand the exact nature of the type. Keep in mind, however, that the
data is being retrieved from the ProductID column in the Production.Product table in SQL Server. That column is configured with the INT data type. That means SSIS is converting the type from the SQL Server INT type to the SSIS DT_I4 type. Now look at the properties in the Name column (shown in Figure 3). Notice that the DataType property now has a value of Unicode string [DT_WSTR]. In this case, the source data comes from the SQL Server Name column, which is configured with the NVARCHAR data type. Again, SSIS has implicitly converted the source data to the SSIS type.

Figure 3: Properties for the Name column
In fact, each column in the data flow has been implicitly converted
to an SSIS type. Table 1 shows the data type of the source data and the
SSIS type in which it has been converted. | Column | SQL Server data type | SSIS data type |
| ProductID | INT | DT_I4 (four-byte signed integer) |
| Name | NVARCHAR(50) | DT_WSTR (Unicode string) |
| MakeFlag | BIT | DT_BOOL (Boolean) |
| ReorderPoint | SMALLINT | DT_I2 (two-byte signed integer) |
| ListPrice | MONEY | DT_CY (currency) |
| Weight | DECIMAL(8,2) | DT_NUMERIC (numeric) |
| ProductLine | NCHAR(2) | DT_WSTR (Unicode string) |
| SellStartDate | DATETIME | DT_DBTIMESTAMP (database timestamp) |
| EndDate | DATE | DT_DBDATE (database date) |
| rowguid | UNIQUEIDENTIFIER | DT_GUID (unique identifier) |
Table 1: Implicit conversions from SQL Server to SSIS
Notice that each SQL Server type has been converted to an SSIS type
and that those types correspond with each other in a way that permits
the data values to pass seamlessly between the database and SSIS. If you
were to refer to the MSSQLToSSIS10.XML
mapping file, you would see that all the mappings have been defined
there. Yet even as efficient as this system is, there might be some
cases in which you’ll want to configure a column with a different SSIS
data type, in which case you can perform an explicit conversion. Explicit Conversions of SSIS Types
Two common ways to convert data in your data flow is to use the Data Conversion transformation to perform a simple conversion or to use the Derived Column transformation to create a column that is based on converted data. Let’s first look at the Data Conversion transformation.In our example package, we’ve added a Data Conversion transformation to convert two columns: rowguid and ListPrice. If you refer back to Table 1, you’ll see that the rowguid column, as it is rendered in the SSIS data flow, is configured with the DT_GUID data type, which is the only SSIS unique identifier type. For this example, you’ll convert the column to an ANSI string type (DT_STR) and change the column name to OldProdGUID. As for the ListPrice column, it’s configured with the currency data type (DT_CY). You’ll convert that column to an eight-byte signed integer (DT_I8) and rename it ProdPrice. Figure 4 shows how your conversions should appear in the Data Conversion Transformation Editor.

Figure 4: Converting columns to different SSIS data types
Notice that when you convert the rowguid
column to a string data type, you specify a length. Just as in SQL
Server, you must specify a length for any of the character data types.
That means you must ensure that the length is long enough to accommodate
all the values in the table. Otherwise, SSIS will try to truncate the
data. (By default, a truncation causes the transformation to generate an
error, although you can override this behavior by redirecting your
error output.) As noted above, another way you can convert data is to you use the Derived Column transformation. In this case, you’re converting data as part of the expression you use to define the column. For example, suppose you want to concatenate the ProductID and Name columns. However, the ProductID column is configured with the DT_I4 data type, and the Name column is configured with the DT_WSTR data type. To concatenate values from these two columns, you need to first convert the ProductID column to a string, as shown in the following expression:
(DT_WSTR,4)ProductID + SUBSTRING(Name,1,4)
To convert a column in this way, you first specify the new data type
and length, in parentheses, and then the column name. You can then
concatenate this value with the Name column. In this case, you’re using the SUBSTRING function to specify that only the first four letters of the name be used. The column expression is one of the values you define when we use the Derived Column transformation to create a column. Figure 5 shows how to configure the other values.

Figure 5: Converting a column when creating a derived column
As the figure shows, a new column named NewProdID is being added to the data flow. The column is configured with the Unicode string data type (DT_WSTR) and its length is set to 8. Implicit Conversions to Destination Data
After you’ve transformed the data in the data flow, you’re ready to load it into your target destination. However, you might want to first verify the columns in your data flow. To do so, you can use the Data Flow Path Editor for the data flow path connecting the Derived Column transformation to the OLE DB destination. When you open the editor, go to the Metadata page, as shown in Figure 6.
Figure 6: Available columns in the SSIS data flow
As you can see, all columns and their data types are listed in the
editor. That includes the two columns that have been converted, both
before and after that conversion. Also included in the information is
the value’s length, where applicable. If precision and scale are factors
in any of your columns, those too are included. Once you’re satisfied that the data looks correct, you can configure the destination. If you’re inserting data into a SQL Server database, there should be little problem, unless the data itself does not conform to the target type. For instance, an incorrectly formatted GUID might cause the destination component to generate an error when loading the data into a target column configured with the UNIQUEIDENTIFIER type.
Table 2 shows how the data types in the SSIS data flow correspond to the data types in the AWProducts table. As you can see, not all the SSIS types correlate directly to those of the target columns. (The ListPrice and rowguid columns are not inserted into the destination, only the converted columns: ProdPrice and OldProdGUID.)
| SSIS Column | SSIS data type | Database column | SQL Server data type |
| ProductID | DT_I4 (four-byte signed integer) | OldProdID | INT |
| Name | DT_WSTR (Unicode string) | ProdName | NVARCHAR(50) |
| MakeFlag | DT_BOOL (Boolean) | MakeFlag | BIT |
| ReorderPoint | DT_I2 (two-byte signed integer) | ReorderPoint | SMALLINT |
| ListPrice | DT_CY (currency) | ||
| Weight | DT_NUMERIC (numeric) | Weight | DECIMAL(8,2) |
| ProductLine | DT_WSTR (Unicode string) | ProductLine | NCHAR(2) |
| SellStartDate | DT_DBTIMESTAMP (database timestamp) | SellStartDate | DATETIME |
| EndDate | DT_DBDATE (database date) | EndDate | DATE |
| rowguid | DT_GUID (unique identifier) | ||
| OldProdGUID | DT_STR (ANSI character string) | OldProdGUID | UNIQUEIDENTIFIER |
| ProdPrice | DT_I8 (Eight-byte signed integer) | ProdPrice | MONEY |
| NewProdID | DT_WSTR (Unicode string) | NewProdID | NVARCHAR(40) |
Table 2: Implicit conversions from SSIS to SQL Server
For example, the OldProdGUID column in the data flow is configured with the DT_STR data type, but the table column is configured with the UNIQUEIDENTIFIER type. At the same time, the applicable XML mapping file in this case, SSIS10ToMSSQL.XML, does not include a mapping for the DT_STR SSIS type to the UNIQUEIDENTIFIER SQL Server type. In such cases, SQL Server will usually accept the values and convert them to the UNIQUEIDENTIFIER
type, as long as those values conform to requirements of the target
type. If your destination won’t accept the values because of type
incompatibility, then you might need to convert or transform your data
flow in some other way to conform to the targeted data source. Working with SSIS Data Types
Whenever you work with data in an SSIS package, you’re working with SSIS data types. It doesn’t matter where the data comes from or where it’s going. When you retrieve or load data, SSIS tries to automatically convert it to the correct types. If SSIS can’t implicitly convert the data—and transforming the data within the package doesn’t work—you might need to modify the XML mapping files, stage the data so it’s compatible with both SSIS and the data source, create a custom component that can retrieve or load the data, or implement a solution outside of SSIS to prepare the data. For the most part, however, you should find that the SSIS types provide you with the versatility you need to retrieve data from a variety of sources and load it into a variety of destinations.
SSIS Basics: Adding Data Flow to Your Package
Note:
If you want to try out the examples in this article, you’ll need to create an OLE DB connection manager that points to the AdventureWorks database and a Flat File connection manager that points to an Excel file. You can find details about how to set up these connection managers in my previous article, which is referenced above. I created the examples shown in this article and the last one on a local instance of SQL Server 2008 R2.
If you want to try out the examples in this article, you’ll need to create an OLE DB connection manager that points to the AdventureWorks database and a Flat File connection manager that points to an Excel file. You can find details about how to set up these connection managers in my previous article, which is referenced above. I created the examples shown in this article and the last one on a local instance of SQL Server 2008 R2.
Adding a Data Flow Task
Our goal in creating this package is to move data from a SQL Server database to an Excel file. As part of that goal, we also want to insert an additional column into the Excel file that’s based on derived data.To carry out our goal, we must add a Data Flow task to our control flow. The task lets us retrieve data from our data source, transform that data, and insert it into our destination, the Excel file. The Data Flow task is one of the most important and powerful components in SSIS and as such has it’s own workspace, which is represented by the Data Flow tab in SSIS Designer, as shown in Figure 1.

Figure 1: The Data Flow tab in SSIS Designer
Before we can do anything on the Data Flow tab, we must first add a Data Flow task to our control flow. To add the task, drag it from the Control Flow Items window to the Control Flow tab of the SSIS Designer screen, as illustrated in Figure 2. 
Figure 2: Adding a Data Flow task to the control flow
To configure the data flow, double-click the Data Flow task in the control flow. This will move you to the Data Flow tab, shown in Figure 3. 
Figure 3: The Data Flow tab in SSIS Designer
Configuring the Data Flow
You configure a Data Flow task by adding components to the Data Flow tab. SSIS supports three types of data flow components:- Sources: Where the data comes from
- Transformations: How you can modify the data
- Destinations: Where you want to put the data
To add components to the Data Flow task, you need to open the Toolbox if it’s not already open. To do this, point to the View menu and then click ToolBox, as shown in Figure 4.

Figure 4: Opening the Toolbox to view the data flow components
At the left side of the Data Flow tab, you should now find the Toolbox window, which lists the various components you can add to your data flow. The Toolbox organizes the components according to their function, as shown in Figure 5. 
Figure 5: The component categories as they appear in the Toolbox
To view the actual components, you must expand the categories. For example, to view the source components, you must expand the Data Flow Sources category, as shown in Figure 6 
Figure 6: Viewing the data flow source components
Adding an OLE DB Source
The first component we’re going to add to the data flow is a source. Because we’re going to be retrieving data from a SQL Server database, we’ll use an OLE DB source. To add the component, expand the Data Flow Sources category in the Toolbox. Then drag an OLE DB source from to the Data Flow window. Your data flow should now look similar to Figure 7.
Figure 7: Adding an OLE DB source to your data flow
You will see that we have a new item named OLE DB Source. You can rename the component by right-clicking it and selecting rename. For this example, I renamed it Employees. There are several other features about the OLE DB source noting:
- A database icon is associated with that source type. Other source types will show different icons.
- A reversed red X appears to the right of the name. This indicates that the component has not yet been properly configured.
- Two arrows extend below the component. These are called data paths. In this case, there is one green and one red. The green data path marks the flow of data that has no errors. The red data path redirects rows whose values are truncated or that generate an error. Together these data paths enable the developer to specifically control the flow of data, even if errors are present.

Figure 8: Configuring the OLEDB source
From the OLE DB connection manager drop-down list, select the OLE DB connection manager we set up in the last article, the one that connects to the AdventureWorks database. Next, you must select one of the following four options from the Data access mode drop-down list:
- Table or view
- Table name or view name variable
- SQL command
- SQL command from variable
CREATE VIEW uvw_GetEmployeePayRate
AS
    SELECT  H.EmployeeID ,
            RateChangeDate ,
            Rate
    FROM    HumanResources.EmployeePayHistory H
            JOIN ( SELECT   EmployeeID ,
                            MAX(RateChangeDate) AS [MaxDate]
                   FROM     HumanResources.EmployeePayHistory
                   GROUP BY EmployeeID
                 ) xx ON H.EmployeeID = xx.EmployeeID
                         AND H.RateChangeDate = xx.MaxDate
GO
Listing 1: The uvw_GetEmployeePayRate view definition
After you ensure that Table or view is selected in the Data access mode drop-down list, select the uvw_GetEmployeePayRate view from the Name of the table or the view drop-down list. Now go to the Columns
page to select the columns that will be returned from the data source.
By default, all columns are selected. Figure 9 shows the columns (EmployeeID, RateChangeDate, and Rate) that will be added to the data flow for our package, as they appear on the Columns page. 
Figure 9: The Columns page of the OLE DB Source Editor
If there are columns you don’t wish to use, you can simply uncheck them in the Available External Columns box. Now click on the Error Output page (shown in Figure 10) to view the actions that the SSIS package will take if it encounters errors.

Figure 10: The Error Output page of the OLE DB Source Editor
By default, if there is an error or truncation, the component will
fail. You can override the default behavior, but explaining how to do
that is beyond the scope of this article. You’ll learn about error
handling in future articles. Now return to the Connection Manager page and click the Preview button to view a sample dataset in the Preview Query Results window, shown in Figure 11. Previewing the data ensures that what is being returned is what you are expecting.

Figure 11: Previewing a sample dataset
After you’ve configured the OLE DB Source component, click OK. Adding a Derived Column Transformation
The next step in configuring our data flow is to add a transformation component. In this case, we’ll add the Derived Column transformation to create a column that calculates the annual pay increase for each employee record we retrieve through the OLE DB source.To add the component, expand the Data Flow Transformations category in the Toolbox window, and drag the Derived Column transformation (shown in Figure 12) to the Data Flow tab design surface.

Figure 12: The Derived Column transformation as its listed in the Toolbox
Drag the green data path from the OLE DB source to the Derived Column
transformation to associate the two components, as shown in Figure 13.
(If you don’t connect the two components, they won’t be linked and, as a
result, you won’t be able to edit the transformation.) 
Figure 13: Using the data path to connect the two components
The next step is to configure the Derived Column component. Double-click the component to open the Derived Column Transformation Editor, as shown in Figure 14. 
Figure 14: Configuring the Derived Column transformation
This editor is made up of three regions, which I’ve labeled 1, 2 and 3: - Objects you can use as a starting point. For example you can either select columns from your data flow or select a variable. (We will be working with variables in a future article.)
- Functions and operators you can use in your derived column expression. For example, you can use a mathematical function to calculate data returned from a column or use a date/time function to extract the year from a selected date.
- Workspace where you build one or more derived columns. Each row in the grid contains the details necessary to define a derived column.
To select the column, expand the Columns node, and drag the Rate column to the Expression column of the first row in the derived columns grid, as shown in Figure 15.

Figure 15: Adding a column to the Expression column of the derived column grid
When you add your column to the Expression column, SSIS prepopulates the other columns in that row of the grid, as shown in Figure 16. 
Figure 16: Prepopulated values in derived column grid
As you can see, SSIS has assigned our derived column the name Derived Column 1 and set the Derived Column value to <add as new column>. In addition, our [Rate] field now appears in the Expression column, and the currency[DT_CY] value has been assigned to the Data Type column. You can change the Derived Column Name value by simply typing a new name in the box. For this example, I’ve renamed the column NewPayRate.
For the Derived Column value, you can choose to add a new column to your data flow (which is the default value, <add as new column>) or to replace one of the existing columns in your data flow. In this instance, we’ll add a new column, but there may be times when overwriting a column is required.
The data type is automatically created by the system and can’t be changed at this stage.
Our next step is to refine our expression. Currently, because only the Rate column is included in the expression, the derived column will return the existing values in that column. However, we want to calculate a new pay rate. The first step, then, is to add an operator. To view the list of available operators, expand the list and scroll through them. Some of the operators are for string functions and some for math functions.
To increase the employee’s pay rate by 5%, we’ll use the following calculation:
[Rate] * 1.05
To do this in the Expression
box, either type the multiplication operator (*), or drag it from the
list of operators to our expression (just after the column name), and
then type 1.05, as shown in Figure 17. 
Figure 17: Defining an expression for our derived column
You will see that the Data Type has now changed to numeric [DT_NUMERIC]. Once you are happy with the expression, click on OK to complete the process. You will be returned to the Data Flow tab. From here, you can rename the Derived Column transformation to clearly show what it does. Again, there are two data paths to use to link to further transformations or to connect to destinations.
Adding an Excel Destination
Now we need to add a destination to our data flow to enable us to export our results into an Excel spreadsheet.To add the destination, expand the Data Flow Destinations category in the Toolbox, and drag the Excel destination to the SSIS Designer workspace, as shown in Figure 18.

Figure 18: Adding an Excel destination to your data flow
Now connect the green data path from the Derived Column transformation to the Excel destination to associate the two components, as shown in Figure 19. 
Figure 19: Connecting the data path from the transformation to the destination
As you can see, even though we have connected the PayRate transformation to the Excel destination,
we still have the reversed red X showing us that there is a connection
issue. This is because we have not yet selected the connection manager
or linked the data flow columns to those in the Excel destination. Next, right-click the Excel destination, and click Edit. This launches the Excel Destination Editor dialog box, shown in Figure 20. On the Connection Manager page, under OLE DB connection manager, click on the New button then under Excel File Path click on the Browse button and select the file you created in the previous article and click on OK, then under Name of the Excel Sheet select the appropriate sheet from the file.

Figure 20: Configuring the Excel destination component
At the bottom of the Connection Manager
page, you’ll notice a message that indicates we haven’t mapped the
source columns with the destination columns. To do this, go to the Mappings
page (shown in Figure 21) and ensure that the columns in the data flow
(the input columns) map correctly to the columns in the destination Excel file.
The package will make a best guess based on field names; however, for
this example, I have purposefully named my columns in the excel
spreadsheet differently from those in the source database so they
wouldn’t be matched automatically. 
Figure 21: The Mappings page of the Excel Destination Editor
To match the remaining columns, click the column name in the Input Column
grid at the bottom of the page, and select the correct column. As you
select the column, the list will be reduced so that only those columns
not linked are available. At the same time, the source and destination
columns in the top diagram will be connected by arrows, as shown in
Figure 22. 
Figure 22: Mapping the columns between the data flow and the destination
Once you’ve properly mapped the columns, click OK. The Data Flow tab should now look similar to the screenshot in Figure 23. 
Figure 23: The configured data flow in your SSIS package
Running an SSIS Package in BIDS
Now all we need to do is execute the package and see if it works. To do this, click the Execute button. It’s the green arrow on the toolbar, as shown in Figure 24.
Figure 24: Clicking the Execute button to run your SSIS package
As the package progresses through the data flow components, each one
will change color. The component will turn yellow while it is running,
then turn green or red on completion. If it turns green, it has run
successfully, and if it turns red, it has failed. Note, however, that if
a component runs too quickly, you won’t see it turn yellow. Instead, it
will go straight from white to green or red. The Data Flow tab also shows the number of rows that are processed along each step of the way. That number is displayed next to the data path. For our example package, 290 rows were processed between the Employees source and the PayRate transformation, and 290 rows were processed between the transformation and the Excel destination. Figure 25 shows the data flow after the three components ran successfully. Note that the number of processed rows are also displayed.

Figure 25: The data flow after if has completed running
You can also find details about the package’s execution on the Progress
tab (shown in Figure 26). The tab displays each step of the execution
process. If there is an error, a red exclamation mark is displayed next
to the step’s description. If there is a warning, a yellow exclamation
mark is displayed. We will go into resolving errors and how to find them
in a future article. 
Figure 26: The Progress tab in SSIS Designer
Now all that’s needed is to check the Excel file to ensure that the data was properly added. You should expect to see results similar to those in Figure 27. 
Figure 27: Reviewing the Excel file after package execution
Summary
In this article of the "SSIS Basics" series, I’ve shown you how to add the data flow to your SSIS package in order to retrieve data from a SQL Server database and load it into an Excel file. I’ve also shown you how to add a derived column that calculates the data to be inserted into the file. In addition, I’ve demonstrated how to run the package.In future articles, I plan to show you how to deploy the package so you can run it as part of a scheduled job or call in other ways. In addition, I’ll explain how to use variables in your package and pass them between tasks. I also aim to cover more control flow tasks and data flow components, including those that address conditional flow logic and for-each looping logic. There is much much more that can be done using SSIS, and I hope over the course of this series to cover as much information as possible.
Implementing Lookup Logic in SQL Server Integration Services
There might be times when developing a SQL Server Integration Services (SSIS) package that you want to perform a lookup in order to supplement or validate the data in your data flow. A lookup lets you access data related to your current dataset without having to create a special structure to support that access.
To facilitate the ability to perform lookups, SSIS includes the Lookup transformation, which provides the mechanism necessary to access and retrieve data from a secondary dataset. The transformation works by joining the primary dataset (the input data) to the secondary dataset (the referenced data). SSIS attempts to perform an equi-join based on one or more matching columns in the input and referenced datasets, just like you would join two tables in in a SQL Server database.
Because SSIS uses an equi-join, each row of the input dataset must match at least one row in the referenced dataset. The rows are considered matching if the values in the joined columns are equal. By default, if an input row cannot be joined to a referenced row, the Lookup transformation treats the row as an error. However, you can override the default behavior by configuring the transformation to instead redirect any rows without a match to a specific output. If an input row matches multiple rows in the referenced dataset, the transformation uses only the first row. The way in which the other rows are treated depends on how the transformation is configured.
The Lookup transformation lets you access a referenced dataset either through an OLE DB connection manager or through a Cache connection manager. The Cache connection manager accesses the dataset held in an in-memory cache store throughout the duration of the package execution. You can also persist the cache to a cache file (.caw) so it can be available to multiple packages or be deployed to several computers.
The best way to understand how the Lookup transformation works is to see it in action. In this article, we’ll work through an example that retrieves employee data from the AdventureWorks2008R2 sample database and loads it into two comma-delimited text files. The database is located on a local instance of SQL Server 2008 R2. The referenced dataset that will be used by the Lookup transformation is also based on data from that database, but stored in a cache file at the onset of the package execution.
The first step, then, in getting this example underway is to set up a new SSIS package in Business Intelligence Development Studio (BIDS), add two Data Flow tasks to the control flow, and connect the precedence constraint from the first Data Flow task to the second Data Flow task, as I’ve done in Figure 1.

Figure 1: Adding data flow components to your SSIS package
Notice that I’ve named the fist Data Flow task Load data into cache and the second one Load data into file. These names should make it clear what purpose each task serves. The Data Flow
tasks are also the only two control flow components we need to add to
our package. Everything else is at the data flow level. So let’s get
started. Writing Data to a Cache
Because we’re creating a lookup based on cached data, our initial step is to configure the first data flow to retrieve the data we need from the AdventureWorks2008R2 database and save it to a cache file. Figure 2 shows what the data flow should look like after the data flow has been configured to cache the data. As you can see, you need to include only an OLE DB source and a Cache transformation.
Figure 2: Configuring the data flow that loads data into a cache
Before I configured the OLE DB source, I created an OLE DB connection manager to connect to the AdventureWorks2008R2 database on my local instance of SQL Server. I named the connection manager AdventureWorks2008R2. I then configured the OLE DB source to connect to the AdventureWorks2008R2 connection manager and to use the following T-SQL statement to retrieve the data to be cached:
USE AdventureWorks2008R2;GOSELECT
BusinessEntityID,
NationalIDNumberFROM
HumanResources.EmployeeWHERE
BusinessEntityID < 250;
Notice that I’m retrieving a subset of data from the HumanResources.Employee table. The returned dataset includes two columns: BusinessEntityID and NationalIDNumber. We will use the BusinessEntityID column to match rows with the input dataset in order to return a NationalIDNumber value for each employee. Figure 3 shows what your OLE DB Source editor should look like after you’ve configured it with the connection manager and T-SQL statement. BusinessEntityID,
NationalIDNumberFROM
HumanResources.EmployeeWHERE
BusinessEntityID < 250;

Figure 3: Using an OLE DB source to retrieve data from the AdventureWorks2008R2 database
You can view a sample of the data that will be cached by clicking the Preview button in the OLE DB Source editor. This launches the Preview Query Results dialog box, shown in Figure 4, which will display up to 200 rows of your dataset. Notice that a NationalIDNumber value is associated with each BusinessEntityID value. The two values combined will provide the cached data necessary to create a lookup in your data flow. 
Figure 4: Previewing the data to be saved to a cache
After I configured the OLE DB source, I moved on to the Cache transformation. As part of the process of setting up the transformation, I first configured a Cache connection manager. To do so, I opened the Cache Transformation editor and clicked the New button next to the Cacheconnection manager drop-down list. This launched the Cache Connection Manager editor, shown in Figure 5. 
Figure 5: Adding a Cache connection manager to your SSIS package
I named the Cache connection manager NationalIdCache, provided a description, and selected the Use File Cache
checkbox so my cache would be saved to a file. This, of course, isn’t
necessary for a simple example like this, but having the ability to save
the cache to a file is an important feature of the SSIS lookup
operation, so that’s why I’ve decided to demonstrate it here. Next, I provided and path and file name for the .caw file, and then selected the Columns tab in the Cache Connection Manager editor, which is shown in Figure 6.

Figure 6: Configuring the column properties in your Cache connection manager
Because I created my Cache connection manager from within the Cache transformation, the column information was already configured on the Columns tab. However, I had to change the Index Position value for the BusinessEntityID column from 0 to 1.
This column is an index column, which means it must be assigned a
positive integer. If there are more than one index columns, those
integers should be sequential, with the column having the most unique
values being the lowest. In this case, there is only one index column,
so I need only assign one value. The NationalIDNumber is a non-index column and as such should be configured with an Index Position value of 0, the default value. When a Cache connection manager is used in conjunction with a Lookup transformation, as we’ll be doing later in this example, the index column (or columns) is the one that is mapped to the corresponding column in the input dataset. Only index columns in the referenced dataset can be mapped to columns in the input dataset.
After I set up the Cache connection manager, I configured the Cache transformation. First, I confirmed that the Cache connection manager I just created is the one specified in the Cache connection manager drop-down list on the Connection Manager page of the Cache Transformation editor, as shown in Figure 7.

Figure 7: Setting up the Cache transformation in your data flow
Next, I confirmed the column mappings on the Mappings page of the Cache Transformation
editor. Given that I hadn’t changed any column names along with way,
these mappings should have been done automatically and appear as they do
in Figure 8. 
Figure 8: Mapping columns in the Cache transformation
That’s all there is to configuring the first data flow to cache the
referenced data. I confirmed that everything was running properly by
executing only this data flow and then confirming that the .caw file had
been created in its designated folder. We can now move on to the second
data flow. Performing Lookups from Cached Data
The second data flow is the one in which we perform the actual lookup. We will once again retrieve employee data from the AdventureWorks2008R2 database, look up the national ID for each employee (and adding it to the data flow), and save the data to one of two files: the first for employees who have an associated national ID and the second file for those who don’t. Figure 9 shows you what your data flow should look like once you’ve added all the components.
Figure 9: Configuring the data flow to load data into text files
The first step I took in setting up this data flow was to add an OLE DB source and configure it to connect to the AdventureWorks2008R2 database via to the AdventureWorks2008R2
connection manager. I then specified that the source component run the
following T-SQL statement in order to retrieve the necessary employee
data:
SELECT
BusinessEntityID,
FirstName,
LastName,
JobTitleFROM
HumanResources.vEmployee;
The data returned by this statement represents the input dataset that
will be used for our lookup operation. Notice that the dataset includes
the BusinessEntityID column, which will be used to map this dataset to the referenced dataset. Figure 10 shows you what the Connection Manager page of the OLE DB Source editor should look like after you’ve configured that connection manager and query. BusinessEntityID,
FirstName,
LastName,
JobTitleFROM
HumanResources.vEmployee;

Figure 10: Configuring an OLE DB source to retrieve employee data
As you did with the OLE DB source in the first data flow, you can preview the data returned by the SELECT statement by clicking the Preview button. Your results should look similar to those shown in Figure 11. 
Figure 11: Previewing the employee data returned by the OLE DB source
My next step was to add a Lookup
transformation to the data flow. The transformation will attempt to
match the input data to the referenced data saved to cache. When you
configure the transformation you can choose the cache mode and
connection type. You have three options for configuring the cache mode: - Full cache: The referenced dataset is generated and loaded into cache before the Lookup transformation is executed.
- Partial cache: The referenced dataset is generated when the Lookup transformation is executed, and the dataset is loaded into cache.
- No cache: The referenced dataset is generated when the Lookup transformation is executed, but no data is loaded into cache.

Figure 12: Configuring the General page of the Lookup Transformation editor
Notice that the editor also includes the Connection type section, which supports two options: Cache Connection Manager and OLE DB Connection Manager. In this case, I selected the Cache Connection Manager
option because I will be retrieving data from a cache file, and this
connection manager type is required to access the data in that file. As you can see in Figure 12, you can also choose an option from the drop-down list Specify how to handle rows with no matching entries. This option determines how rows in the input dataset are treated if there are no matching rows in the referenced database. By default, the unmatched rows are treated as errors. However, I selected the Redirect rows to no match output option so I could better control the unmatched rows, as you’ll see in a bit.
After I configured the General page of the Lookup Transformation editor, I moved on to the Connection page and ensured that the Cache connection manager named NationalIdCache was selected in the Cache Connection Manager drop-down list. This is the same connection manager I used in the first data flow to save the dataset to a cache file. Figure 13 shows the Connection page of the Lookup Transformation editor with the specified Cache connection manager.

Figure 13: Configuring the Connection page of the Lookup Transformation editor
Next, I configured the Columns page of the Lookup Transformation editor, shown in Figure 14. I first mapped the BusinessEntityID input column to the BusinessEntityID
lookup column by dragging the input column to the lookup column. This
process created the black arrow between the tables that you see in the
figure. As a result, the BusinessEntityID columns will be the ones used to form the join between the input and referenced datasets. 
Figure 14: Configuring the Columns page of the Lookup Transformation editor
Next, I selected the checkbox next to the NationalIDNumber
column in the lookup table to indicate that this was the column that
contained the lookup values I wanted to add to the data flow. I then
ensured that the lookup operation defined near the bottom of the Columns page indicated that a new column would be added as a result of the lookup operation. The Columns page of your Lookup Transformation editor should end up looking similar to Figure 14. My next step was to add a Flat File destination to the data flow. When I connected the data path from the Lookup transformation to the Flat File destination, the Input Output Selection dialog box appeared, as shown in Figure 15. The dialog box let’s you chose which data flow output to send to the flat file—the matched rows or the unmatched rows. In this case, I went with the default, Lookup Match Output, which refers to the matched rows.

Figure 15: Selecting an output for the Lookup transformation
Next, I opened the Flat File Destination editor and clicked the New button next to the Flat File Connection Manager drop-down list. This launched the Flat File Connection Manager editor, shown in Figure 16. I typed the name MatchingRows in the Connection manager name text box, typed the file name C:\DataFiles\MatchingRows.txt in the File name text box, and left all other setting with their default values. 
Figure 16: Setting up a Flat File connection manager
After I saved my connection manager settings, I was returned to the Connection Manager page of the Flat File Destination editor. The MatchingRows connection manager was now displayed in the Flat File Connection Manager drop-down list, as shown in Figure 17. 
Figure 17: Configuring a Flat File destination in your data flow
I then selected the Mappings
page (shown in Figure 18) to verify that the columns were properly
mapped between the data flow and the file destination. One thing you’ll
notice at this point is that the data flow now includes the NationalIDNumber column, which was added to the data flow by the Lookup transformation. 
Figure 18: Verifying column mappings in your Flat File destination
The next step I took in configuring the data flow was to add a second Flat File destination and connect the second data path from the Lookup transformation to the new destination. I then configured a second connection manager with the name NonMatchingRows and the file name C:\DataFiles\NonMatchingRows.txt.
All rows in the input data that do not match rows in the referenced
data will be directed to this file. Refer back to Figure 9 to see what
your data flow should look like at this point. Running Your SSIS Package
The final step, of course, is to run the SSIS package in BIDS. When I ran the package, I watched the second data flow so I could monitor how many rows matched the lookup dataset and how many did not. Figure 19 shows the data flow right after I ran the package.
Figure 19: Running your SSIS package
In this case, 249 rows in the input dataset matched rows in the
referenced dataset, and 41 rows did not. These are the numbers I would
have expected based on my source data. I also confirmed that both text
files had been created and that they contained the expected data. As you can see, the Lookup transformation makes it relatively easy to access referenced data in order to supplement the data flow. For this example, I retrieved my referenced data from the same database as I retrieved the input data. However, that referenced data could have come from any source whose data could be saved to cache, or it could have come directly from another database through an OLE DB connection. Once you understand the principles behind the Lookup transformation, you can apply them to your particular situation in order to create an effective lookup operation
Adding the Script Task to Your SSIS Packages:
One of the most effective ways to extend your SQL Server Integration Services (SSIS) control flow is to use a Script task to write custom code that perform tasks you cannot perform with the built-in components. For example, you can use the Script task to access Active Directory information or to create package-specific performance counters. You can also use the Script task to combine functions that might normally require multiple tasks and data flow components.
In this article, I demonstrate how to implement a Script
task into the control flow of a basic SSIS package. The purpose of the
package is to retrieve data from a comma-separated values (CSV) file,
insert the data into a SQL Server table (though no data is actually
loaded), and then delete the file. The package includes a Script
task that will first determine if the file has been updated since the
last data load and, if so, whether the file currently contains data. You
can download the SSIS package file, along with the two data files (one
with data, and one without) from the speech-bubble at the head of the
article. You'll have to rename the data file that you use to
PersonData.CSV.
NOTE: The Script task is different from the Script component. The Script
component can be used as a source, transformation, or destination to
enhance the data flow, but it cannot be used in the control flow, just
like the Script task is not available to the data flow. However, many of the basic concepts I cover in this article apply to the Script component.
Setting Up Your SSIS Package
Before adding the Script task to your SSIS package, you should add and configure any components that are necessary to support the task, such as variables, connections managers, and other tasks. For the example in this article, however, I created a CSV file named PersonData.csv before adding any components to the package. To make it simpler for you to create the file, I’m including the bcp command I used to generate the file on my system:
bcp "SELECT TOP 100 * FROM
AdventureWorks2008R2.Person.Person ORDER BY BusinessEntityID" queryout
C:\DataFiles\PersonData.csv -c -t, -S localhost\SqlSrv2008R2 –T
bcp "SELECT * FROM
AdventureWorks2008R2.Person.Person WHERE BusinessEntityID = 123456789"
queryout C:\DataFiles\PersonData.csv -c -t, -S localhost\SqlSrv2008R2 –T
NOTE: I tested the SSIS package against
both files. However, because the files share the same name, I had to
create them one at a time, deleting the original, as necessary, after I
ran the SSIS package.
- IsEmpty: A Boolean variable with a package-level scope. The variable will be used by the Script task to specify whether the source CSV file contains data. I’ve set the initial value to False, but the Script task will set the final value, so you can set the initial value to either True or False.
- LastUpdate: A DateTime variable with a package-level scope. I’ve set the value as an arbitrary date that precedes the date that I created the CSV files. In theory, the LastUpdate variable stores the timestamp of the last time the package ran and updated the database. In reality, this date would probably come from a table or some other system that logged the updates. For this article, however, it serves our purposes to set a hard-coded date.
NOTE: This article assumes that you
know how to run bcp commands as well as add and configure SSIS
components, such as variables, connection managers, and tasks. If you’re
not familiar how to use bcp or work with these components, you should
first review the relevant topics in SQL Server Books Online or in
another source.
Adding the Script Task to Your Package
After you add the Script task to your SSIS package, you can configure it by opening the Script Task Editor. On the editor’s General page, you should provide a name and description for the task. (I named the task Check file status.) Next, go to the editor’s Script page to configure the script-related properties, as shown in Figure 1.
Figure 1: Script page of the Script Task Editor
The first property that you need to set is ScriptLanguage.
You can create your scripts in one of two languages: Visual Basic 2008
or Visual C# 2008. I used C# for the script that I created.The next property on the Script page is EntryPoint. This is the method (specific to the selected script language) that the SSIS runtime calls as the entry point into your code. The Main method, in most cases, should work fine. However, if you choose another method, it must be in the ScriptMain class of the Visual Studio for Applications (VSTA) project.
The next two properties on the Script page are ReadOnlyVariables and ReadWriteVariables. As the names imply, you enter the name of any SSIS variables you want to use in your script. (Separate the names with commas for multiple variables of either type.) For instance, I added the LastUpdate variable to the ReadOnlyVariables property and the IsEmpty variable to the ReadWriteVariables property. As a result, my C# script will be able to retrieve the date from the LastUpdate variable and set the file status in the IsEmpty variable.
That’s all there is to configuring the Script task properties in preparation for creating the script itself, so once you’ve configured the properties, click the Edit Script button on the editor’s Script page to open the VSTA integrated development environment (IDE) window, shown in Figure 2. All script modifications are made in the VSTA development environment.

Figure 2: Default C# code in the VSTA IDE window
As Figure 2 shows, when you first open the VSTA window, you’ll see
the default C# script, which includes the language necessary to work
with the Main method of the ScriptMain class. Because Figure 2 shows
only part of the script, I’m included the entire default code here for
your convenience:
/*
Microsoft SQL Server Integration Services Script Task
Write scripts using Microsoft Visual C# 2008.
The ScriptMain is the entry point class of the script.
*/
using System;
using System.Data;
using Microsoft.SqlServer.Dts.Runtime;
using System.Windows.Forms;
namespace ST_96fb03801a81438dbb2752f91e76b1d5.csproj
{
[System.AddIn.AddIn("ScriptMain", Version = "1.0", Publisher = "", Description = "")]
public partial class ScriptMain : Microsoft.SqlServer.Dts.Tasks.ScriptTask.VSTARTScriptObjectModelBase
{
#region VSTA generated code
enum ScriptResults
{
Success = Microsoft.SqlServer.Dts.Runtime.DTSExecResult.Success,
Failure = Microsoft.SqlServer.Dts.Runtime.DTSExecResult.Failure
};
#endregion
/*
The execution engine calls this method when the task executes.
To access the object model, use the Dts property. Connections, variables, events,
and logging features are available as members of the Dts property as shown in the following examples.
To reference a variable, call Dts.Variables["MyCaseSensitiveVariableName"].Value;
To post a log entry, call Dts.Log("This is my log text", 999, null);
To fire an event, call Dts.Events.FireInformation(99, "test", "hit the help message", "", 0, true);
To use the connections collection use something like the following:
ConnectionManager cm = Dts.Connections.Add("OLEDB");
cm.ConnectionString = "Data Source=localhost;Initial Catalog=AdventureWorks;Provider=SQLNCLI10;Integrated Security=SSPI;Auto Translate=False;";
Before returning from this method, set the value of Dts.TaskResult to indicate success or failure.
To open Help, press F1.
*/
public void Main()
{
// TODO: Add your code here
Dts.TaskResult = (int)ScriptResults.Success;
}
}
}
For the most part, you need to be concerned only with adding code to
the Main method, specifically, to the section that is marked with the
comment // TODO: Add your code here.
(Comments are either preceded by double slashes for a single line or
enclosed slashes and asterisks—/* and */—for multiple lines.) Usually,
the only exception to where you enter code is at the beginning of the
script, where you include the necessary using statements to define the relevant namespaces. For instance, the script includes the using System;
statement so we can access classes in the System namespace, like those
that reference components such as events, interfaces, and data types.Microsoft SQL Server Integration Services Script Task
Write scripts using Microsoft Visual C# 2008.
The ScriptMain is the entry point class of the script.
*/
using System;
using System.Data;
using Microsoft.SqlServer.Dts.Runtime;
using System.Windows.Forms;
namespace ST_96fb03801a81438dbb2752f91e76b1d5.csproj
{
[System.AddIn.AddIn("ScriptMain", Version = "1.0", Publisher = "", Description = "")]
public partial class ScriptMain : Microsoft.SqlServer.Dts.Tasks.ScriptTask.VSTARTScriptObjectModelBase
{
#region VSTA generated code
enum ScriptResults
{
Success = Microsoft.SqlServer.Dts.Runtime.DTSExecResult.Success,
Failure = Microsoft.SqlServer.Dts.Runtime.DTSExecResult.Failure
};
#endregion
/*
The execution engine calls this method when the task executes.
To access the object model, use the Dts property. Connections, variables, events,
and logging features are available as members of the Dts property as shown in the following examples.
To reference a variable, call Dts.Variables["MyCaseSensitiveVariableName"].Value;
To post a log entry, call Dts.Log("This is my log text", 999, null);
To fire an event, call Dts.Events.FireInformation(99, "test", "hit the help message", "", 0, true);
To use the connections collection use something like the following:
ConnectionManager cm = Dts.Connections.Add("OLEDB");
cm.ConnectionString = "Data Source=localhost;Initial Catalog=AdventureWorks;Provider=SQLNCLI10;Integrated Security=SSPI;Auto Translate=False;";
Before returning from this method, set the value of Dts.TaskResult to indicate success or failure.
To open Help, press F1.
*/
public void Main()
{
// TODO: Add your code here
Dts.TaskResult = (int)ScriptResults.Success;
}
}
}
NOTE: A full explanation of how to use the C# language within a Script task is beyond the scope of this article. For specifics about the language, refer to a more complete resource, such as MSDN.
Writing Your C# Script
The first step I often take when working the code in the Script task is to get rid of the comments. In this case, I removed the comments before the Main method. You can also delete the opening comments, but I left them in just to provide a few reminders about the environment in which we’re working. So let’s look at how I’ve modified the script, and then I’ll explain the changes I’ve made. The following code shows how I’ve updated the original script and expanded the Main method:
Microsoft SQL Server Integration Services Script Task
Write scripts using Microsoft Visual C# 2008.
The ScriptMain is the entry point class of the script.
*/
using System;
using System.Data;
using Microsoft.SqlServer.Dts.Runtime;
using System.Windows.Forms;
using System.IO; //added to support file access
namespace ST_5bd724e0deb3452e8646db6ec63913b0.csproj
{
[System.AddIn.AddIn("ScriptMain", Version = "1.0", Publisher = "", Description = "")]
public partial class ScriptMain : Microsoft.SqlServer.Dts.Tasks.ScriptTask.VSTARTScriptObjectModelBase
{
#region VSTA generated code
enum ScriptResults
{
Success = Microsoft.SqlServer.Dts.Runtime.DTSExecResult.Success,
Failure = Microsoft.SqlServer.Dts.Runtime.DTSExecResult.Failure
};
#endregion
public void Main()
{
// Define C# variable to reference SSIS user variable.
DateTime LastLoggedUpdate = (DateTime)(Dts.Variables["LastUpdate"].Value);
// Define variable for connection string.
string PersonDataConnection = (string)(Dts.Connections["PersonData"].AcquireConnection(null) as String);
// Create file object based on file connection.
FileInfo PersonDataFile = new FileInfo(PersonDataConnection);
// Retrieve properties from file object.
DateTime LastModified = PersonDataFile.LastWriteTime;
long PersonFileSize = PersonDataFile.Length;
// If the file was modified since the last logged update,
// set IsEmpty variable and set the task result to Success.
// Otherwise, fail the task.
if(LastModified > LastLoggedUpdate)
{
if(PersonFileSize > 0)
{
Dts.Variables["IsEmpty"].Value = false;
}
else
{
Dts.Variables["IsEmpty"].Value = true;
}
Dts.TaskResult = (int)ScriptResults.Success;
}
else
{
Dts.TaskResult = (int)ScriptResults.Failure;
}
}
}
}
Let’s start with the using statements at the beginning of the script. You might have noticed that I added the using System.IO;
statement. The System.IO namespace lets us access the language
components we need in order to retrieve information about the flat file.
I did not modify the script outside the Main method in any other way
(except for deleting comments), so now let’s look at that method.Write scripts using Microsoft Visual C# 2008.
The ScriptMain is the entry point class of the script.
*/
using System;
using System.Data;
using Microsoft.SqlServer.Dts.Runtime;
using System.Windows.Forms;
using System.IO; //added to support file access
namespace ST_5bd724e0deb3452e8646db6ec63913b0.csproj
{
[System.AddIn.AddIn("ScriptMain", Version = "1.0", Publisher = "", Description = "")]
public partial class ScriptMain : Microsoft.SqlServer.Dts.Tasks.ScriptTask.VSTARTScriptObjectModelBase
{
#region VSTA generated code
enum ScriptResults
{
Success = Microsoft.SqlServer.Dts.Runtime.DTSExecResult.Success,
Failure = Microsoft.SqlServer.Dts.Runtime.DTSExecResult.Failure
};
#endregion
public void Main()
{
// Define C# variable to reference SSIS user variable.
DateTime LastLoggedUpdate = (DateTime)(Dts.Variables["LastUpdate"].Value);
// Define variable for connection string.
string PersonDataConnection = (string)(Dts.Connections["PersonData"].AcquireConnection(null) as String);
// Create file object based on file connection.
FileInfo PersonDataFile = new FileInfo(PersonDataConnection);
// Retrieve properties from file object.
DateTime LastModified = PersonDataFile.LastWriteTime;
long PersonFileSize = PersonDataFile.Length;
// If the file was modified since the last logged update,
// set IsEmpty variable and set the task result to Success.
// Otherwise, fail the task.
if(LastModified > LastLoggedUpdate)
{
if(PersonFileSize > 0)
{
Dts.Variables["IsEmpty"].Value = false;
}
else
{
Dts.Variables["IsEmpty"].Value = true;
}
Dts.TaskResult = (int)ScriptResults.Success;
}
else
{
Dts.TaskResult = (int)ScriptResults.Failure;
}
}
}
}
The first item I added after the Main method declaration is a DateTime variable named LastLoggedUpdate:
// Define C# variable to reference SSIS user variable.
DateTime LastLoggedUpdate = (DateTime)(Dts.Variables["LastUpdate"].Value);
I’ve set the variable value to equal that of the SSIS LastUpdate variable that I defined on the package. To retrieve the value of the SSIS variable, I use the Dts object’s Variables property, which returns a Variable object. I then specify the name of the variable, enclosed in double-quotes and brackets, and tag on the Value property (available through the Variable object). This lets me retrieve the variable’s actual value. Note that I also cast the LastUpdate
value to the DateTime data type by preceding the Dts variable
construction by the name of the data type, just like I do when I declare
the LastLoggedUpdate variable. I can now reference the LastLoggedUpdate variable within the Main method, and it will return the data currently stored the LastUpdate SSIS variable.DateTime LastLoggedUpdate = (DateTime)(Dts.Variables["LastUpdate"].Value);
Next I declare a string variable named PersonDataConnection to hold the connection string I retrieve through the PersonData connection manager:
// Define variable for connection string.
string PersonDataConnection = (string)(Dts.Connections["PersonData"].AcquireConnection(null) as String);
Notice that my declaration once again begins with the data type,
followed by the name of the variable. I then set the variable’s value to
equal the connection string. I retrieve the connection string by using
the Dts object’s Connections property. This is followed by the name of the connection manager, enclosed in double-quotes and brackets, and then by the AcquireConnection
method. The method takes one argument—the handle to a transaction type.
In this case, we can specify NULL , which indicates that the container
supports transactions but is not going to participate. In other words,
you don’t need to worry about this. Just pass in NULL for this type of
connection. Notice also that I’m explicitly converting the connection
object to a string to pass into the PersonDataConnection variable.string PersonDataConnection = (string)(Dts.Connections["PersonData"].AcquireConnection(null) as String);
The next variable I declare is PersonDataFile, which is defined with type FileInfo:
// Create file object based on file connection.
FileInfo PersonDataFile = new FileInfo(PersonDataConnection);
In this case, the variable’s value is based on a new instance of the FileInfo class. Because the FileInfo constructor takes the PersonDataConnection variable as an argument, you can use the methods and properties available to the FileInfo class to access information about the PersonData.csv file. That means you can access those properties and methods through the PersonDataFile variable, which is what I do in the next two variable declarations:FileInfo PersonDataFile = new FileInfo(PersonDataConnection);
// Retrieve properties from file object.
DateTime LastModified = PersonDataFile.LastWriteTime;
long PersonFileSize = PersonDataFile.Length;
First, I declare a DateTime variable named LastModified and set its value to equal the value of the LastWriteTime property of the PersonDataFile
variable, which is a FileInfo object. This will provide me with a
timestamp of the last time the file was modified. I declare the second
variable with the long data type and name the variable PersonFileSize. I then set the variable value to equal that of the file object’s Length property.DateTime LastModified = PersonDataFile.LastWriteTime;
long PersonFileSize = PersonDataFile.Length;
After I’ve declared the necessary variables, I’m ready to implement the logic needed to check the status of the PersonData.csv file. In the next section of code, I include two if…else statements, one embedded in the other:
// If the file was modified since the last logged update,
// set IsEmpty variable and set the task result to Success.
// Otherwise, fail the task.
if(LastModified > LastLoggedUpdate)
{
if(PersonFileSize > 0)
{
Dts.Variables["IsEmpty"].Value = false;
}
else
{
Dts.Variables["IsEmpty"].Value = true;
}
Dts.TaskResult = (int)ScriptResults.Success;
}
else
{
Dts.TaskResult = (int)ScriptResults.Failure;
}
Let’s start by looking at the outer if…else
construction. Essentially, what this is saying is, “If the last modified
date is more recent that the last time data was loaded into the
database, run the script in the if section. Otherwise, skip to the end of the script and show the Script task as having failed.// set IsEmpty variable and set the task result to Success.
// Otherwise, fail the task.
if(LastModified > LastLoggedUpdate)
{
if(PersonFileSize > 0)
{
Dts.Variables["IsEmpty"].Value = false;
}
else
{
Dts.Variables["IsEmpty"].Value = true;
}
Dts.TaskResult = (int)ScriptResults.Success;
}
else
{
Dts.TaskResult = (int)ScriptResults.Failure;
}
The if statement begins by specifying the condition that determines whether to run the code in the if section or in the else section. If the condition evaluates to True—in this case, the LastModified date is more recent that the LastLoggedUpdate date—the code in the rest of the if section should run. If the condition does not evaluate to true, the code in the if section does not run and the code in the else section runs, which sets the Dts object’s TaskResult property to Failure. (The TaskResult property tells the runtime whether the task succeeded or failed.)
The embedded if…else construction checks whether the value in the PersonFileSize variable is greater than 0, in other words, whether the file contains any data. If the file does contain data, the code in the if section runs, otherwise the code in the else section runs. As a result, if the file contains data, the SSIS IsEmpty variable is set to false. If the file contains no data, the variable is set to true. Notice that after the embedded if…else construction, I’ve set the value of the TaskResult property to show that the task has successfully run.
That’s all there is to the script. Normally, you would also include code to handle exceptions, but what I’ve shown you here should provide you with an overview of the script’s basics elements. You can now close the VSTA window and then click OK to close the Script Task Editor. Be sure to save your changes.
Adding Other Tasks to Your Package
After I completed configuring the Script task and writing the C# script, I added a Data Flow task to the control flow. The data flow should, in theory, retrieve the data from the PersonData.csv file and insert it into a SQL Server database. However, for the purposes of this exercise, the Data Flow task serves only as a placeholder. It will still run like any other Data Flow task, but no data will actually be moved. Even so, you can still verify whether your control flow is set up correctly.Next, I connected a precedence constraint from the Script task to the Data Flow task. I then added a File System task to the control flow and configured it to delete the PersonData.csv file. Next I connected a precedence constraint from the Script task to the File System task and one from the Data Flow task to the File System task. I then configured the two precedence constraints connecting to the File System task with the Logical OR option, which means that only one constraint must evaluate to True for the task to run. (By default, all constraints connected to a task must evaluate to True for the task to run.) Figure 3 shows what the control flow looked like after I added all the components.

Figure 3: Adding a Data Flow task and File System task to the control flow
Notice how the precedence constraints connecting to the File System task are dotted lines. This indicates that the constraints have been configured with the Logical OR option. Also notice that an expression is associated with each of the precedence constraints leading out of the Script task (as indicated by the fx label). Both constraints are configured so that the tasks down the line will run only if the Script task runs successfully and the expression evaluates to True. I defined the following expression on the precedence constraint that connects to the Data Flow task:
@[User::IsEmpty] == false
This means that the IsEmpty variable must be set to
False in order for the expression to evaluate to True. The expression
defined on the precedence constraint that leads from the Script task to the File System task is as follows:
@[User::IsEmpty] == true
This means, of course, that the IsEmpty variable
must be set to True for the expression to evaluate to True. And that
about does it for setting up the SSIS package. The only other step I
took was to add a breakpoint to the Script task, which I’ll explain in the following section.Running Your SSIS Package
Before I ran the SSIS package, I added a breakpoint on the OnPostExecute event to the Script task. As a result, when I ran the package, it stopped running as it was about to complete the Script task. Figure 4 shows what the package looks like when it stopped running.
Figure 4: Using a breakpoint to view variable values
When the package stopped running, I added a watch (shown in the
bottom pane in Figure 4) on each of the two variables I created early
on. The watches show the variable values at the time the package reached
the breakpoint. Notice that the IsEmpty variable is set to False. Had the PersonData.csv file contained no data, the variable would have been set to True.Next, I resumed running the package until it executing all applicable tasks. As Figure 5 shows, every control flow task ran. That’s because the IsEmpty variable evaluated to False and the Data Flow task ran and then the File System task ran.

Figure 5: Running the SSIS package when IsEmpty is false.
If the IsEmpty variable had evaluated to True, the Data Flow
task would not have run, which is what happened when I added an empty
file to the C:\DataFiles folder. This time around, only the Script task and File System task ran, as shown in Figure 6.
And It Doesn’t End There
In the example above, the SSIS package performed in two different ways, depending on whether the file contained data. But there is a third scenario: the file was not updated since the last data load. If that happens, the Script task fails and the package stops running, which is what we’d expect given the way the script is written in the Script task. Another thing that the example doesn’t reflect is what would happen if the script threw an exception. Given that I’ve included no exception handling, I would again expect the task to fail. What this points to is that the example I’ve shown you here is only a simple script that contains relatively few elements. A script can be far more complex and take many more actions than what I’ve demonstrated here. However, you should now at least have enough information to get started creating your own scripts and using the Script task to extend your control flow so you can perform the tasks that need to be performed.
SSIS Event Handlers Basics
Since the release of SQL Server 2005, SQL Server
Integration Services (SSIS) has proven to be an effective tool for
managing extract, load, and transform (ETL) operations. However, most of
the material you find about developing SSIS packages focuses on the
control flow and data flow as they’re rendered in Business Intelligence
Development Studio (BIDS). But another important—and often
overlooked—feature in an SSIS package is the event handler.Event handlers let you run SSIS components on a per-executable, per-event basis. For example, suppose your package includes a Foreach Loop container. You can associate one or more SSIS components with each event generated by that container when it is executed. This includes such events as OnError, OnInformation, and OnPostExecute. The components you associate with the container’s events are separate from the regular control flow. Consequently, you can configure them specifically to the needs of the associated event handler. This will all become clearer as I demonstrate how to configure an event handler.
Note:
In SSIS, an executable is any component you add to the control flow,
plus the package itself. The components act as child executables to the
package. If you add a component to a container, the container is the
parent executable (but the child of the package executable), and the
component within the container is the child executable.
IF OBJECT_ID('People', 'U') IS NOT NULL
DROP TABLE dbo.People;
CREATE TABLE dbo.People
(
PersonID INT NOT NULL,
FirstName NVARCHAR(50) NOT NULL,
LastName NVARCHAR(50) NOT NULL,
CONSTRAINT PK_People PRIMARY KEY CLUSTERED (PersonID ASC)
);
IF OBJECT_ID('RunInfo', 'U') IS NOT NULL
DROP TABLE dbo.RunInfo;
CREATE TABLE dbo.RunInfo
(
RunID INT NOT NULL IDENTITY,
TaskID NVARCHAR(50) NOT NULL,
TaskName NVARCHAR(50) NOT NULL,
TaskTime DATETIME NOT NULL DEFAULT(GETDATE())
CONSTRAINT PK_RunInfo PRIMARY KEY CLUSTERED (RunID ASC)
);
After I added the two tables to the database, I
created the SSIS package. Figure 1 shows the control flow of the package
after I added the necessary components. As the figure indicates, the
control flow includes an Execute SQL task to truncate the People table and includes a Sequence container that contains two Data Flow tasks.DROP TABLE dbo.People;
CREATE TABLE dbo.People
(
PersonID INT NOT NULL,
FirstName NVARCHAR(50) NOT NULL,
LastName NVARCHAR(50) NOT NULL,
CONSTRAINT PK_People PRIMARY KEY CLUSTERED (PersonID ASC)
);
IF OBJECT_ID('RunInfo', 'U') IS NOT NULL
DROP TABLE dbo.RunInfo;
CREATE TABLE dbo.RunInfo
(
RunID INT NOT NULL IDENTITY,
TaskID NVARCHAR(50) NOT NULL,
TaskName NVARCHAR(50) NOT NULL,
TaskTime DATETIME NOT NULL DEFAULT(GETDATE())
CONSTRAINT PK_RunInfo PRIMARY KEY CLUSTERED (RunID ASC)
);

Figure 1: Configuring the control flow
Notice that Figure 1 also shows the AdventureWorks2008 connection manager, which is an OLE DB
connection manager that connects to the AdventureWorks2008 database on
the local instance of SQL Server 2008. I use this connection manager for
all my connections.Next I configured the two data flows. The Load Data 1 data flow, shown in Figure 2, uses an OLE DB source to retrieve data from the Person.Person table and a SQL Server destination to insert data into the People table.

Figure 2: Configuring the Load Data 1 data flow
When I configured the OLE DB source, I used the following SELECT statement to retrieve data from the Person.Person table:
SELECT
BusinessEntityID,
FirstName,
LastName
FROM
Person.Person
WHERE
BusinessEntityID < 10000;
Notice that I retrieve only those rows whose BusinessEntityID value is less that 10000. The Load Data 2 data flow is identical to Load Data 1, except that I used the following SELECT statement:BusinessEntityID,
FirstName,
LastName
FROM
Person.Person
WHERE
BusinessEntityID < 10000;
SELECT
BusinessEntityID,
FirstName,
LastName
FROM
Person.Person
WHERE
BusinessEntityID >= 10000;
As you can see, this time I’m retrieving only
those rows whose BusinessEntityID value is greater than or equal to
10000. I set up the two data flows in this way to better demonstrate the
relationship between executables and event handlers in the SSIS
package. You can download the completed package from
the speech-bubble at the head of this article, or you can simply create
the package yourself. If you’re uncertain how to create an SSIS package
or configure any of these components, be sure to check out SQL Server
Books Online. Once you’ve set up your package, you’re ready to add the
event handlers.BusinessEntityID,
FirstName,
LastName
FROM
Person.Person
WHERE
BusinessEntityID >= 10000;
Selecting an Executable and Event
You configure your event handlers on the Event Handlers tab of SSIS Designer. The tab, shown in Figure 3, provides access to the package’s executables and to the events associated with each executable. The tab also provides the design surface necessary to add components to an event handler, just as you would add components to the control flow.
Figure 3: Accessing the Event Handlers tab
When you first access the Event Handlers tab, the selected executable is the package itself, which in this case, I’ve named EventHandlersPkg. In addition, the selected event is OnError.
As a result, any components you would add to the design surface at this
point would be specific to this combination of this executable and
event pair. To view all the executables, click the down-arrow on the Executable text box and then expand the list of executables, as shown in Figure 4.
Figure 4: Viewing the package executables
Notice that the executables are listed hierarchically, with EventHandlersPkg at the top of the hierarchy and the Execute SQL task (Truncate People table) and the Sequence container (Load People data) at the second level of the hierarchy. At the third level, below the Sequence container, are the two Data Flow tasks (Load Data 1 and Load Data 2).
For each executable, a folder named Event Handlers is listed. Any event
handlers you configure for an executable are listed in that folder,
with the event handlers sorted by event.
Note: The sources, transformations, and destinations you add to a data flow are not executables. They are all part of the Data Flow executable, which is why these components are not included in the list of executables on the Event Handlers tab.

Figure 5: Viewing the package events
When working on the design surface of the Event Handlers
tab, you are always working with a specific executable-event pair. That
means, in order to configure an event handler, you must first select an
executable and then select the event. For example, if you refer to
Figure 6, you’ll see that I’ve selected the Truncate People table executable and then selected the OnError event. As a result, any components I add to this executable-event pair will run whenever the Truncate People table executable generates an OnError event.
Figure 6: Selecting an executable and event handler
Once you’ve selected your executable-event pair, you’re ready to add your components, so let’s take a look at how you do that.Configuring the Event Handler
If you refer back to Figure 6, you’ll notice that the design surface includes a link that instructs you to click it in order to create an event handler for that specific event and executable. You’ll be presented with this link for any executable-event pair for which an event handler has not been configured. You must click this link to create the event handler and add any components.
Note:
Once you click the link on the design surface for a specific
executable-event pair, an event handler is created, even if you don’t
add a component. To delete an event handler for a specific
executable-event pair, click the Delete button to the right of the Event handler text box.

Figure 7: Adding an Execute SQL task to an event handler
When you configure an event handler, you can use
any of the system or user variables available to the executable, so
let’s look at the variables available to the Load Data 1 executable. To view these variables, open the Variables pane in SSIS Designer by clicking Variables in the SSIS menu. Then, in the Variables pane, click Show System Variables to list all variables available to your event handler components, as shown in Figure 8.
Figure 8: Viewing the variables in the Variables pane
In this case, we want to use the SourceID and SourceName system variables to identify the components that are generating the OnPostExecute events, which is what we’ll log to the RunInfo table. We’ll be adding the variables in the Execute SQL task, so let’s look at how you configure that task. Figure 9 shows the General page of the Execute SQL Task editor. 
Figure 9: General tab of the Execute SQL Task Editor
Notice that I’ve specified the AdventureWorks2008 connection manager in the Connection property. Then, in the SQLStatement property, I added the following INSERT statement:
INSERT INTO RunInfo
(TaskID, Taskname)
VALUES (?, ?);
As you can see, I’ve included two question mark
placeholders in the VALUES clause. The placeholders allow you to insert
the values from the SourceID and SourceName
system variables into the RunInfo table. However, to do this, you must
also map the variables to the statement. Figure 10 shows the Parameter Mapping page of the Execute SQL Task editor, which includes a listing for each variable that will be used by the INSERT statement.(TaskID, Taskname)
VALUES (?, ?);

Figure 10: Parameter Mapping tab of the Execute SQL Task Editor
As Figure 10 indicates, both variables are input
variables configured with the NVARCHAR data type. In addition, the name
of the first variable (SourceID) is 0, and the name of the second variable (SourceName)
is 1. This follows the naming conventions necessary to pass parameter
values into the INSERT statement. That’s all there is to configuring the
Execute SQL task. And that’s also the only component I added to the Load Data 1 executable. However, I also configured the same event for the Load Data 2 executable and then added an Execute SQL task to the event handler, set up just like the task in Load Data 1. That means when the SSIS package runs, it will execute two event handlers, one for each data flow.Running the SSIS Package
Once you’ve configured your event handlers, you’re ready to run the SSIS package. Running a package that contains event handlers is no different from running any other type of package. The event handlers will be executed as long as the executable issues the event for which SSIS components have been configured. That means, in this case, as long as the Data Flow tasks run successfully, the OnPostExecute events will be issued and the Execute SQL tasks will run. The INSERT statements within those tasks will then add the variable information to the RunInfo table.After I ran the EventHandlersPkg package the first time, I queried the RunInfo table and received the following results:
RunID
|
TaskID
|
TaskName
|
TaskTime
|
1
|
{85B4ED54-D20D-4E90-B60C-E0151D7B1348}
|
Load Data 1
|
2011-04-17 19:25:13.370
|
2
|
{057C0C52-99B1-4B96-BDC8-923A6A85CCBE}
|
Load Data 2
|
2011-04-17 19:25:13.670
|
As you can see, the task ID and task names have been added to the table, and as expected, there is one row for each task. If you run the package multiple times, you will see additional rows.
Although the example I’ve demonstrated in this article is very basic, it does show you the power of event handlers to capture a variety of information under specific circumstances. And you can perform other actions as well. For example, in addition to being able to set up a system to audit your packages, you can take such steps as sending an email if an executable issues an OnError event. SSIS event handlers are flexible and provide many options for auditing and monitoring your SSIS packages. And given how easy they are to implement, it is well worth the time and effort to take full advantage of all that event handlers have to offer.
Executing SSIS Packages Part 1:
Executing all SSIS packages in a folder: three methods
A common requirement is to execute several SSIS packages as part of one logical process. This is especially true when one is transferring existing data from an external system.If the indivisual packages are placed in a folder and named in such a way that a batch can be executed via a wildcard filemask, then they can be altered without changing any code, and can be used for different processes by changing the filemask. This article presents three different methods of executing all packages in a folder:
- SSIS control package
- Stored procedure
- DOS batch file
The folder that contains the packages is d:\TestPackages\.
All the packages to be run have names of the format t1…….dtsx.
SSIS control package
For this we create a package that uses a for each loop task to call an execute package task for all packages in the folder.The first task is to create an SSIS package with a Foreach Loop container that will loop round the packages in the folder, setting a variable called "PackageToRun" to the file name for each package.
- Load Business Intelligence Development Studio and start a SSIS project.
- Create a new package.
- Add a Foreach Loop container to the package.
- Right-click on the Foreach Loop container and select Edit.
- Click on Collection.
- Set the Enumerator to Foreach File Enumerator.
- In the Enumerator configuration:
- Set Folder to "d:\TestPackages\"
- Set Files to "t1*.dtsx"
- Under Retrieve file name select Fully qualified.
- Click OK.

- Click on Variable Mappings.
- Click on the Variable drop-down list and select New Variable.
- Set Name to PackageToRun.
- Click OK.

Next, we need to add the Execute Package task to the Foreach Loop container so that this task will be executed for each package that we wish to run. We then set the variable value to be the name of the package to be executed by the ExecutePackage task.
- Drag an Execute Package task into the Foreach Loop container.
- Right-click on the Execute Package task and select Edit.
- Select Package.
- Set Location to File system

- Click on the Connection drop-down list and select <New connection…>.
- Set the File to an existing package.

- Click OK to save the connection.
- Click OK to complete the Execute Package task configuration.
- Right-click on the connection and select Properties.
- In the Properties window change the name to PackageToRunConnection.
- Select Expressions and add a new expression.
- In the property drop-down list select ConnectionString.
- Click on the Expression Editor button.
- From the Variables tree drag @[User::PackageToRun] into the Expression window.

- Click OK twice, to save the expression.

If you now run the package, it will execute each package in the folder with the correct filename mask.
Stored Procedure
This involves the following steps:- Retrieve a list of the package names to run from the folder
- Loop through each package name
- Execute each package
Create table #dir (Filename varchar(1000))
Insert #dir
Exec master..xp_cmdshell 'dir /B d:\TestPackages\ t1*.dtsx'
delete #dir where Filename is null or Filename like '%not found%'
The following is a useful technique for looping through values in a table and here we use it to loop through the filenames in #dir:Insert #dir
Exec master..xp_cmdshell 'dir /B d:\TestPackages\ t1*.dtsx'
delete #dir where Filename is null or Filename like '%not found%'
Declare @Filename varchar(1000)
Select @Filename = ''
While @Filename < (select max(Filename) from #dir)
Begin
Select @Filename = min(Filename) from #dir where Filename > @Filename
end
Now we just need to create the command to execute the package:Select @Filename = ''
While @Filename < (select max(Filename) from #dir)
Begin
Select @Filename = min(Filename) from #dir where Filename > @Filename
end
Declare @cmd varchar(1000)
select @cmd = 'dtexec /F " d:\TestPackages\' + @FileName + '''
exec master..xp_cmdshell @cmd
This takes the package name and uses the dtexec command to execute it. Putting this all together, we get:select @cmd = 'dtexec /F " d:\TestPackages\' + @FileName + '''
exec master..xp_cmdshell @cmd
Declare @Filename varchar(1000)
Declare @cmd varchar(1000)
Create table #dir (Filename varchar(1000))
Insert #dir
Exec master..xp_cmdshell 'dir /B d:\TestPackages\t1*.dtsx'
delete #dir where Filename is null or Filename like '%not found%'
Select @Filename = ''
While @Filename < (select max(Filename) from #dir)
Begin
Select @Filename = min(Filename) from #dir where Filename > @Filename
select @cmd = 'dtexec /F "d:\TestPackages\' + @Filename + '"'
exec master..xp_cmdshell @cmd
end
drop table #dir
Create procedure [dbo].[s_ProcessAllFilesInDir]
@FilePath varchar(1000) ,
@FileMaskvarchar(100) ,
@ProcSp varchar(128)
as
set nocount on
declare @File varchar(128) ,
@MaxFile varchar(128) ,
@cmd varchar(2000)
create table #Dir (s varchar(8000))
select @cmd = 'dir /B ' + @FilePath + @FileMask
insert #Dir exec master..xp_cmdshell @cmd
delete #Dir where s is null or s like '%not found%'
select @File = '', @MaxFile = max(s) from #Dir
while @File < @MaxFile
begin
select @File = min(s) from #Dir where s > @File
select @cmd = @ProcSp + ' ''' + @FilePath + ''' , ''' + @File + ''''
exec (@cmd)
end
drop table #Dir
go
Create procedure [dbo].[s_ExecutePackage]
@FilePath varchar(1000) ,
@Filename varchar(128)
as
Declare @cmd varchar(1000)
select @cmd = 'dtexec /F "' + @FilePath + @Filename + '"'
exec master..xp_cmdshell @cmd
go
Exec [dbo].[s_ProcessAllFilesInDir]
@FilePath = 'd:\TestPackages\' ,
@FileMask = 't1*.dtsx' ,
@ProcSp = '[dbo].[s_ExecutePackage]'
DOS batch file
The DOS command required is dtexec /F "d:\TestPackages\mypackagename" as above. We can make use of a DOS For loop to execute this command for all files in a folder:
for %1 in (d:\TestPackages\t1*.dtsx) do dtexec /F "%1"
This uses the for loop construct:- (d:\TestPackages\t1*.dtsx) returns a list of the files which meet the path (similar to a dir command).
- For %1 in (d:\TestPackages\t1*.dtsx) loops through the file list setting the variable %1 to the filename.
- Do dtexec /F % executes dtexec /F with each filename in turn.
Summary
We have introduced three different methods of executing all packages in a folder. The methods are of differing complexity, the SSIS control package being by far the most difficult to code, and the DOS command by far the simplest.There are a few things missing from the solutions presented which would (or should) prevent them from being used in a production system. At a minimum this should include logging and error handling. The start and end time of each package execution should be logged by the control process and also errors should be detected and logged.
At first sight, it may seem that the DOS command is the one that we should be using, but this method loses a lot of flexibility. There is much you can do with batch files, but not many people have skills in writing such code beyond very simple commands, so you can quickly end up with an un-maintainable system.
The stored procedure solution gives a lot of flexibility – it is easy to add logging and pre/post processing to the process. However, it does require an installation of SQL Server. Although this process would usually be run via SQL Server, it may sometimes need to be run on a client machine (or not involve SQL Server at all); this is quite difficult with a stored procedure as it is server based whereas the other two solutions are client applications.
The SSIS solution keeps the process within SSIS, so you can take advantage of the integration of package processing, e.g. inheritance of properties from the calling package, development and debugging of packages, within the development studio.
Overall, none of these solutions is very difficult to implement, so the decision which to use will probably depend on the experience of the developer, how much flexibility is required, and the environment in which it is to be run.
Executing SSIS Packages Part 2
SSIS packages can deployed to run within SQL Server (the msdb) database or as stand alone files which can be executed. The problem with the first approach is there is too much dependency on the DBA to install the packages into msdb and keep track of version control. By far the best approach is to execute the packages from files using the DTEXEC command. The downside is you will need a file depository area either on the SQL Server box or on an (application) server that SQL Server can access to load and run the packages. The upside is as a developer you can deploy and test new versions by just copying the new version of the package (*.dtsx) to the file repository which can take seconds rather than days waiting for the DBA to get off his bottom. The package will always run in SQL Server memory space (unless you have installed Integration Services as a separate instance independently – and if you have there will be a licensing issue).
I want to demonstrate to you the syntax to execute the package in code, (a stored procedure) and additionally pass parameters to a package variable. I also want to show you the code you will need to capture any errors from package failures.
Assumptions:-
- You need execute rights to master..xp_cmdshell
- SQL Server 2008 version
- You have read/write access to c:\ on server
Use AdventureWorks
CREATE Table dbo.Transactions
(TranNo int,
Quantity int,
Amt money)
INSERT INTO dbo.Transactions
Values
(1,5,30),
(2,7,55),
(3,10,75)
You will need to copy the attached package “ImportTransactions.dtsx” to the c:\ssis folder. This package has two variables Filename and ImportFolder.CREATE Table dbo.Transactions
(TranNo int,
Quantity int,
Amt money)
CREATE TABLE [dbo].[ErrorLog](
[id] [int] IDENTITY(1,1) NOT NULL,
[msg] [varchar](max) NULL,
[dte] [datetime] NULL,
[src] [varchar](50) NULL
) ON [PRIMARY]
INSERT INTO dbo.Transactions
Values
(1,5,30),
(2,7,55),
(3,10,75)
EXECUTE xp_cmdshell 'md c:\files'
--create folder on server for packages
EXECUTE xp_cmdshell 'md c:\ssis'
--export records from table into tab delimited text file
EXECUTE xp_cmdshell 'bcp databasename.dbo.Transactions out c:\files\Transactions_20101231.txt -c -t"\t" -S ServerName -T'
EXECUTE xp_cmdshell 'bcp databasename.dbo.Transactions out c:\files\Transactions_20101231.txt -c -t"\t" -S ServerName -T'
The expression for the ConnectionString for the “connection to flat file” is @[User::ImportFolder]+ @[User::Filename]

So if this package was to run it would try to import a file called “c:\files\Transactions_20091231.txt” (which doesn’t exist – the one we have created with bcp out is called “c:\files\Transactions_20101231.txt”).
We now need to create a stored procedure to run the package for any file or perhaps for a file dated the previous day as the default behaviour. We also want to capture any errors if the package fails for whatever reason. Here is the code.
CREATE PROCEDURE [dbo].[usp_ImportTransactions]
@DefaultDate DATE = NULL
AS
BEGIN TRY
--DECLARE @DefaultDate DATE
DECLARE @SSIS VARCHAR(8000)
-- create a table variable to record the package execution results
DECLARE @Output TABLE
(
ExecutionResults VARCHAR(MAX)
)
DECLARE @retVal INT
--set deault date to either date passed or yesterday
SELECT @DefaultDate = COALESCE(@DefaultDate,
DATEADD(dd, -1, GETDATE()))
-- build the DTEXEC command and also pass a value to the package variable
SELECT @SSIS = 'DTEXEC.exe /f "c:\SSIS\ImportTransactions.dtsx" /set \package.variables[User::Filename].Value;\"Transactions_'
+ CONVERT(VARCHAR(8), @DefaultDate, 112) + '.txt\"'
--------------import the file------------------------
-- USE "INSERT EXEC" to execute the package but also capture the execution results
INSERT @Output ( ExecutionResults )
EXEC @retVal = xp_cmdshell @SSIS
-- if the returned value is not zero then there has been an error
-- so we need to save the execution results
IF @retval <> 0
BEGIN
INSERT ErrorLog ( msg, dte, src )
SELECT ExecutionResults,
GETDATE(),
'ImportTransactions.dtsx'
FROM @Output
-- we then need to raise an error to alert some action
RAISERROR ( 'SSIS package %s failed -see ErrorLog table rc = %d',
16, - 1, 'ImportTransactions.dtsx', @retval )
RETURN
END
END TRY
BEGIN CATCH
--rethrow the error to the calling application
-- the code for this has been taken from books on-line (2008)
EXEC usp_RethrowError
END CATCH
GO
You can run the stored procedure to use the default date or for a specific date (usp_ImportTransactions ‘20101231’) and
maybe alter the text file and put in some text so that the package
fails on a data conversion error to see how the stored proc behaves.@DefaultDate DATE = NULL
AS
BEGIN TRY
--DECLARE @DefaultDate DATE
DECLARE @SSIS VARCHAR(8000)
-- create a table variable to record the package execution results
DECLARE @Output TABLE
(
ExecutionResults VARCHAR(MAX)
)
DECLARE @retVal INT
--set deault date to either date passed or yesterday
SELECT @DefaultDate = COALESCE(@DefaultDate,
DATEADD(dd, -1, GETDATE()))
-- build the DTEXEC command and also pass a value to the package variable
SELECT @SSIS = 'DTEXEC.exe /f "c:\SSIS\ImportTransactions.dtsx" /set \package.variables[User::Filename].Value;\"Transactions_'
+ CONVERT(VARCHAR(8), @DefaultDate, 112) + '.txt\"'
--------------import the file------------------------
-- USE "INSERT EXEC" to execute the package but also capture the execution results
INSERT @Output ( ExecutionResults )
EXEC @retVal = xp_cmdshell @SSIS
-- if the returned value is not zero then there has been an error
-- so we need to save the execution results
IF @retval <> 0
BEGIN
INSERT ErrorLog ( msg, dte, src )
SELECT ExecutionResults,
GETDATE(),
'ImportTransactions.dtsx'
FROM @Output
-- we then need to raise an error to alert some action
RAISERROR ( 'SSIS package %s failed -see ErrorLog table rc = %d',
16, - 1, 'ImportTransactions.dtsx', @retval )
RETURN
END
END TRY
BEGIN CATCH
--rethrow the error to the calling application
-- the code for this has been taken from books on-line (2008)
EXEC usp_RethrowError
END CATCH
GO
Conclusions:
The first thing to note is that unless we explicitly capture the output and raise an error (which the example stored proc does) from executing the package when it fails then a) you won’t be informed of the failure and b) you won’t know what caused the failure.To find out what happened after a failure occurred you can run.
SELECT *
FROM errorLog
WHERE src = 'ImportTransactions.dtsx'
ORDER BY id DESC
The second thing to note is the rather perverse syntax for passing values to the package variables.FROM errorLog
WHERE src = 'ImportTransactions.dtsx'
ORDER BY id DESC
If you wanted to pass values to more than one variable in the package then you just carry on adding /set parameters and the string would look something like this
'DTEXEC.exe /f "c:\SSIS\ImportTransactions.dtsx" /set \package.variables[User::Filename].Value;\"Transactions_20101123.txt\" /set \package.variables[User::ImportFolder].Value;\"c:\files\\\"'
Once again I would like to thank Nigel Rivett for showing me these
techniques and once you start using them I think you will find that
deploying and running packages is a lot easier.
The sample integration services package can be downloaded from the speechbubble at the top of the article.
Passing Variables to and from an SSIS task:
Passing Variables to and from an SSIS task
Like it? SSISht!
Like it or loath it, SSIS is here to stay. I suppose it’s nice and graphical, and it is also aesthetically pleasing when you finally get a screen full of green tasks – I tend to leave my screen displaying for a while when this happens, so that everyone can see it whilst I go and make a coffee. SSIS is much richer than DTS. Additionally you quite often see jobs for SSIS specialists; it would seem that companies are using it as their de-facto ETL tool, standing apart from SQL Server.SSIS is, by its very nature, frustrating to work with because it is a mish-mash of dissimilar development environments, and I don’t find that the syntax is always intuitive
There doesn’t seem to be a great deal of material on the web and it can be hard to find good examples to use as guidelines. So, in the spirit of building up a knowledge base, and hopefully persuading Tony to set up a dedicated section on Simple-Talk for SSIS, I have constructed an example to demonstrate passing variables into and out of an ‘Execute SQL Task and Script Task’.
Passing Variables to and from an ‘Execute SQL Task and Script Task’.
The two tasks do fundamentally the same thing, which is to try and date-stamp a file. The final variable value “FullPath” could then be easily used by a File System Task to copy/move or delete a file perhaps.I suppose most SQL Server developers would be more comfortable knocking up this fairly trivial code in SQL, but the difficulty is in passing and catching the input variables in the task. This example demonstrates the problem.
I have set up a package with three String variables called
- FileName, which has a data type of String and an initial value of “Import.txt”
- FolderName, which has a data type of String and an initial value of “c:\”
- FullPath, which has a data type of String and no initial value
The package is called, rather imaginatively, “Package3”. The scope of the variables is at the package level. One thing to note when you set up variables (choose SSIS-VARIABLES from the top menu) is to make sure you have clicked on the package and not a task when you create or add a variable. If you create a variable while being clicked on a task (therefore with task scope) then the variable will disappear from the list when you click up to the package. Sorry to be an old dog but I initially found this a bit confusing.
The simplest way to inspect your variables is to set a break-point on the task (right click on the task and choose EDIT BREAKPOINTS) for the OnPostExecute event of the task. This will then allow you to inspect the value of the variable after the task has completed its execution. The red dots on the tasks indicate that there are already breakpoints set up on the task.

Doing it the 'Execute SQL Task' way
In the ‘Execute SQL Task Editor’ in the ‘Parameter Mapping’ section, (double-click on the task and choose Parameter mapping), I have set it up so that the two variables i.e. User::FolderName and User::FileName are added to the dialogue box. Each has a Direction of “Input” which seems logical and a data type of VARCHAR. The parameter names that I have used are just the ordinal positions of 0 and 1, which is what the context help suggests. In other words, the value of User::FolderName is the first input parameter and User::FileName is the second input parameter. The parameter lengths are 50. In other words, we are dealing with a varchar(50) parameter. The initial default values for these, when you set them up, are -1 which tells me nothing I am afraid.

DECLARE @YesterdaysDate varchar(8)
DECLARE @Filename varchar(50)
DECLARE @Folder varchar(50)
DECLARE @Etc varchar(50)
SET @Folder = ?
SET @Filename = ?
--SET @Etc = ?
SELECT @YesterdaysDate = CONVERT(varchar(8),DATEADD(dd,-1,getdate()),112)
SELECT @Folder + SUBSTRING(@Filename,1,CHARINDEX('.txt',@Filename)-1) + '_' + @YesterdaysDate + '.txt' AS FullPathFromQuery
For such trivial code you would not want to set up a stored
procedure I suspect, so the option of passing parameters to a stored
procedure is not really there.DECLARE @Filename varchar(50)
DECLARE @Folder varchar(50)
DECLARE @Etc varchar(50)
SET @Folder = ?
SET @Filename = ?
--SET @Etc = ?
SELECT @YesterdaysDate = CONVERT(varchar(8),DATEADD(dd,-1,getdate()),112)
SELECT @Folder + SUBSTRING(@Filename,1,CHARINDEX('.txt',@Filename)-1) + '_' + @YesterdaysDate + '.txt' AS FullPathFromQuery
The only way to pick up these input variable values is to use question marks “?” in the order that they are passed. This query as it stands will clearly not parse in query analyser window so you can only really test your code by running it in the task: This is not ideal.
You must also set the ResultSet option to be “Single row”.


Using a Script Task instead
Perhaps a simpler way to do this is just to use the Script Task. The trivial code again demonstrates how to pick up and assign values to and from variables in the vb.net code. You need to tell the task which variables it is going to use by adding them to the ReadOnlyVariables and ReadWriteVariables options in the Script Task editor window and also be aware that the variables names are case-sensitive.
Imports System
Imports System.Data
Imports System.Math
Imports Microsoft.SqlServer.Dts.Runtime
Public Class ScriptMain
Public Sub Main()
Dim strFolder As String
Dim strFilename As String
Dim strTomorrow As String
Dim strNewFullPath As String
'do path in script
strFolder = Dts.Variables("FolderName").Value.ToString
strFilename = Dts.Variables("FileName").Value.ToString()
strTomorrow = CStr(Format(Today().AddDays(+1), "yyyyMMdd"))
'display new value of path
'MsgBox(strNewFullPath)
Dts.Variables("FullPath").Value = strNewFullPath
Dts.TaskResult = Dts.Results.Success
End Sub
End Class
If you put a breakpoint on the task the
value of the variable can be inspected to give tomorrows date, and it
should look like this…Imports System.Data
Imports System.Math
Imports Microsoft.SqlServer.Dts.Runtime
Public Class ScriptMain
Public Sub Main()
Dim strFolder As String
Dim strFilename As String
Dim strTomorrow As String
Dim strNewFullPath As String
'do path in script
strFolder = Dts.Variables("FolderName").Value.ToString
strFilename = Dts.Variables("FileName").Value.ToString()
strTomorrow = CStr(Format(Today().AddDays(+1), "yyyyMMdd"))
strNewFullPath = strFolder & strFilename.Substring(0, strFilename.IndexOf(".txt")) & "_" & strTomorrow & ".txt"
'display new value of path
'MsgBox(strNewFullPath)
Dts.Variables("FullPath").Value = strNewFullPath
Dts.TaskResult = Dts.Results.Success
End Sub
End Class

So which approach is best?
People tell me that using question marks was how it was in DTS, but I have to say I didn’t find setting up the Execute SQL Task particularly intuitive. The script task for me seems like the simplest solution of the two, surprisingly.So the example is not going to win a Nobel Peace Prize for complexity but it does demonstrate the awkwardness of SSIS in the real world. Hopefully the article will encourage readers to publish their experiences using the various tasks and we can build up a knowledge base of real world examples for everyone to reference on the simple-talk site. I have recently been wrestling with the XML task and data source which will be the subject of my next article.
SSIS Package Configuration in SQL Server 2008
Apart from different environments, sometimes, there are others changes. Sometimes the client may change the drive from C to D or D to E, or change the Database name. If you are using SMTP mail servers, you may have to change the server IP and authentication when the environment changes. So whenever the environment changes, you may have to change all the configuration settings associated with SSIS packages.
You can avoid all the headache of changing these settings by using package configuration.
Here are the steps to setup Package Configuration in SQL Server 2008.
1. Once the SSIS package is developed, Right Click on surface area and select Package Configurations...


5. Suppose we need to select database settings for OLEDB Connection Manager Local.MyDatabase which is the connection manager for the SQL Server database. Then you will need to select the properties you require to save as a package configuration from the following screen.

For connection manager, you can either select entire ConnectionString property or you can select ServerName, UserName, Password, and InitialCatalog to construct the connection string. I prefer latter one as it gives more options when there is a change.
6.
Click on Next button followed by Finish button to complete the wizard.
Now you can see config.DtsConfig file at the location you mentioned in
step 3. Below is snapshot of config file (I did some formatting for
better visulation)

I personally prefer using Package Variables in config file instead of connection managers because that gives me facility to use in hundreds of packages where Server and Database name are same. however, you need to map the variables in connection manager properties.
Using Analysis Services Execute DDL Task in SSIS
SQL Server Integration Services (SSIS) is a Business Intelligence tool
used to perform Extract, Transform & Load (ETL) operations. There
are few tasks available in SSIS control flow to create, drop, update,
and process CUBE objects. There are different types of Analysis Services
tasks available in SSIS. For example:
How to use Analysis Services Execute DDL Tasks
In this example, I will be using Analysis Services Execute DDL Task to create a database in Analysis Services. To begin, suppose you have "Sales" database in Analysis Services in Development environment and you want to create the same database in new environment (e.g. Test, Production). Below are the steps to achieve this goal:
Step 1: Connect to Analysis Services in development environment and generate XMLA script of "Sales: database. Save this file with Sales.xmla name to physical location e.g. D:\Test\Sales.xmla
Stpe 2: Create new SSIS package. Add new Analysis Services connection
manager. Give required Server name and leave Initial Catalog blank.
Click on Test Connection to make sure it is connected and finally click OK to close Connection Manager wizard.

Stpe 3: You can add a package variable "ServerName" to assign SSAS server name. Map this variable with ServerName in Expression of connection manager properties as shown below. Make sure this variable is configured in config file.

Step 4: Create new file connection manager for xmla file. This Connection Manager will be renamed with "Sales.xmla".

Step 5: Drag and Drop Analysis Services Execute DDL Task. Rename this with "Analysis Services Execute DDL Task - Create Sales Cube". Now Double click on the task to open Analysis Services Execute DDL task Editor. Set Connection as Name "localhost.SSAS", Source Type as "File Connection", and Source as "Sales.xmla". Click OK to complete.

Step 6: Save this package. Now you can move this package along with sales.xmla file and config file to any environment and execute. It will create Sales cube in that box. Make sure that the path for xmla file is same as development environment othewise you need to add the path in config file to make it independent of environment.
Note: Before executing this package, change the value of ServerName variable with current environment in config file. Click here to see how to create config file in SSIS.
SQL Server Management Studio (SSMS) provides Import and Export Wizards
which can be used to transfer data from one source to another. You can
choose from a variety of source and destination data source types,
select tables to copy or specify your own query to extract data, and
save this as an SSIS package. I guess the Import and Export Wizard is a good starting point for learning about SSIS packages so I will walk through the steps to run these wizards:
1. Export Wizard
Below are the steps to create SSIS Package using Export Wizard
 Step3: Click on Next to choose a destination. The Choose a Destination
dialog allows you to specify the destination data source for the data
you are exporting. For example we will export our data to Excel so we
will use this Excel spreadsheet as the destination. Fill in the dialog
as follows:
Step3: Click on Next to choose a destination. The Choose a Destination
dialog allows you to specify the destination data source for the data
you are exporting. For example we will export our data to Excel so we
will use this Excel spreadsheet as the destination. Fill in the dialog
as follows:
 Step4: Click Next to Specify Table Copy or Query dialog. The Specify Table Copy or Query
dialog allows you to choose whether to export data by selecting tables
and/or views from the data source or specifying a query to extract data.
Select Copy data from one or more tables or views option and click Next to proceed to the Select Source Tables and Views dialog.
Step4: Click Next to Specify Table Copy or Query dialog. The Specify Table Copy or Query
dialog allows you to choose whether to export data by selecting tables
and/or views from the data source or specifying a query to extract data.
Select Copy data from one or more tables or views option and click Next to proceed to the Select Source Tables and Views dialog.
Step5: The Select Source Tables and Views dialog allows you to select the tables and views that you want to export. For our demonstration we are going to select the DimGeography table as shown below:
 You can click the Preview… button to view the first 100 rows of the data in the data source.
You can click the Edit Mappings… button to review the column mappings from the data source to the data destination. You can click the option to drop and recreate the table in the destination data source; by default this option is unchecked.
You can click the Edit SQL… button to review and/or edit the SQL to create the table in the destination data source. Click OK twice to return to the Select Source Tables and Views dialog, then click Next to proceed to the Save and Execute Package dialog.
Step6: The Save and Execute Package dialog gives you options to perform the export operation and to create an SSIS package and save it to SQL Server or the file system as shown below:
 Step7: Click Next to proceed to the Save SSIS Package dialog. The Save SSIS Package
is invoked if you chose to save your export operation as an SSIS
package on the Save and Execute Package dialog. Fill in the dialog as
shown below:
Step7: Click Next to proceed to the Save SSIS Package dialog. The Save SSIS Package
is invoked if you chose to save your export operation as an SSIS
package on the Save and Execute Package dialog. Fill in the dialog as
shown below:
Step8: Click Next to the Complete the Wizard dialog. The Complete the Wizard
dialog shows a summary of the options that we have chosen for the
export operation. Now click Finish to execute the SSIS package. Once the
command is over, you will see the number of rows transferred from
Source to Destination.
 We are done! You can open the Excel spreadsheet and view the table that was exported. You can also view the package at location D:\SSIS.
- Analysis Services Execute DDL Task
- Analysis Services Processing Task
- Data Mining Query Tasks
This post will explain you how to use Analysis Services Execute DDL Task.
Analysis Services Execute DDL Task
SQL Server Analysis Services Execute DDL Task can be used to create, modify, and delete Analysis Services objects. The Analysis Services Execute DDL Task is similar to the Execute SQL Task,
the difference is that using the Analysis Services Execute DDL Task we
can issue DDL statements against an Analysis Services. The DDL
statements can be used to create cubes, dimensions, KPI’s, Calculation,
Cube Partitions Roles or any other OLAP objects. Analysis Services Execute DDL Task
The Analysis Services Processing Task can be used to process analysis services objects such as cubes, and dimensions.
In this example, I will be using Analysis Services Execute DDL Task to create a database in Analysis Services. To begin, suppose you have "Sales" database in Analysis Services in Development environment and you want to create the same database in new environment (e.g. Test, Production). Below are the steps to achieve this goal:
Step 1: Connect to Analysis Services in development environment and generate XMLA script of "Sales: database. Save this file with Sales.xmla name to physical location e.g. D:\Test\Sales.xmla

Stpe 3: You can add a package variable "ServerName" to assign SSAS server name. Map this variable with ServerName in Expression of connection manager properties as shown below. Make sure this variable is configured in config file.

Step 4: Create new file connection manager for xmla file. This Connection Manager will be renamed with "Sales.xmla".

Step 5: Drag and Drop Analysis Services Execute DDL Task. Rename this with "Analysis Services Execute DDL Task - Create Sales Cube". Now Double click on the task to open Analysis Services Execute DDL task Editor. Set Connection as Name "localhost.SSAS", Source Type as "File Connection", and Source as "Sales.xmla". Click OK to complete.

Step 6: Save this package. Now you can move this package along with sales.xmla file and config file to any environment and execute. It will create Sales cube in that box. Make sure that the path for xmla file is same as development environment othewise you need to add the path in config file to make it independent of environment.
Note: Before executing this package, change the value of ServerName variable with current environment in config file. Click here to see how to create config file in SSIS.
SSIS Part 2 - Creating SSIS packages using Import & Export wizards
1. Export Wizard
SSMS provides the Export Wizard
task which can be used to copy data from one data source to
another. Here I'll go through the Export Wizard to export data from a
SQL Server database to an Excel Sheet.
Note: I am taking example of AdventureWorksDW to explain. You can download the AdventureWorksDW sample database from the CodePlex.
Below are the steps to create SSIS Package using Export Wizard
Step1:
Launch SSMS and connect to the Database Engine. For demonstration
purposes I am using AdventureWorksDW database. Right click on the AdventureWorksDW database in the Object Explorer, select Tasks, and then Export Data… from the context menu to launch the Export Wizard. Click Next to advance past the Welcome dialog (if shown).
Step2: Choose a Data Source. The Choose a Data Source
dialog allows you to specify the source of your data. Since we are
running the Export wizard, the dialog will be displayed with the values
already filled in as shown below:


Step5: The Select Source Tables and Views dialog allows you to select the tables and views that you want to export. For our demonstration we are going to select the DimGeography table as shown below:

You can click the Edit Mappings… button to review the column mappings from the data source to the data destination. You can click the option to drop and recreate the table in the destination data source; by default this option is unchecked.
You can click the Edit SQL… button to review and/or edit the SQL to create the table in the destination data source. Click OK twice to return to the Select Source Tables and Views dialog, then click Next to proceed to the Save and Execute Package dialog.
Step6: The Save and Execute Package dialog gives you options to perform the export operation and to create an SSIS package and save it to SQL Server or the file system as shown below:


SSIS Part 3 - Creating new SSIS Package
In the sections, we will walk through the following steps:
- Create a new SSIS package and discuss some of the package properties
- Add Connection Managers for our data source and destination
- Add tasks to the package Control Flow
- Add tasks to the package Data Flow
- Execute the package in BIDS
To begin, launch BIDS by selecting SQL Server Business Intelligence Development Studio from the Microsoft SQL Server 2008 program group. Click File --> New --> Project on the top level menu to display the New Project dialog. Select Business Intelligence Projects as the project type, then Integration Services Project as the template; fill in the dialog as shown below:

After creating this new project and solution, you can navigate to the Sample folder in Windows Explorer and see the following:
 The
Sample folder holds solution file (SSIS-Sample1.sln) and contains the
SSIS-Sample1 folder which holds the Project. The Sample folder was
created as a result of clicking Create directory for solution.
The
Sample folder holds solution file (SSIS-Sample1.sln) and contains the
SSIS-Sample1 folder which holds the Project. The Sample folder was
created as a result of clicking Create directory for solution.
You will see the following in the Solution Explorer which is located in the top right corner of the window:

By default a new SSIS package is added when you create an Integration Services Project; you can right click on it and rename it.
To add a new SSIS package, right click on the SSIS Packages node under the SSIS-Sample1 project and select New SSIS Package from the popup menu. A new package Package1.dtsx will be created. Rename this with SalesForecastInput.

2. Connection Managers
This section is our second step in creating a simple SSIS package from scratch. SSIS packages typically interact with a variety of data sources. There is a Connection Managers area on the design surface where you can specify each data source that you will access.
In this section we will add two data sources to our package - one to access the AdventureWorksDW database and another to access our Excel spreadsheet.
To add the AdventureWorksDW connection manager, simply right click inside the Connection Managers area then choose New OLEDB Connection… from the popup menu. The Configure OLEDB Connection Manager wizard will be displayed; click the New button to display the Connection Manager dialog and fill it in as follows:

To add a connection manager for our Excel spreadsheet, right click inside the Connection Managers area then choose New Connection from the popup menu, then select EXCEL from the Add SSIS Connection Manager dialog. The Excel Connection Manager dialog will be displayed; enter a file name as shown below:

3. SSIS Control Flow
This is our third step in creating a simple SSIS package from scratch. Control Flow contains the various tasks that the package will perform.
Add Data Flow Task
For our current
package, we need a Data Flow task. Drag and drop the Data Flow Task from
the Toolbox onto the Control Flow designer.
This is our fourth step in creating a simple SSIS package from scratch. Data Flow designer contains the various tasks that will be performed by a Data Flow task specified in the Control Flow.
To begin, click on the Data Flow tab (or double click on Data Flow Task) in the designer and you should see the empty Data Flow designer.
For our current package we want to retrieve some data from the AdventureWorksDW database and output it to an Excel spreadsheet. To do this, we need an OLE DB Source and an Excel Destination. In addition, we need to add a column to the Data Flow; this column will be the numeric column in the spreadsheet where the user enters the forecast amount. Drag and drop an OLE DB Source, Derived Column, and Excel Destination from the Toolbox onto the Data Flow designer. After doing so the Data Flow designer should look like this:

SELECT
G.GeographyKey
,G.SalesTerritoryKey,G.City
,G.StateProvinceName AS [State]
,G.PostalCode
FROM dbo.DimGeography AS G (NOLOCK)
INNER JOIN dbo.DimSalesTerritory AS T (NOLOCK)
ON T.SalesTerritoryKey = G.SalesTerritoryKey
WHERE T.SalesTerritoryCountry = 'United States'ORDER BY G.StateProvinceName,G.City

Click on Columns to display the column mappings as shown below:


Right click the Excel Destination task and select Edit from the popup menu. The Excel Destination Editor dialog will be displayed. Click the New button next to the Name of the Excel Sheet to display the Create Table dialog. The Create Table dialog allows us to create a new table in the Excel spreadsheet. The columns and their types are determined by the data flow. We configured an OLE DB Source task that executes a query and a Derived Column task that added the Forecast column to the data flow. You can edit the CREATE TABLE script if you like. Click OK on the Create Table dialog and the Excel Destination Editor Connection Manager page will look like this:


At this point we have completed the Data Flow. Note that there are
no longer any red icons in the task rectangles. We will proceed to the
final step in this section of the tutorial and execute the package.
This is our fifth and final step in creating a simple SSIS package from scratch. Here we will execute the package within BIDS.
To begin, right click on the SSIS package SalesForecastInput.dtsx and select Execute Package from the popup menu.
Here is the Control Flow after the package has run successfully:


We can open the Excel spreadsheet that the package created and see the following (only a portion of the spreadsheet is shown):

SSIS Containers
SSIS Containers are controls (objects) that provide structure to SSIS packages. Containers support repeating control flows in packages and they group tasks and containers into meaningful units of work. Containers can include other containers in addition to tasks.
Types of SSIS Container
SSIS provides four types of containers. I'll explain these containers with example in my following Posts.
The following table lists the container types:
| Container Type | Container Description | Purpose of SSIS Container |
|---|---|---|
| Foreach Loop Container | This container runs a Control Flow repeatedly using an enumerator. | To repeat tasks for each element in a collection, for example retrieve files from a folder, running T-SQL statements that reside in multiple files, or running a command for multiple objects. |
| For Loop Container | This container runs a Control Flow repeatedly by checking conditional expression (same as For Loop in programming language). | To repeat tasks until a specified expression evaluates to false. For example, a package can send a different e-mail message seven times, one time for every day of the week. |
| Sequence Container | Groups tasks as well as containers into Control Flows that are subsets of the package Control Flow. | This container group tasks and containers that must succeed or fail as a unit. For example, a package can group tasks that delete and add rows in a database table, and then commit or roll back all the tasks when one fails. |
| Task Host Container | Provides services to a single task. | The task Host container encapsulates a single task. But this task is not configured separately in SSIS Designer. It is configured when you set the properties of the task it encapsulates. |
Containers are fundamental to the operation of transactions, checkpoints and event handlers. Each container has some common properties that affect the usage of these features. Understanding these properties and what they do helps a lot in the developing SSIS packages.
| Property | Description |
|---|---|
| DelayValidation | A Boolean value that indicates whether validation of the container is delayed until run time |
| Disable | A Boolean value that indicates whether the container runs |
| DisableEventHandlers | A Boolean value that indicates whether the event handlers associated with the container run |
| FailPackageOnFailure | A Boolean value that specifies whether the package fails if an error occurs in the container. |
| FailParentOnError | A Boolean value that specifies whether the parent container fails if an error occurs in the container. |
| IsolationLevel | The isolation level of the container transaction. The values are Unspecified, Chaos, ReadUncommitted, ReadCommitted, RepeatableRead, Serializable, and Snapshot. |
| MaximumErrorCount | The maximum number of errors that can occur before a container stops running. |
| TransactionOption | The transactional participation of the container. The values are NotSupported, Supported, Required. |
For Loop Container in SSIS
The For Loop Container uses the following elements to define the loop:
- An optional initialization expression that assigns values to the loop counters.
- An evaluation expression that contains the expression used to test whether the loop should stop or continue.
- An optional iteration expression that increments or decrements the loop counter.
1. To Begin, Open SSIS Project or create new Project through BIDS. Add a new package and rename it with ForLoopContainer.
2. Add two package variables - StartValue and EndValue, both of integer type.

3.
Drag and drop For Loop Container from toolbox and double click on it to
open For Loop Editor. Set InitExpression, EvalExpression, and
AssignExpression with @StartValue, @StartValue <= @EndValue and
@StartValue = @StartValue + 1 respectively as shown below:

4. Drag and drop Script Task inside For Loop Container and double click to open Script Task Editor.
Type User::StartValue in ReadOnlyVariables property of script Task editor. Now Click on Edit Script... button to write code
5. Write following code in Main() function to display a message box for current value of StartValue variable in loop iteration:
MessageBox.Show("StartValue = " + Dts.Variables["User::StartValue"].Value.ToString());
Main function will look like this:

6. Close script task editor and save changes. Now right click on Package in Solution Explorer and click Execute to execute the package.


Thats all. We can apply any logic inside For Loop Container as per business requirement.
Sequence Container in SSIS
There are some benefits of using a Sequence container which are mentioned below:
- Provides the facility of disabling groups of tasks to focus debugging on one subset of the package control flow.
- Managing multiple tasks in one location by setting properties on a Sequence Container instead of setting properties on the individual tasks.
- Provides scope for variables that a group of related tasks and containers use.
Using Sequence Containers lets you handle the control flow in more detail, without having to manage individual tasks and containers. For example, you can set the Disable property of the Sequence container to True to disable all the tasks and containers in the Sequence container.
If a package has many tasks then it is easier to group the tasks in Sequence Containers and you can collapse and expand Sequence Containers.
Note: You can also create task groups which collapse and expand using the Group boxthis is a design-time feature that has no properties or run-time behavior.
Now I'll explain you how to use sequence Container in a package.
1. To begin, right click on SSIS Packages folder in Solution Explorer and click New SSIS Package. Rename it with SequenceContainer.dtsx as shown below:

2. Add a package variable DayOfWeek

3. Drag and drop Script Task from toolbox. This task will be used to initialize DayOfWeek variable with current day of week. Rename Task name as Script Task - Set DayOfWeek.
4. Double click on Script Task to open Script Task Editor. Enter User::DayOfWeek in ReadOnlyVariables property.
5. Click on Edit Script... and write below code in Main() function of ScriptMain.cs:

I have just attached an image of code to avoid formatting problems of the code.
6. Drag and Drop 7 Sequence
Container tasks from Toolbox and rename the task on Week Days e.g. "SC -
Sunday", "SC - Monday" etc.
I
am not placing any controls flow items inside Sequence Container to
narrow down the example and focus more on how to use sequence container.
7. Connect all these Sequence Containers to Script Task. Now double click on green arrow to open Precedence Constraint Editor. Select Evaluation operator as Expression and Constraint and Expression as @DayOfWeek == "Sunday". Click OK to close and save changes. Tthe Expression for remaining task will be differ as per week day e.g. @DayOfWeek == "Monday" for Monday and so on.

8. Save the package. Now right click on the package in Solution Explorer and execute the package.

9. This package will execute only one sequence container as per expression set for the precedence constraints.

This is just an example of how we can use Sequence Container. But we can use this in many ways which depends on the requirement.
Foreach Loop Container in SSIS
I have already mentioned about Foreach Loop Enumerators in my previous article. Now I'll explain Foreach Loop Container using Foreach File enumerator. I'll move data of multiple excel sheets into a database table.
1. To begin, I have created three Excel Spreadsheets and store these sheets at location D:\SSIS\Hari\DataFiles.
These files have sample data for my example. Below is thesnapshot of file 2010-06-20.xlsx:

2. Open existing project or create new project using BIDS. I will use existing project Sample saved at location D:\SSIS\Hari\Sample (which I have used for other articles as well). Right click on SSIS Packages folder in Solution Explorer and click New SSIS Package. Rename it with ForeachLoopContainer.dtsx as shown below:

3. Drag and drop Foreach Loop Container from Toolbox. Add a package variable FileName of String type and assign default value D:\SSIS\Hari\DataFiles\2010-06-20.xlsx. I'll use this variable to store File Name of each iteration.
4. Drag and drop Data Flow Task inside Foreach Loop Container and rename it with DFT - Load Data From Excel.
5. Double click the Foreach Loop container to open Foreach Loop Editor to configure the Foreach Loop container. Click on Collection and provide the folder that contains the files to enumerate (in our example D:\SSIS\Hari\Sample), specify a filter for the file name and type *.xlsx and specify the fully qualified file name as retrieve file name as shown below:

6. Click on Variable Mappings and Select variable User::FileName from dropdown box. Corresponding Index for this variable will be 0. Click OK to proceed and save changes.
7. Add Excel Connection Manager to read data from Excel sheets:- Right click on Connection Managers area and select New Connection... and select EXCEL as type and click on Add button. Enter D:\SSIS\Hari\DataFiles\2010-06-20.xlsx in Excel File Path and make sure that checkbox First row has column names is checked. Click OK to proceed and save changes.

8. Config ConnectionString with FileName variable:- Click on Excel Connection Manager --> go to properties --> Click on Expression --> This will open Property Expression Editor. Select ExcelFilePath from Property dropdown box. Click on Expression and Drag and drop User::FileName from Variables. Click OK two times and save changes.

9. Add OLEDB connection manager to load data into database table: Right click on Connection Managers area and select New OLEDB Connection... This will open Configure OLE DB Connection Manager. Click on New button. Enter Server name and database name in respective boxes as shown below:

10. Double click on Data Flow Task to go to Data Flow tab. Drag and drop Excel Source from Data Flow Sources and double click on it to open Excel Source Editor. Select Excel Connection Manager in OLEDB connection manager and Sheet1$ in Name of the Excel sheet dropdown boxes.
11. Click on Columns in left side window. This will display all the External Columns available in excel and Output Columns. Click OK to process and save changes.
12. Drag and drop OLEDB Destination from Data Flow Destinations. Click on Excel Source to see green and red output lines. Connect green output line to OLEDB Destination. Now double click on OLEDB Destination to open OLE DB Destination Editor. Select local.Test as OLE DB connection manager. Click on New... button to create Destination table. It will open Create Table wizard. You can edit T-SQL statement as per your need. You can change the name of table if you wish. Click OK to proceed.

13. Click on Mappings to map source and destination columns. It will automatically map the columns by their matching names. However you can map the columns manually as well. Click OK to process and save changes.

14. We are done with package development. Finally package looks one as shown below:

Now its time to execute the package and check the result.
Go to package location D:\SSIS\Hari\Sample\SSIS-Sample1 --> Right Click on package ForeachLoopContainer.dtsx and click SQL Server 2008 Integration Services Package Execution Utility. This will open Package Execute Utility wizard.

Click on Execute button. A new wizard Package Execution Progress will open. You can see progress of package execution in this wizard.


Dynamic Database Connection using SSIS ForEach Loop Container
Many of my friends have asked about how to connect through multiple Databases from different Server using single Dynamic Connection. I want to explain this feature in this article. Basically, I want to execute one query (to calculate Record Counts for a given table) on a set of servers (which can be Dev, Test,UAT, PreProduction and Production servers). In my example, I am using ForEach Loop to connect to the servers one by one--> Execute the Query --> Fetch and store the data.
So here is the approach:
- Create a Table in your local database (whatever DB you want) and load all the connection strings. Within SSIS package, use Execute SQL Task to query all the connection strings and store the result-set in a variable of object type.
- Use ForEach Loop container to shred the content of the object variable and iterate through each of the connection strings.
- Place an Execute SQL task inside ForEach Loop container with the SQL statements you have to run in all the DB instances. You can use Script Task to modify your query as per your need.

Below is the details with an example:
STEP1:
To begin, Create two tables as shown below in on of the environment:
-- Table to store list of Sources
CREATE TABLE SourceList (
ID [smallint],
ServerName [varchar](128),
DatabaseName [varchar](128),
TableName [varchar](128),
ConnString [nvarchar](255)
)
GO
-- Local Table to store Results
CREATE TABLE Results(
TableName [varchar](128),
ConnString [nvarchar](255),
RecordCount[int],
ActionTime [datetime]
)
GO
STEP 2:
Insert all connection strings in SourceList table using below script:
INSERT INTO SourceList
SELECT 1 ID,
'(local)' ServerName, --Define required Server
'TestHN' DatabaseName,--Define DB Name
'TestTable' TableName,
'Data Source=(local);Initial Catalog=TestHN;Provider=SQLNCLI10.1;Integrated Security=SSPI;Auto Translate=False;' ConnString
Insert as many connections as you want.
STEP 3:
Add new package in your project and rename it with ForEachLoopMultipleServers.dtsx. Add following variable:

| Variable | Type | Value | Purpose |
|---|---|---|---|
| ConnString | String | Data Source=(local); Initial Catalog=TestHN; Provider=SQLNCLI10.1; Integrated Security=SSPI; Auto Translate=False; | To store default connection string |
| Query | String | SELECT '' TableName, N'' ConnString, 0 RecordCount, GETDATE() ActionTime | Default SQL Query string. This can be modified at runtime based on other variables |
| SourceList | Object | System.Object | To store the list of connection strings |
| SourceTable | String | Any Table Name. It can be blank. | To store the table name of current connection string. This table will be queried at run time |
STEP 4:
Create two connection managers as shown below:

Local.TestHN: For local database which has table SourceList. Also this will be used to store the result in Results table.
DynamicConnection: This connection will be used for setting up dynamic connection with multiple servers.
Now click on DynamicConnection in connection manager and click on ellipse to set up dynamic connection string. Map connection String with variable User::ConnString.
Drag and drop Execute SQL Task and rename with "Execute SQL Task - Get List of Connection Strings". Now click on properties and set following values as shown in snapshot:
Result Set: Full Result Set
Connection: Local.TestHN
ConnectionType: Direct Input
SQL Statement: SELECT ConnString,TableName FROM SourceList

Now click on Result Set to store the result of SQL Task in variable User::SourceList.

STEP 6:
Drag and drop ForEach Loop container from toolbox and rename with "Foreach Loop Container - DB Tables". Double click on ForEach Loop container to open Foreach Loop Editor. Click on Collection and select Foreach ADO Enumerator as Enumerator. In Enumerator configuration, select User::SourceList as ADO object source variable as shown below:

public void Main()
{
try
{
String Table = Dts.Variables["User::SourceTable"].Value.ToString();
String ConnString = Dts.Variables["User::ConnString"].Value.ToString();
MessageBox.Show("SourceTable = " + Table + "\nCurrentConnString = " + ConnString);
//SELECT '' TableName,N'' ConnString,0 RecordCount,GETDATE() ActionTime
string SQL = "SELECT '" + Table + "' AS TableName, N'" + ConnString + "' AS ConnString, COUNT (*) AS RecordCount, GETDATE() AS ActionTime FROM " + Dts.Variables["User::SourceTable"].Value.ToString() + " (NOLOCK)";
Dts.Variables["User::Query"].Value = SQL;
Dts.TaskResult = (int)ScriptResults.Success;
}
catch (Exception e)
{
Dts.Log(e.Message, 0, null);
}
}
STEP 8:
Drag and drop Data Flow Task and double click on it to open Data Flow tab. Add OLE DB Source and Destination. Double click on OLE DB Source to configure the properties. Select DynamicConnection as OLE DB connection manager and SQL command from variable as Data access mode. Select variable name as User::Query. Now click on columns to genertae meta data.
Double click on OLE DB Destination to configure the properties. Select Local.TestHN as OLE DB connection manager and Table or view - fast load as Data access mode. Select [dbo].[Results] as Name of the table or the view. now click on Mappings to map the columns from source. Click OK and save changes.
Finally DFT will look like below snapshot:

STEP 9: We are done with package development and its time to test the package.
Right click on the package in Solution Explorer and select execute. The message box will display you the current connection string.


You can check the data in results table:
Here is the result:
SELECT * FROM SourceList
SELECT * FROM Results
Send Mail Task in SSIS 2008:
By using the Send Mail task, a package can send messages if tasks in the package workflow succeed or fail, or send messages in response to an event that the package raises at run time. For example, the task can notify a database administrator about the success or failure of the Backup Database task.
You can configure the Send Mail task in the following ways:
- Write the message text for the e-mail.
- Write a subject line for the e-mail message.
- Set the priority level of the message. The task supports three priority levels: normal, low, and high.
- Specify the recipients on the To, Cc, and Bcc lines. If the task specifies multiple recipients, they are separated by semicolons.
STEP 1:
Create a new SSIS Package and rename it with SendMailTask.dtsx.
STEP 2:
Add two package variable MessageSource and SMTPServer of type string to this package as shown below:

STEP 3:
Add a new SMTP Connection manager and configure its properties. Enter SMTP Connection manager in Name and Connection for sending mails in Description boxes. Now enter your SMTPServerName in SMTP server box as shown below:
Set SmtpServer property of above connection manager with variable User::SMTPServer by clicking on Expression in properties of SMTP Connection Manager. This is highlighted in below snap shot:

STEP 4:
Drag and drop Script Task to set your message. Double click on Script Task to open Script Task Editor, Select User::MessageSource as ReadWriteVariables and click on Edit Script... button to set the message. Write below code in main function. (This is for VB.NET, you can choose C# or VB.NET)
Public Sub Main()
'Set MessageSource variable
Dts.Variables("User::MessageSource").Value = "Hi," & vbCrLf & _
"This is a test mail to check Send Mail Task in SSIS!" & vbCrLf & vbCrLf & _
"Thanks and Regards," & vbCrLf & "_____________" & vbCrLf & "Hari"
Dts.TaskResult = ScriptResults.Success
End Sub
However, the message text can be a string that you provide, a connection to a file that contains the text, or the name of a variable (in our case) that contains the text.
STEP 5:
Drag and drop Send Mail Task and double click on it to open Send Mail Task Editor. Select Mail from Left side and set mail properties as shown below:

Thats all. We are done with Send Mail Task setup, this package will look like below snapshot. Just right click on package in Solution Explorer and Execute. Receiver will get an email as soon as package executes successfully. However, mail delivery depends on the response of SMTP Server as well.

ExecutionValue and ExecValueVariable in SSIS
The ExecutionValue property can be defined on the object Task and all tasks have this property. Its up to the developer to do something useful with this. The purpose of this property is to return something useful and interesting about what it has performed along with standard success/failure result.
The best example perhaps is the Execute SQL Task which uses the ExecutionValue property to return the number of rows affected by the SQL statement(s). This could be a useful feature which you may often want to capture into a variable and using the result to do something else. We cann't read the value of a task property at runtime from SSIS but we can use ExecValueVariable to get it.
The ExecValueVariable property exposed through the task which lets us select a package variable. When the task sets the ExecutionValue, the actual value is copied into the variable we set on the ExecValueVariable property and a variable is something we can access and do something with. So if you are interested in ExecutionValue property then make sure you create a package variable and set the name as the ExecValueVariable.
Below are the steps to implement this:
STEP1:
Create a new package and add below variable.

Drad and drop Execute SQL Task and set the properties as per your requirement. I am using below query in SQLStatement to update Employee table:
UPDATE [TestHN].dbo.Employee
SET [Basic] = [Basic]*2
WHERE [Basic] < 5000
This query updates 4 records.

STEP3:
Set the ExecValueVariable with User::ExecutionValue variable as shown below:

Drag and drop Script Task to display the result of ExecValue variable. Now Execute the package.

Here is the list of few tasks that return something useful via the ExecutionValue and ExecValueVariable:
| Task | Description of ExecutionValue |
|---|---|
| Execute SQL Task | Returns the number of rows affected by the SQL statement(s). |
| File System Task | Returns the number of successful operations performed. |
| File Watcher Task | Returns the full path of the file found. |
| Transfer Jobs Task | Returns the number of jobs transferred |
| Transfer Error Messages Task | Returns the number of error messages transferred. |
| Transfer SQL Server Objects Task | Returns the number of objects transferred. |
Incremental Load in SSIS
Problem Description: Perform Incremental Load using
SSIS package. There is one Source table with ID (may be Primary Key),
CreatedDate and ModifiedDate along with other columns. The requirement
is to load the destination table with new records and update the
existing records (if any updated records are available).
Soultion:
You can use Lookup Transformation where you compare source and destination data based on some id/code and get the new and updated records, and then use Conditoional Split to select the new and updated rows before loading the table.
However, I don't recommend this approach, specially when destination table is very huge and volume of delta is very high.
You can do it in simple steps:
STEP1:
Create a new Package IncrementalLoad.dtsx and add following package variables:

STEP2:
Create Source, Destination, and staging tables using below code:
-- Source Table (create in source DB)
IF OBJECT_ID('dbo.TestSource','U') IS NOT NULL
DROP TABLE dbo.TestSource
GO
CREATE Table dbo.TestSource
(
[ID] [int] IDENTITY(1,1)
,[Code] [varchar](10)
,[Description] [varchar](100)
,[CreatedDate] [datetime] NOT NULL default GETDATE()
,[ModifiedDate] [datetime] NOT NULL default GETDATE()
)
GO
-- Destination Table (create in destination DB)
IF OBJECT_ID('dbo.TestDestination','U') IS NOT NULL
DROP TABLE dbo.TestDestination
GO
CREATE Table dbo.TestDestination
(
[ID] [int]
,[Code] [varchar](10)
,[Description] [varchar](100)
,[CreatedDate] [datetime] NOT NULL
,[ModifiedDate] [datetime] NOT NULL
)
GO
-- Staging Table (create in destination DB)
IF OBJECT_ID('dbo.TestDestinationSTG','U') IS NOT NULL
DROP TABLE dbo.TestDestinationSTG
GO
CREATE Table dbo.TestDestinationSTG
(
[ID] [int]
,[Code] [varchar](10)
,[Description] [varchar](100)
,[CreatedDate] [datetime] NOT NULL
,[ModifiedDate] [datetime] NOT NULL
)
GO
STEP3:
Create two OLE DB Connection Manager, one for Source Server and another for Destination Server.
 In the connection manager properties, set the expression ConnectionString with respective variables as shown below:

STEP4:
Drag and drop Execute SQL Task and name it -
Execute SQL Task - Get Max ID and Last ModifiedDate.
Double click on EST and set following properties:
ResultSet = Single row
Connection = Destination Server
SQLStatement =
SELECT
ISNULL(MAX(ID) ,0) MaxID,
ISNULL(MAX(ModifiedDate),'2000-01-01') MaxModifiedDate
FROM TestDestination (NOLOCK)
Drag and drop another Execute SQL Task to Truncate staging table. Rename the task - Execute SQL Task - Truncate staging Table and set following properties:
ResultSet = None
Connection = Destination Server
SQLStatement = Truncate Table dbo.TestDestinationStg
Drag and drop Data Flow Task and name it Data Flow Task - Pull New and Updated rows.
Double click on DFT or click on Data Flow tab.
Now drag and drop OLE DB Source and select Source Server in OLE DB connection manager, select SQL command in Data access mode, and write following T-SQL code in SQL command text:
SELECT [ID],[Code],[Description],
[CreatedDate],[ModifiedDate]
FROM TestSource
WHERE [ID] > ? OR [ModifiedDate] >= ?
Click on Columns to generate metadata and set Parameters for above query:

Now drag and drop OLE DB Destination task and select Destination Server in OLE DB Connection manager, Table or view - fast load in Data access mode, and dbo.TestDestinationSTG in Name of the table or view.
Now click on Mapping to map the metadat with source columns.
Drag and drop one more Execute SQL Task and rename it to Execute SQL Task - Insert and Updated new rows and set following properties:
ResultSet = None
Connection = Destination Server
SQLStatement =
-- INSERT New Records
INSERT INTO TestDestination
([ID],[Code],[Description],
[CreatedDate],[ModifiedDate])
SELECT
[ID],[Code],[Description],
[CreatedDate],[ModifiedDate]
FROM TestDestinationStg
WHERE ID > ?
--UPDATE modified records
UPDATE D
SET D.[ID] = S.[ID]
,D.[Code] = S.[Code]
,D.[Description] = S.[Description]
,D.[CreatedDate] = S.[CreatedDate]
,D.[ModifiedDate] = S.[ModifiedDate]
FROM TestDestination D
JOIN TestDestinationStg S
ON S.ID = D.ID
WHERE
S.ID <= ? AND
S.ModifiedDate > D.ModifiedDate
Click on Parameter Mapping and set the parameters as shown below:

Finally package will look like below snapshot:

STEP5:
We are done with package development. Its time to test the package. I will test this package in three steps:
1. Insert few dummy records in Source table while keeping Destination table empty.
--CASE 1: First Time Execution
INSERT INTO dbo.TestSource ([Code],[Description])
VALUES ('AAA','American Automobile Association')
WAITFOR DELAY '00:00:01.100' -- delay between two rows
INSERT INTO dbo.TestSource ([Code],[Description])
VALUES ('ABC','Associated Builders & Contractors')
WAITFOR DELAY '00:00:01.150'
INSERT INTO dbo.TestSource ([Code],[Description])
VALUES ('RR','Road Runner')
GO

Now execute the package and check the destination data. You can add Data viewers in Data Flow to see the result at run time as shown below:

2. Insert few more records in Source table to check whether new records are inserted into Destination table.
--CASE 2: Only New Records
INSERT INTO dbo.TestSource ([Code],[Description])
VALUES ('TSL','Trina Solar Limited')
WAITFOR DELAY '00:00:01' -- delay between two rows
INSERT INTO dbo.TestSource ([Code],[Description])
VALUES ('FSLR','First Solar, Inc.')
Now execute the package and check for new records:

3. Insert few more records and update few existing records in Source table and check whether both table are in sync.
--CASE 3 -- New & Updated Records
INSERT INTO dbo.TestSource ([Code],[Description])
VALUES ('LDK','LDK Solar Co., Ltd')
UPDATE dbo.TestSource
SET [Description] = 'Associated Builders and Contractors',
ModifiedDate = GETDATE()
WHERE [Code] = 'ABC'
Finaly check source and destination tables for match. Since I have both Source & Destination tables in one server, I can use EXCEPT command (for this example) which retunrs no records i.e. both the tables are in sync.

Problem/Scenario
Need to import Excel files to a SQL table. Everyday one file is created at specified location in the source system. We need to copy that file from Source System to Local system and then load to SQL Table.
Conditions:
1. Each file should be loaded only once. Everynight Job should be executed to load data into reporting Data mart.
2. Source system will maintain all the history files so files at souce should not be deleted.
3. If Job failed due to some reason (schema changes, server down, connection issues etc.), it should load all the files from last run date to current date in next successul run. For example, job didn't run last one week then whenever job runs next time successfully, it should load current file as well as all the files of last week which were missing.
4. All the source files will have the same structure (Schema)
5. Nomenclature - Each file will have name Transaction followed by current date in YYYY-MM-DD format. For example, if a file was created on 01-Aug-2010 then its name should be Transaction2010-08-01.
Solution
I will take advantage of the ForEach Loop Container. I'll create a new SSIS package to solve the above problem.
STEP 1:
Create following tables in your local database (destination database).
CREATE TABLE [TransactionHistory](
[TransactionID] [int] NOT NULL,
[ProductID] [int] NOT NULL,
[ReferenceOrderID] [int] NOT NULL,
[TransactionDate] [datetime] NOT NULL,
[TransactionType] [nchar](1) NOT NULL,
[Quantity] [int] NOT NULL,
[ActualCost] [money] NOT NULL,
CONSTRAINT [PK_TransactionHistory_TransactionID]
PRIMARY KEY CLUSTERED ([TransactionID] ASC)
) ON [PRIMARY]
GO
CREATE TABLE [ExcelFilesLog](
[FileName] [varchar](100),
[FileCreatedDate] [datetime],
[FileLoadDate] [datetime],
[RecordCount] [int],
) ON [PRIMARY]
GO
STEP 2: Create a new SSIS package and rename it to LoadDynamicExcelFiles.dtsx
STEP 3: Add following package variables:
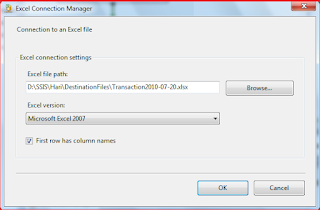

Destination Files: D:\SSIS\Hari\DestinationFiles


In Result Set tab, set Result Name 0 to variable User::LastRunDate.
Finally click OK and save changes.
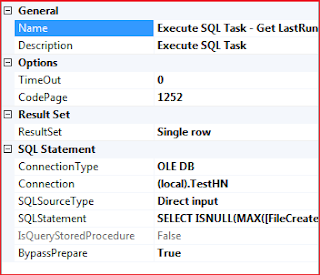
Drag and drop Script Task and double click to open Script Task Editor. Select User::DirectoryDestination, User::DirectorySource, User::LastRunDate in ReadOnlyVariables. Click on Edit Script... and paste below code:
using System.IO;
public void Main()
{
try
{
string DirectorySource = Dts.Variables["User::DirectorySource"].Value.ToString();
string DirectoryDestination = Dts.Variables["User::DirectoryDestination"].Value.ToString();
DateTime LastRunDate = (DateTime)Dts.Variables["User::LastRunDate"].Value;
string fileName,fileExtension;
string[] files = Directory.GetFiles(DirectorySource);
//Copy source files to destination
foreach (string f in files)
{
fileName = Path.GetFileName(f);
fileExtension = Path.GetExtension(f);
DateTime CurrentDate = DateTime.Parse(fileName.Substring("Transaction".Length, 10));
if ((DateTime.Compare(CurrentDate,LastRunDate)>0) && (fileExtension == ".xlsx"))
{
//MessageBox.Show(fileName.ToString());
File.Copy(f, Path.Combine(DirectoryDestination, fileName), true);
}
}
Dts.TaskResult = (int)ScriptResults.Success;
}
catch (Exception ex)
{
Dts.Log(ex.Message, 0, null);
Dts.TaskResult = (int)ScriptResults.Failure;
}
}


SET @DestinationPath = ?
SET @FilePath = ?
SET @FileName = REPLACE(@FilePath,@DestinationPath + '\','')
INSERT INTO [ExcelFilesLog]
(
[FileName]
,[FileCreatedDate]
,[FileLoadDate]
,[RecordCount]
)
SELECT
@FileName [FileName]
,CAST(SUBSTRING(@FileName,12,10) as datetime) [FileCreatedDate]
,GETDATE() [FileLoadDate]
,?

Below is the final layout of our package:


When I execute this package next time, it will load only new files. Yon can check ExcelFileLog for each iteration:
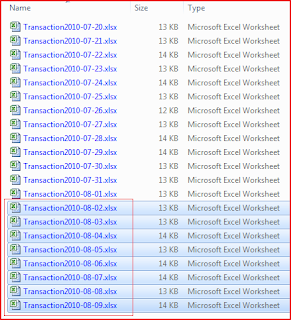
In this article I'm writting about Logging features in SQL Server Integration Services (SSIS).
I'hv been using SSIS since last 6-7 years and I have had to implement Logging Mechanism in almost all the projects to track/debug the execution of each and every task/event used in the package. Some of you may say its pretty easy to implement - still I guess we need to take care of logging because some of the things are not so easy.
Integration Services includes logging features that write log entries whenever run-time events occur but the good thing is that it can also write custom messages. Also SSIS supports a diverse set of log providers that can write log entries to: Text files, SQL Server Profiler, SQL Server, Windows Event Log, or XML files.
My favourite log is SQL Sevrer because using sql table I can write my own queries to find logging info related to specific task/event or any failure easily.
Basically SSIS logs are associated with packages and are configured at the package level. The task(s)/container(s) in a package can be enabled for logging even if the package itself is not e.g enable logging on an Execute SQL task without enabling logging on the parent package. Also package/container/task can write to multiple logs. You can enable logging on the package only, however you can choose to enable logging on any individual task/container.
You can select a level of logging as per your requirement by specifying the events to log and the information to log for each event, however some events provide more useful information than others.
I'll explain Logging using SQL Server 2012.
Note: SSIS 2005 uses table sysDtsLog90 for logging and SSIS 2008 & SSIS 2012 use sysSSISLog table for logging.
Below is the description of each element in the log schema:
The following table describes the predefined events that can be enabled to write log entries when run-time events occur:
Implementing Logging in SSIS 2012
To implement the SSIS logging, follow these steps:
Step1. Create a Connection Manager for logging database. Right click on Connection Managers area and click on New OLE DB Connections... as shown below:

Step2. In the "Configure OLE DB Connection Manager" click on Create button. Now select Server Name and database name from Connect a database. I am using (Local) server and Test database. Click on Test Connection button to verify the connection.

Finally click on OK button to save the connection manager. This will create a new connection manage with ServerName.DatabaseName name. In my example, it is (local).Test. You can rename it to appropriate and meaningful name. For instance cmLogging.
Step3. Right click anywhere on the package surface area in the Control Flow to open Configure SSIS Log: Package wizard. Check the Package folder checkbox (left side) to enable the logging. Under the "Providers and Log" tab, select "SSIS log provider for SQL Server" in Provider type and click on Add button t add this logging for the package. Finally, click on Configuration to select the logging connection manager. Select cmLogging as connection manager.

Step4. Select logging events.
To prevent log files from using large amounts of disk space, which could degrade performance, you can limit logging by selecting specific events and information items to log. For example, you can configure a log to capture only the date and the computer name along with error message. It is not a good idea to log all the events. Under "Details" tab, select required events for logging:

Step5. Click on Advance button to set advance properties of the logging events.

Finally click on the OK button to save logging configuration.
Step6. Now you can validate your logging information by executing the SSIS package. To get more information about hoe to execute SSIS package, click Different ways to Execute SSIS packages. My package looks like the picture shown below:
 You can see the log in sysSSISLog table after executing the package.
SELECT * FROM Test.dbo.sysssislog

You can use Lookup Transformation where you compare source and destination data based on some id/code and get the new and updated records, and then use Conditoional Split to select the new and updated rows before loading the table.
However, I don't recommend this approach, specially when destination table is very huge and volume of delta is very high.
You can do it in simple steps:
- Find the Maximum ID & Last ModifiedDate from destination and store in package variables.
- Pull the new and updated records from source and load to a staging table using above variables.
- Insert and Update the records using Execute SQL Task
STEP1:
Create a new Package IncrementalLoad.dtsx and add following package variables:

| VariableName | Description | Examle |
| DestinationConnStr | Connection string for destination server/db |
Data Source=(local); Initial Catalog=TestHN; Provider=SQLNCLI10.1; Integrated Security=SSPI; Auto Translate=False; |
| MaxID | Max ID from destination table |
100 |
| MaxModifiedDate | Max Date from destination table |
2010:11:10 11:50:20.003 |
| SourceConnStr | Connection string for source server/db |
Data Source=(local); Initial Catalog=TestHN; Provider=SQLNCLI10.1; Integrated Security=SSPI; Auto Translate=False; |
STEP2:
Create Source, Destination, and staging tables using below code:
-- Source Table (create in source DB)
IF OBJECT_ID('dbo.TestSource','U') IS NOT NULL
DROP TABLE dbo.TestSource
GO
CREATE Table dbo.TestSource
(
[ID] [int] IDENTITY(1,1)
,[Code] [varchar](10)
,[Description] [varchar](100)
,[CreatedDate] [datetime] NOT NULL default GETDATE()
,[ModifiedDate] [datetime] NOT NULL default GETDATE()
)
GO
-- Destination Table (create in destination DB)
IF OBJECT_ID('dbo.TestDestination','U') IS NOT NULL
DROP TABLE dbo.TestDestination
GO
CREATE Table dbo.TestDestination
(
[ID] [int]
,[Code] [varchar](10)
,[Description] [varchar](100)
,[CreatedDate] [datetime] NOT NULL
,[ModifiedDate] [datetime] NOT NULL
)
GO
-- Staging Table (create in destination DB)
IF OBJECT_ID('dbo.TestDestinationSTG','U') IS NOT NULL
DROP TABLE dbo.TestDestinationSTG
GO
CREATE Table dbo.TestDestinationSTG
(
[ID] [int]
,[Code] [varchar](10)
,[Description] [varchar](100)
,[CreatedDate] [datetime] NOT NULL
,[ModifiedDate] [datetime] NOT NULL
)
GO
STEP3:
Create two OLE DB Connection Manager, one for Source Server and another for Destination Server.

STEP4:
Drag and drop Execute SQL Task and name it -
Execute SQL Task - Get Max ID and Last ModifiedDate.
Double click on EST and set following properties:
ResultSet = Single row
Connection = Destination Server
SQLStatement =
SELECT
ISNULL(MAX(ID) ,0) MaxID,
ISNULL(MAX(ModifiedDate),'2000-01-01') MaxModifiedDate
FROM TestDestination (NOLOCK)
Drag and drop another Execute SQL Task to Truncate staging table. Rename the task - Execute SQL Task - Truncate staging Table and set following properties:
ResultSet = None
Connection = Destination Server
SQLStatement = Truncate Table dbo.TestDestinationStg
Drag and drop Data Flow Task and name it Data Flow Task - Pull New and Updated rows.
Double click on DFT or click on Data Flow tab.
Now drag and drop OLE DB Source and select Source Server in OLE DB connection manager, select SQL command in Data access mode, and write following T-SQL code in SQL command text:
SELECT [ID],[Code],[Description],
[CreatedDate],[ModifiedDate]
FROM TestSource
WHERE [ID] > ? OR [ModifiedDate] >= ?
Click on Columns to generate metadata and set Parameters for above query:

Now drag and drop OLE DB Destination task and select Destination Server in OLE DB Connection manager, Table or view - fast load in Data access mode, and dbo.TestDestinationSTG in Name of the table or view.
Now click on Mapping to map the metadat with source columns.
Drag and drop one more Execute SQL Task and rename it to Execute SQL Task - Insert and Updated new rows and set following properties:
ResultSet = None
Connection = Destination Server
SQLStatement =
-- INSERT New Records
INSERT INTO TestDestination
([ID],[Code],[Description],
[CreatedDate],[ModifiedDate])
SELECT
[ID],[Code],[Description],
[CreatedDate],[ModifiedDate]
FROM TestDestinationStg
WHERE ID > ?
--UPDATE modified records
UPDATE D
SET D.[ID] = S.[ID]
,D.[Code] = S.[Code]
,D.[Description] = S.[Description]
,D.[CreatedDate] = S.[CreatedDate]
,D.[ModifiedDate] = S.[ModifiedDate]
FROM TestDestination D
JOIN TestDestinationStg S
ON S.ID = D.ID
WHERE
S.ID <= ? AND
S.ModifiedDate > D.ModifiedDate
Click on Parameter Mapping and set the parameters as shown below:

Finally package will look like below snapshot:

STEP5:
We are done with package development. Its time to test the package. I will test this package in three steps:
1. Insert few dummy records in Source table while keeping Destination table empty.
--CASE 1: First Time Execution
INSERT INTO dbo.TestSource ([Code],[Description])
VALUES ('AAA','American Automobile Association')
WAITFOR DELAY '00:00:01.100' -- delay between two rows
INSERT INTO dbo.TestSource ([Code],[Description])
VALUES ('ABC','Associated Builders & Contractors')
WAITFOR DELAY '00:00:01.150'
INSERT INTO dbo.TestSource ([Code],[Description])
VALUES ('RR','Road Runner')
GO


2. Insert few more records in Source table to check whether new records are inserted into Destination table.
--CASE 2: Only New Records
INSERT INTO dbo.TestSource ([Code],[Description])
VALUES ('TSL','Trina Solar Limited')
WAITFOR DELAY '00:00:01' -- delay between two rows
INSERT INTO dbo.TestSource ([Code],[Description])
VALUES ('FSLR','First Solar, Inc.')
Now execute the package and check for new records:

3. Insert few more records and update few existing records in Source table and check whether both table are in sync.
--CASE 3 -- New & Updated Records
INSERT INTO dbo.TestSource ([Code],[Description])
VALUES ('LDK','LDK Solar Co., Ltd')
UPDATE dbo.TestSource
SET [Description] = 'Associated Builders and Contractors',
ModifiedDate = GETDATE()
WHERE [Code] = 'ABC'
Finaly check source and destination tables for match. Since I have both Source & Destination tables in one server, I can use EXCEPT command (for this example) which retunrs no records i.e. both the tables are in sync.

Dynamic SSIS Package to Import Excel files into SQL Server Database
Need to import Excel files to a SQL table. Everyday one file is created at specified location in the source system. We need to copy that file from Source System to Local system and then load to SQL Table.
Conditions:
1. Each file should be loaded only once. Everynight Job should be executed to load data into reporting Data mart.
2. Source system will maintain all the history files so files at souce should not be deleted.
3. If Job failed due to some reason (schema changes, server down, connection issues etc.), it should load all the files from last run date to current date in next successul run. For example, job didn't run last one week then whenever job runs next time successfully, it should load current file as well as all the files of last week which were missing.
4. All the source files will have the same structure (Schema)
5. Nomenclature - Each file will have name Transaction followed by current date in YYYY-MM-DD format. For example, if a file was created on 01-Aug-2010 then its name should be Transaction2010-08-01.
Solution
I will take advantage of the ForEach Loop Container. I'll create a new SSIS package to solve the above problem.
STEP 1:
Create following tables in your local database (destination database).
CREATE TABLE [TransactionHistory](
[TransactionID] [int] NOT NULL,
[ProductID] [int] NOT NULL,
[ReferenceOrderID] [int] NOT NULL,
[TransactionDate] [datetime] NOT NULL,
[TransactionType] [nchar](1) NOT NULL,
[Quantity] [int] NOT NULL,
[ActualCost] [money] NOT NULL,
CONSTRAINT [PK_TransactionHistory_TransactionID]
PRIMARY KEY CLUSTERED ([TransactionID] ASC)
) ON [PRIMARY]
GO
CREATE TABLE [ExcelFilesLog](
[FileName] [varchar](100),
[FileCreatedDate] [datetime],
[FileLoadDate] [datetime],
[RecordCount] [int],
) ON [PRIMARY]
GO
STEP 2: Create a new SSIS package and rename it to LoadDynamicExcelFiles.dtsx
STEP 3: Add following package variables:
| VariableName | Description | Examle |
| LastRunDate | To store last run date | 2010-07-30 |
| CurrentDate | To hold running date | 2010-08-10 |
| Directory Source | To store source directory path | D:\SSIS\Hari\SourceFiles |
| Directory Destination | To store local directory path | D:\SSIS\Hari\DestinationFiles |
| CurrentFile Name | To store current file name | D:\SSIS\Hari\SourceFiles\ Transaction2010-08-01 |
Create one OLE DB connection (I will use (local).TestHN connection manager) for local database where you want to load excel files data. Create one Excel Connection Manager for excel files located in D:\SSIS\Hari\DestinationFiles. At least one file should be there to create excel connection manager.

Click on Excel Connection Manager --> go to Properties window --> Select Expression and set ExcelFilePath with package variable User::CurrentFileName as shown below:

For this article, I'll use two directories - one for sources files and one for destination files. Location of these files are given below:
Source Files: D:\SSIS\Hari\SourceFilesDestination Files: D:\SSIS\Hari\DestinationFiles
I have created few excel files from Production.TransactionHistory table of AdventureWorks2008R2 database as shown below:

I
have created files from 2010-07-20 to 2010-08-01. After executing the
package first time, I will create files from 2010-08-02 to 2010-08-09 to
test the package.
STEP 4:
Drag and drop File System Task and double click to open File System Task Editor. Enter FST - Delete destination directory content in name and select Delete directory content as Operation. Set IsSourcePathVariable to True and select SourceVariable as User::DirectoryDestination. Finally click on OK and save changes.

Drag and drop Execute SQL Task and double click to open Execute SQL Task Editor.
Enter Execute SQL Task - Get LastRunDate in Name, select Single row as
Result Set, Conection Type as OLE DB and Connection as (local).TestHN
and SQLSourceType as Direct input. Enter below query in SQLStatement:
SELECT ISNULL(MAX([FileCreatedDate]),'2010-01-01') AS LastRunDate
FROM [dbo].[ExcelFilesLog] (NOLOCK)
FROM [dbo].[ExcelFilesLog] (NOLOCK)
In Result Set tab, set Result Name 0 to variable User::LastRunDate.
Finally click OK and save changes.

Drag and drop Script Task and double click to open Script Task Editor. Select User::DirectoryDestination, User::DirectorySource, User::LastRunDate in ReadOnlyVariables. Click on Edit Script... and paste below code:
using System.IO;
public void Main()
{
try
{
string DirectorySource = Dts.Variables["User::DirectorySource"].Value.ToString();
string DirectoryDestination = Dts.Variables["User::DirectoryDestination"].Value.ToString();
DateTime LastRunDate = (DateTime)Dts.Variables["User::LastRunDate"].Value;
string fileName,fileExtension;
string[] files = Directory.GetFiles(DirectorySource);
//Copy source files to destination
foreach (string f in files)
{
fileName = Path.GetFileName(f);
fileExtension = Path.GetExtension(f);
DateTime CurrentDate = DateTime.Parse(fileName.Substring("Transaction".Length, 10));
if ((DateTime.Compare(CurrentDate,LastRunDate)>0) && (fileExtension == ".xlsx"))
{
//MessageBox.Show(fileName.ToString());
File.Copy(f, Path.Combine(DirectoryDestination, fileName), true);
}
}
Dts.TaskResult = (int)ScriptResults.Success;
}
catch (Exception ex)
{
Dts.Log(ex.Message, 0, null);
Dts.TaskResult = (int)ScriptResults.Failure;
}
}
Drag and drop Foreach Loop container. Select Foreach File Enumerator as Enumerator, enter D:\SSIS\Hari\DestinationFiles in Folder path and *.xlsx in files textbox. Select Fully qualified as Retrieve file name. In Variable Mappings, Select User::CurrentFileName for Index 0 to store current file name for each iteration.

Now drag and drop Data Flow Task inside Foreach loop container. Use Excel Source reader to read excel files from destination directory. Use Excel Connection Manager as connection manager for excel files. In connection properties, Select @[User::CurrentFileName] as ExcelFilePath. Use Data Conversion, if required. Use Row Count Task to count number of rows in data flow and store it in User::RecordCount variable. Use OLE DB Destination to load data into SQL table.

Drag and drop Execute SQL Task inside Foreach loop container to log information about current file.
Double click on Execute SQL Task to open Execute SQL Task Editor, enter Execute SQL Task - Insert info into Log table as Name, None as Result Set, OLE DB as connection type, (local).TestHN as connection, Direct input as SQLSourceType and below query as SQLStatement.
DECLARE
@FileName varchar(500)
,@FilePath varchar(500)
,@DestinationPath varchar(500)
SET @DestinationPath = ?
SET @FilePath = ?
SET @FileName = REPLACE(@FilePath,@DestinationPath + '\','')
INSERT INTO [ExcelFilesLog]
(
[FileName]
,[FileCreatedDate]
,[FileLoadDate]
,[RecordCount]
)
SELECT
@FileName [FileName]
,CAST(SUBSTRING(@FileName,12,10) as datetime) [FileCreatedDate]
,GETDATE() [FileLoadDate]
,?
In Parameter mapping, map
User::DirectoryDestination, User::CurrentFileName, and User::RecordCount
with parameter 0,1,2 respectively as shown below.

Finally click OK and save changes.
Below is the final layout of our package:

STEP 6:
We are done with the package development. To execute the package, go to SSIS package location, (in this example, it is D:\SSIS\Hari\Sample\SSIS-Sample1), right click on LoadDynamicExcelFiles.dtsx --> Open with --> SQL Server 2008 Integration Services Package Execution Utility. This will open Execute Package Utility. Click on Execute button to run ssis package. Now you can see the progress of package execution in Package Execution Progress window.
We are done with the package development. To execute the package, go to SSIS package location, (in this example, it is D:\SSIS\Hari\Sample\SSIS-Sample1), right click on LoadDynamicExcelFiles.dtsx --> Open with --> SQL Server 2008 Integration Services Package Execution Utility. This will open Execute Package Utility. Click on Execute button to run ssis package. Now you can see the progress of package execution in Package Execution Progress window.

Now you can check ExcelFileLog table to cross check the result of package.

Now I'll add few more excel files in source location - from
Transaction2010-08-02 to Transaction2010-08-09 as shown below:

When I execute this package next time, it will load only new files. Yon can check ExcelFileLog for each iteration:

Different ways to Execute SSIS Packages
We have the following ways to execute SSIS packages:
DTExec Command Line Utility
SQL Server provides the command line tool DTExec.exe which can be used to execute an SSIS package. DTExec can be run from a Command Prompt or from a batch (.BAT) file.
To begin, open a Command Prompt and navigate to the project folder as shown below (I am taking an example of SalesForcastInput package from local directory "D:\SSIS\Hari\Sample\SSIS-Sample1\SalesForcastInput.dtsx"):

Now type the following command to execute the SalesForecastInput.dtsx package:
DTEXEC /FILE SalesForecastInput.dtsx
To see the complete list of command line options for DTEXEC, type following:
DTEXEC /?
It is not necessary to navigate command prompt to package directory before executing DTExec command; You can give the full path of your package as shown below:
DTExec /f "D:\SSIS\Hari\Sample\SSIS-Sample1\SalesForcastInput.dtsx" /conf "D:\SSIS\Hari\Sample\SSIS-Sample1\SalesForcastInput.dtsConfig" /M -1
Here, /f (/File) parameter used to load the package that is saved in the file system in your system. Likewise, /conf (/ConfigFile) parameter used to load the configuration file that is saved in the file system in your system. /M (/MaxConcurrent) specifies the number of executable files that the package can run concurrently.
Click here for more information about DTExec utility and it's parameters.
DTExecUI Windows Application
SQL Server includes the Windows application DTExecUI.exe which can be used to execute an SSIS package. DTExecUI provides a graphical user interface that can be used to specify the various options to be set when executing an SSIS package. You can launch DTEXECUI by double-clicking on an SSIS package file (.dtsx).
To begin, navigate to the your project folder. Double-click on the package (For instance, SalesForecastInput.dtsx in my example) and you will see the following multi-page dialog displayed:

As you can see there are many settings available when you use this utility. As a general rule you can simply click the Execute button to run your package. You can also fine tune your execution by clicking through the various screens and entering your own settings. After changing the settings click on Command Line which will show you the DTExec command line based on the settings you have chosen.
Note: If you have a configuration file which is not configured at package level, then do not forget to add the configuration file through Configurations setting.
Scheduling SSIS Package through SQL Server Agent
SQL Server Agent includes the SQL Server Integration Services Package job step type which allows you to execute an SSIS package in a SQL Server Agent job step. This can be especially handy as it allows you to schedule the execution of SSIS package so that it runs without any user interaction.
To begin, open SQL Server Management Studio (SSMS), connect to the Database Engine, and drill down to the SQL Server Agent node in the Object Explorer. Right click on the Jobs node and select New Job from the popup menu. Go to the Steps page, click New, and fill in the dialog as shown below:
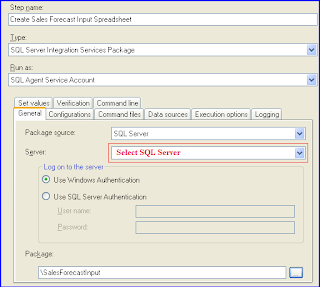
In the above example, the SSIS package to be executed is deployed to SQL Server (i.e. the MSDB database). You can also execute packages deployed to the file system or the SSIS package store. Note that the Run as setting is the SQL Agent Service Account. This is the default setting although from a security standpoint it may not be what you want. You can setup a Proxy that allows you to give a particular credential permission to execute an SSIS package from a SQL Server Agent job step.
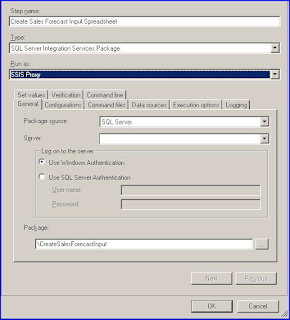
- DTExec Command Line Utility
- DTExecUI Windows Application
- SQL Server Agent
DTExec Command Line Utility
SQL Server provides the command line tool DTExec.exe which can be used to execute an SSIS package. DTExec can be run from a Command Prompt or from a batch (.BAT) file.
To begin, open a Command Prompt and navigate to the project folder as shown below (I am taking an example of SalesForcastInput package from local directory "D:\SSIS\Hari\Sample\SSIS-Sample1\SalesForcastInput.dtsx"):

Now type the following command to execute the SalesForecastInput.dtsx package:
DTEXEC /FILE SalesForecastInput.dtsx
To see the complete list of command line options for DTEXEC, type following:
DTEXEC /?
It is not necessary to navigate command prompt to package directory before executing DTExec command; You can give the full path of your package as shown below:
DTExec /f "D:\SSIS\Hari\Sample\SSIS-Sample1\SalesForcastInput.dtsx" /conf "D:\SSIS\Hari\Sample\SSIS-Sample1\SalesForcastInput.dtsConfig" /M -1
Here, /f (/File) parameter used to load the package that is saved in the file system in your system. Likewise, /conf (/ConfigFile) parameter used to load the configuration file that is saved in the file system in your system. /M (/MaxConcurrent) specifies the number of executable files that the package can run concurrently.
Click here for more information about DTExec utility and it's parameters.
DTExecUI Windows Application
SQL Server includes the Windows application DTExecUI.exe which can be used to execute an SSIS package. DTExecUI provides a graphical user interface that can be used to specify the various options to be set when executing an SSIS package. You can launch DTEXECUI by double-clicking on an SSIS package file (.dtsx).
To begin, navigate to the your project folder. Double-click on the package (For instance, SalesForecastInput.dtsx in my example) and you will see the following multi-page dialog displayed:

As you can see there are many settings available when you use this utility. As a general rule you can simply click the Execute button to run your package. You can also fine tune your execution by clicking through the various screens and entering your own settings. After changing the settings click on Command Line which will show you the DTExec command line based on the settings you have chosen.
Note: If you have a configuration file which is not configured at package level, then do not forget to add the configuration file through Configurations setting.
Scheduling SSIS Package through SQL Server Agent
SQL Server Agent includes the SQL Server Integration Services Package job step type which allows you to execute an SSIS package in a SQL Server Agent job step. This can be especially handy as it allows you to schedule the execution of SSIS package so that it runs without any user interaction.
To begin, open SQL Server Management Studio (SSMS), connect to the Database Engine, and drill down to the SQL Server Agent node in the Object Explorer. Right click on the Jobs node and select New Job from the popup menu. Go to the Steps page, click New, and fill in the dialog as shown below:

In the above example, the SSIS package to be executed is deployed to SQL Server (i.e. the MSDB database). You can also execute packages deployed to the file system or the SSIS package store. Note that the Run as setting is the SQL Agent Service Account. This is the default setting although from a security standpoint it may not be what you want. You can setup a Proxy that allows you to give a particular credential permission to execute an SSIS package from a SQL Server Agent job step.

SSIS Logging
I'hv been using SSIS since last 6-7 years and I have had to implement Logging Mechanism in almost all the projects to track/debug the execution of each and every task/event used in the package. Some of you may say its pretty easy to implement - still I guess we need to take care of logging because some of the things are not so easy.
Integration Services includes logging features that write log entries whenever run-time events occur but the good thing is that it can also write custom messages. Also SSIS supports a diverse set of log providers that can write log entries to: Text files, SQL Server Profiler, SQL Server, Windows Event Log, or XML files.
My favourite log is SQL Sevrer because using sql table I can write my own queries to find logging info related to specific task/event or any failure easily.
Basically SSIS logs are associated with packages and are configured at the package level. The task(s)/container(s) in a package can be enabled for logging even if the package itself is not e.g enable logging on an Execute SQL task without enabling logging on the parent package. Also package/container/task can write to multiple logs. You can enable logging on the package only, however you can choose to enable logging on any individual task/container.
You can select a level of logging as per your requirement by specifying the events to log and the information to log for each event, however some events provide more useful information than others.
I'll explain Logging using SQL Server 2012.
Note: SSIS 2005 uses table sysDtsLog90 for logging and SSIS 2008 & SSIS 2012 use sysSSISLog table for logging.
Below is the description of each element in the log schema:
| Element | Description |
|---|---|
| Computer | The name of the computer on which the log event occurred. |
| Operator | The identity of the user who executed the package. |
| Source | The name of the container or task in which the log event occurred. |
| SourceID | The unique identifier of the package; the For Loop, Foreach Loop, or Sequence container; or the task in which the log event occurred. |
| ExecutionID | The GUID of the package execution instance. |
| StartTime | The time at which the container or task starts to run. |
| EndTime | The time at which the container or task stops running. |
| DataCode | An integer value from the DTSExecResult enumeration that indicates the result of running task:
|
| DataBytes | A byte array specific to the log entry. The meaning of this field varies by log entry. |
| Message | A message associated with the log entry. |
The following table describes the predefined events that can be enabled to write log entries when run-time events occur:
| Events | Description |
|---|---|
| OnError | Writes a log entry when an error occurs. |
| OnExecStatusChanged | Writes a log entry when the execution status of the executable changes. |
| OnInformation | Writes a log entry during the validation and execution of an executable to report information. |
| OnPostExecute | Writes a log entry immediately after the executable has finished running. |
| OnPostValidate | Writes a log entry when the validation of the executable finishes. |
| OnPreExecute | Writes a log entry immediately before the executable runs. |
| OnPreValidate | Writes a log entry when the validation of the executable starts. |
| OnProgress | Writes a log entry when measurable progress is made by the executable. |
| OnQueryCancel | Writes a log entry at any juncture in the task processing where it is feasible to cancel execution. |
| OnTaskFailed | Writes a log entry when a task fails. |
| OnVariableValueChanged | Writes a log entry when the value of a variable changes. |
| OnWarning | Writes a log entry when a warning occurs. |
| PipelineComponentTime | For each data flow component, writes a log entry for each phase of validation and execution. The log entry specifies the processing time for each phase. |
| Diagnostic | Writes a log entry that provides diagnostic information e.g. you can log a message before and after every call to an external data provider. |
Implementing Logging in SSIS 2012
To implement the SSIS logging, follow these steps:
Step1. Create a Connection Manager for logging database. Right click on Connection Managers area and click on New OLE DB Connections... as shown below:

Step2. In the "Configure OLE DB Connection Manager" click on Create button. Now select Server Name and database name from Connect a database. I am using (Local) server and Test database. Click on Test Connection button to verify the connection.

Finally click on OK button to save the connection manager. This will create a new connection manage with ServerName.DatabaseName name. In my example, it is (local).Test. You can rename it to appropriate and meaningful name. For instance cmLogging.
Step3. Right click anywhere on the package surface area in the Control Flow to open Configure SSIS Log: Package wizard. Check the Package folder checkbox (left side) to enable the logging. Under the "Providers and Log" tab, select "SSIS log provider for SQL Server" in Provider type and click on Add button t add this logging for the package. Finally, click on Configuration to select the logging connection manager. Select cmLogging as connection manager.

Step4. Select logging events.
To prevent log files from using large amounts of disk space, which could degrade performance, you can limit logging by selecting specific events and information items to log. For example, you can configure a log to capture only the date and the computer name along with error message. It is not a good idea to log all the events. Under "Details" tab, select required events for logging:

Step5. Click on Advance button to set advance properties of the logging events.

Finally click on the OK button to save logging configuration.
Step6. Now you can validate your logging information by executing the SSIS package. To get more information about hoe to execute SSIS package, click Different ways to Execute SSIS packages. My package looks like the picture shown below:

SELECT * FROM Test.dbo.sysssislog

Awesome post
ReplyDeleteThis is such a great resource that you are providing and you give it away for free. I love seeing websites that understand the value of providing a quality resource for free. It?s the old what goes around comes around routine. Did you acquired lots of links and I see lots of trackbacks??
Have you ever considered adding more videos to your blog posts to keep the readers more entertained? I mean I just read through the entire article of yours and it was quite good but since Im more of a visual learner,I found that to be more helpful well let me know how it turns out! I love what you guys are always up too. Such clever work and reporting! Keep up the great works guys Ive added you guys to my blogroll. This is a great article thanks for sharing this informative information.. I will visit your blog regularly for some latest post.
http://www.sqlservermasters.com/
Resources like the one you mentioned here will be very useful to me! I will post a link to this page on my blog. I am sure my visitors will find that very useful.
ReplyDeleteI can see that you are are genuinely passionate about this! I am trying to build my own website and youve helped me with some great information.
http://www.mindqonline.com/
Hi thankxx sqlservermasters and mndqonline.............
ReplyDeletei will update my blog regularly...........thankxx
Ashok Kumar Sql Development And Dba Adminstrations Techi Blog : Ssis Basics And All >>>>> Download Now
ReplyDelete>>>>> Download Full
Ashok Kumar Sql Development And Dba Adminstrations Techi Blog : Ssis Basics And All >>>>> Download LINK
>>>>> Download Now
Ashok Kumar Sql Development And Dba Adminstrations Techi Blog : Ssis Basics And All >>>>> Download Full
>>>>> Download LINK
Ashok Kumar Sql Development And Dba Adminstrations Techi Blog : Ssis Basics And All >>>>> Download Now
ReplyDelete>>>>> Download Full
Ashok Kumar Sql Development And Dba Adminstrations Techi Blog : Ssis Basics And All >>>>> Download LINK
>>>>> Download Now
Ashok Kumar Sql Development And Dba Adminstrations Techi Blog : Ssis Basics And All >>>>> Download Full
>>>>> Download LINK yy