Counter of Festivals

Ashok Blog for SQL Learners and Beginners and Experts

Thursday 27 November 2014

How to get Count from CHARINDEX Function

How to use the CHARINDEX Function
The CHARINDEX function returns the starting position of a character, or a string of characters within another character string. The CHARINDEX function is called using the following format:
CHARINDEX expression1 , expression2 [ , start_location )
Where expression1 is the string of characters to be found in expression2, and start_location is the position where the CHARINDEX function will start looking for expression1 in expression2.
The CHARINDEX function returns an integer. The integer value returned is the position where the characters being search for are located within the string being searched. If the CHARINDEX does not find the characters you are searching for then the function returns a zero integer value. Let say we execute the following CHARINDEX function call:
 CHARINDEX('SQL', 'Microsoft SQL Server')
This function call will return the starting location of the character string "SQL", in the string "Microsoft SQL Server". In this case the CHARINDEX function will return the number 11, which as you can see is the starting position of "S" in string "Microsoft SQL Server".
Now say we have the following CHARINDEX Command:
 CHARINDEX('7.0', 'Microsoft SQL Server 2000')
In this example the CHARINDEX function will return zero, since the character string "7.0" cannot be found in the string "Microsoft SQL Server 2000". Let go through a couple of examples of how you might be able to use the CHARINDEX function to solve some actual T-SQL problems.
For the first example say you would like to display only the last name of the ContactName column, for the first 5 records in the Northwind database Customer table. Here are the first 5 records.
 ContactName
 ------------------------------ 
 Maria Anders
 Ana Trujillo
 Antonio Moreno
 Thomas Hardy
 Christina Berglund
As you can see, the CustomerName contains both the first and last name of the customer, where first and last name are separated by a single space. I will use the CHARINDEX function to identify the position of the space between the two names. This way we can used the position of the space to parse the ContactName so we can display only the last name portion of the column. Here is some T-SQL code to display only the last name for the first 5 records in the Northwind Customer table.
 select top 5 substring(ContactName,
                       charindex(' ',ContactName)+1 ,
                       len(ContactName)) as [Last Name]
       from Northwind.dbo.customers
Here is the output from this command:
 Last Name
 ------------------------------ 
 Anders
 Trujillo
 Moreno
 Hardy
 Berglund
The CHARINDEX function found the space between the First and Last Name, so that the substring function could split the ContactName, thus only the Last Name was displayed. I added 1 to the integer value that CHARINDEX returned, so the Last Name displayed did not start with a space.
For the second example, say you want to count all the records from a table where a given column contains a particular character string. The CHARINDEX function could be used to satisfy your request. To count of the Addresses in the Northwind.dbo.Customer table where the Address column contains either the word 'Road' or an abbreviation for road ('Rd'), your SELECT statement would look like this:

you can't do count(charindex(string)) would give syntax error

But to resolve error see this

 select count(*) from Northwind.dbo.Customers 
   where CHARINDEX('Rd',Address) > 0 or CHARINDEX('Road',Address)
 > 1


Monday 24 November 2014

Create Database on Diffrent Drive in SQL Server Using T-SQL

CREATE DATABASE: 
Creates a new database and the files used to store the database, a database snapshot, or attaches a database from the detached files of a previously created database.

Ref:
http://msdn.microsoft.com/en-us/library/ms176061.aspx

CREATE DATABASE testdb
ON
( NAME = testdb_dat,
    FILENAME = 'E:\Databases\testdb.mdf' )
LOG ON
( NAME = testdb_log,
    FILENAME = 'G:\Logs\testdb_log.ldf')
GO


Creating a database without specifying files

The following example creates the database mytest and creates a corresponding primary and transaction log file. Because the statement has no <filespec> items, the primary database file is the size of the model database primary file. The transaction log is set to the larger of these values: 512KB or 25% the size of the primary data file. Because MAXSIZE is not specified, the files can grow to fill all available disk space. This example also demonstrates how to drop the database named mytest if it exists, before creating the mytest database.
USE master;
GO
CREATE DATABASE mytest;
GO
-- Verify the database files and sizes
SELECT name, size, size*1.0/128 AS [Size in MBs] 
FROM sys.master_files
WHERE name = N'mytest';
GO
USE master;
GO
CREATE DATABASE Sales
ON 
( NAME = Sales_dat,
    FILENAME = 'C:\Program Files\Microsoft SQL Server\MSSQL12.MSSQLSERVER\MSSQL\DATA\saledat.mdf',
    SIZE = 10,
    MAXSIZE = 50,
    FILEGROWTH = 5 )
LOG ON
( NAME = Sales_log,
    FILENAME = 'C:\Program Files\Microsoft SQL Server\MSSQL12.MSSQLSERVER\MSSQL\DATA\salelog.ldf',
    SIZE = 5MB,
    MAXSIZE = 25MB,
    FILEGROWTH = 5MB ) ;
GO

Attaching a database

The following example detaches the database Archive created in example D, and then attaches it by using the FOR ATTACH clause. Archive was defined to have multiple data and log files. However, because the location of the files has not changed since they were created, only the primary file has to be specified in the FOR ATTACH clause. Beginning with SQL Server 2005, any full-text files that are part of the database that is being attached will be attached with the database.
USE master;
GO
sp_detach_db Archive;
GO
CREATE DATABASE Archive
      ON (FILENAME = 'D:\SalesData\archdat1.mdf') 
      FOR ATTACH ;
GO

Wednesday 19 November 2014

Why VIEW takes long time to Execute

Why VIEW takes long time to Execute


Here in this article we are discussing related to the performance of the views. Why the performance of the view is slow. Please note that I am not taking about the indexed views, it's another thing and out of the scope of this article.
Like stored procedure, the optimizers cache the execution plan in the case for further use.
Let's take an example:
We have a simple base table contains records and we just create a view from this base table objects and then execute both (Base table and View separately)

CREATE TABLE emp_Table
       (empid    INT NOT NULL IDENTITY(1,1) PRIMARY KEY,
        empname  VARCHAR(50) NOT NULL,
        empsal   DECIMAL(20,2))
       
GO

CREATE VIEW vw_empView
AS
SELECT empid, empname, empsal
FROM   emp_Table

GO
-- Example-1
SELECT * FROM emp_Table

GO
-- Example-2
SELECT * FROM vw_empView

GO

Here in this example which one is executed faster?
It's Example-1. That means direct query from Table objects. To get the better understanding related to execution we just look at the execution plan.


Both execution plans are same. So, why the execution of views take long time?
This is because it takes SQL Server extra work such as looking up data in the system tables before it can execute the view.
This extra work is not part of the execution plan, so it appears that the two SELECT statements should run at the same speed, which they don't, because some of the work SQL Server is doing is hidden.

Monday 17 November 2014

Avoiding 'Failed to notify via email' errors

Ref:
http://sqlmag.com/blog/avoiding-failed-notify-operator-email-errors
If a picture is worth a thousand words, then the words associated with the following picture would probably involve a decent amount of muttering and cursing about the the DREADED ‘Failed to notify <operator name> via email’ error message that you might see crop up in your environment every once in a while – on new or recently provisioned servers:
image

Email Alerts Good. Configuration Options – Not so Intuitive

As I’ve posted in the past, using Database Mail can be a great way to be notified of problems or issues that might occur with your server (such as corruption or IO problems) or with your jobs – provided, of course, that you’ve got some sort of backup or ‘watchdog’ for your alerting system to make sure that it doesn’t just fail silently without any warnings.
Only, as great as it is to set up a Notification for an operator (I highly recommend using an alias instead of binding actual/individual email-addresses to so-called operators) to be notified of when a job fails or runs into problems, there’s an extra configuration step that you’ll need to jump through to get this to work.
And the problem is that this extra/additional configuration step is obscenely easy to forgot. In fact, I’ve forgotten about it enough times now that being burned by this issue with new servers that I’ve provisioned (or recently inherited) has caused me to blog about this step – in the hopes that doing so will ‘fuse’ this step into my brain. That, and this extra step is so easy to forget about that I’m sure that posting it here will help someone else.

Letting the SQL Server Agent Talk to Database Mail

As you might guess, getting Database Mail to play nicely with the SQL Server Agent is sadly a question of security. Or, stated differently, you’ll get the dreaded ‘Failed to notify … via email’ errors IF you haven’t explicitly allowed the SQL Server Agent to interact with Database Mail.
That said, it’s happily a trivial operation to allow the SQL Server Agent and Database Mail to ‘get giggy’ with each other and throw wild little parties for one another – whenever they want or need to. To do so, you just need to right click on the SQL Server Agent node in SQL Server Management Studio, and select Properties. Then switch to the Alert System node, and enable the Mail profile you’d like to allow the SQL Server Agent to use, restart the SQL Server Agent Service (NOT the SQL Server or the box – just the SQL Server Agent Service – which you can pretty much safely do on MOST systems at ANY time without any big worries or concerns), and you’re good to go.


image

Move Database Files MDF and LDF to Another Location

 Move Database Files MDF and LDF to Another Location

Ref:http://blog.sqlauthority.com/2012/10/28/sql-server-move-database-files-mdf-and-ldf-to-another-location/

When a novice DBA or Developer create a database they use SQL Server Management Studio to create new database. Additionally, the T-SQL script to create a database is very easy as well. You can just write CREATE DATABASE DatabaseName and it will create new database for you. The point to remember here is that it will create the database at the default location specified for SQL Server Instance (this default instance can be changed and we will see that in future blog posts). Now, once the database goes in production it will start to grow.
It is not common to keep the Database on the same location where OS is installed. Usually Database files are on SAN, Separate Disk Array or on SSDs. This is done usually for performance reason and manageability perspective. Now the challenges comes up when database which was installed at not preferred default location and needs to move to a different location. Here is the quick tutorial how you can do it.
Let us assume we have two folders loc1 and loc2. We want to move database files from loc1 to loc2.
USE MASTER;GO-- Take database in single user mode -- if you are facing errors
-- This may terminate your active transactions for database
ALTER DATABASE TestDBSET SINGLE_USERWITH ROLLBACK IMMEDIATE;GO-- Detach DBEXEC MASTER.dbo.sp_detach_db @dbname N'TestDB'GO
Now move the files from loc1 to loc2. You can now reattach the files with new locations.
-- Move MDF File from Loc1 to Loc 2
-- Re-Attached DB
CREATE DATABASE [TestDB] ONFILENAME N'F:\loc2\TestDB.mdf' ),
FILENAME N'F:\loc2\TestDB_log.ldf' )FOR ATTACH
GO
Well, we are done. There is little warning here for you: If you do ROLLBACK IMMEDIATE you may terminate your active transactions so do not use it randomly. Do it if you are confident that they are not needed or due to any reason there is a connection to the database which you are not able to kill manually after review.

Copy Database from SQL 2005 to SQL 2008 ( Lower to Higher Version)

We cant able to copy higher version(SQL 2008 Secondbase) to lower version(SQL 2005 Secondbasedev)

Using attach/detach or backup/restore Method.

But We can Achieve using 

Generate Scripts(with Data) / SQL Server Import AND Export Wizard available in 

SQL 2008 on Small Databases.

before doing this we have to disable all constraints and make it copy then enable constraints

-- Disable all the constraint in databaseEXEC sp_msforeachtable "ALTER TABLE ? NOCHECK CONSTRAINT all"
Generate Scripts(with Data):


save to an script window or text file and make it easy.
-- Enable all the constraint in databaseEXEC sp_msforeachtable "ALTER TABLE ? WITH CHECK CHECK CONSTRAINT all"


SQL Server Import AND Export Wizard:

before doing this we have to disable all constraints and make it copy then enable constraints

-- Disable all the constraint in databaseEXEC sp_msforeachtable "ALTER TABLE ? NOCHECK CONSTRAINT all"


  • Then SQL Server Import AND Export Wizard window will be opened. Press Next
  • Choose a Data source (in your case from SQL Server 2008). Choose a Destination( in your case from SQL Server 2005).
  • Select Copy data from one or more tables or view
  • Select the source's tables and destination's tables
  • Click Next & Finish
-- Enable all the constraint in databaseEXEC sp_msforeachtable "ALTER TABLE ? WITH CHECK CHECK CONSTRAINT all"


Thursday 13 November 2014

Enabling Distributed Transactions in Remote Servers

Enabling Distributed Transactions in Remote Servers

When we run a distributed transaction against an instance of SQL Server, we may receive an error message. This problem can be resolved by following the below statements:
      • Make sure that the MSDTC (Microsoft Distributed Transaction Coordinator) is enabled on both the servers.
      • Go to Start –> Run –> Type as ‘Services.msc

      • ~Right click on the above selected service and click on start. This starts the MSDTC service in the server (do the same on the remote servers also)
      • Once the Service is started, the next step is to enable the Network Transaction.
      • Go to Start –> Run –> Type as ‘dcomcnfg.exe’ or Goto Control Panel –> Administrative Tools –> Component Services
      • In windows 7, Expand Console Root –> Compoent Services –> Computers –> My Computer –> Distributed Transaction Coordinator –> Local DTC –> Right Click Properties
      • In windows XP, Expand Console Root –> Compoent Services –> Computers –> My Computer –> Right Click Properties
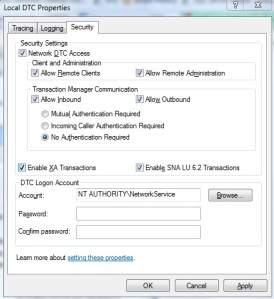
    • Goto ‘Security’ Tab and check the checkbox ‘Network DTC Access’
    • To allow the distributed transaction to run on the current server from a remote server, select the ‘Allow Inbound’ check box.
    • To allow the distributed transaction to run on a remote server from the current server, select the ‘Allow Outbound’ check box.
    • Under the Transaction Manager Communication group, select the ‘No Authentication Required’ option.
    • Click on OK in Security Dialog Box
    • If the settings are not affected once restart the server where the changes were done
    We can check the status of service state by executing the below command in the query window (this need the corresponding permissions for executing):
    1
    EXEC xp_servicecontrol N'querystate',N'msdtc'