
Introduction to Windows PowerShell Script on SQL Server
Ref:
https://www.mssqltips.com/sqlservertip/1680/introduction-to-windows-powershell-for-the-sql-server-dba-part-1/
Windows PowerShell is an extensible command-line shell and associated scripting language built on top of the .NET Framework v2.0. It was released in 2006 and is currently available for Windows XP SP2/SP3, Windows Server 2003, Windows Vista and is included in Windows Server 2008. PowerShell will be included as a common engineering criteria (CEC) in future releases of Microsoft server products making it a must to learn how to use it. Administrators - and DBAs included - have been using scripting to automate administrative tasks with scripting languages like DOS batch, VBScript, Perl, and a few third-party tools like KiXtart and WinScript. Windows PowerShell complements the administrators' scripting toolkit to easily manage and administer Windows workstations and servers and other Microsoft server products as they are being built using the .NET Framework. Although it is designed for operating systems, Windows PowerShell can be used to administer SQL Server 2005 instances and higher as Server Management Objects - the object model used to manage SQL Server 2005 - are built using the .NET Framework, thus, exposing the object model in PowerShell. In fact, SQL Server 2008 ships with its own PowerShell snap-in.
This series of articles will be dealing with introducing Windows PowerShell, its language semantics and how we can write scripts. Once we have a good grasp of Windows PowerShell, we will progress with using it to administer SQL Server.
Depending on the version that you would like to work with, you can download Windows PowerShell from the Microsoft Download Center. The publicly available released version of PowerShell is v1.0 and this is the same version that gets installed along with SQL Server 2008 (v2.0 is available as a community technology preview CTP and is the version that I am currently using). Make sure you already have Microsoft .NET Framework v2.0 (and SQL Server 2005 client tools for managing SQL Server with PowerShell) installed with the latest service packs on your machine before installing Windows PowerShell. After completing the installation, you are now ready to launch Windows PowerShell. You can do this by running the powershell.exe executable from either your command-line or from the Run command. This will open up a command shell similar to DOS, but with a PSprompt before each line.
You might notice that the font color might be different from the usual DOS environment that you're familiar with as I have configured the PowerShell environment differently so as not to get confused between the two.
Navigating the system using the PowerShell command-line
The best way to learn Windows PowerShell is to translate the common tasks that we do using our command-line like listing files and file system properties. PowerShell provides access to these as well as other Windows resources like the registry but with a twist - it exposes these additional resources so that they look like drives, giving you a similar approach when working with them. To display all of the resources in your system, you can use the Get-PSDrivecmdlet
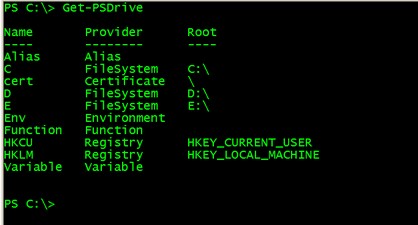
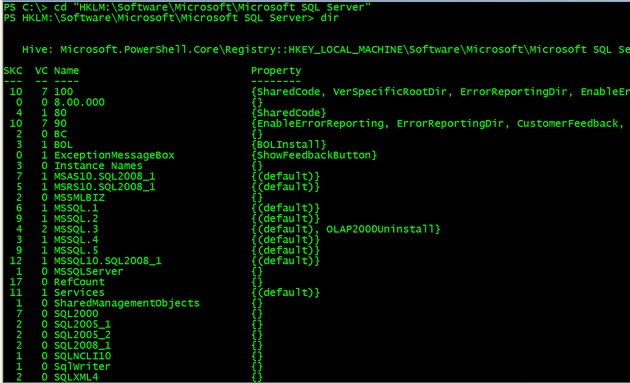
Notice that the drives are not just limited to letters. HKLM, for example, maps to the HKEY_LOCAL_MACHINE portion of the registry. To illustrate, we can navigate to the SQL Server registry key using the usual cd and dir command we use in DOS and list all of the subkeys under that.
You can explore all of the resources available as exposed by PowerShell by just using those familiar DOS commands.
Using as much lifeline as we can get
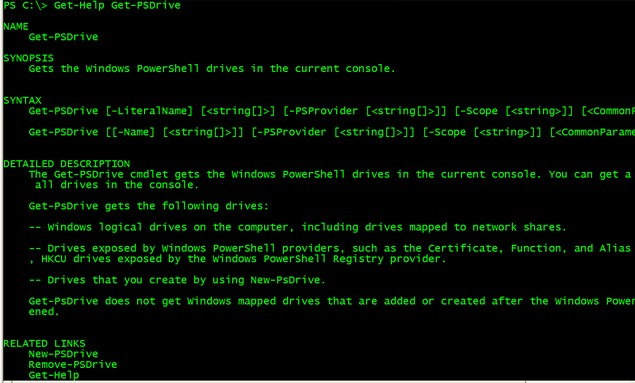
Being new to the environment, we need all the help we can get to make the most out of our learning experience. The most important cmdlet that we can ever learn from Windows PowerShell is the Get-Help cmdlet. This displays help about Windows PowerShell cmdlets and concepts. If you want to know what a particular cmdlet does, simply pass that as a parameter to the Get-Help cmdlet as shown in the example below. Let's say we want to know what the Get-PSDrive cmdlet does
Get-Help is just one of the cmdlets available in Windows PowerShell. But how do we know what else is available for us? You can use the Get-Command cmdlet to display a list of all the Windows PowerShell cmdlets
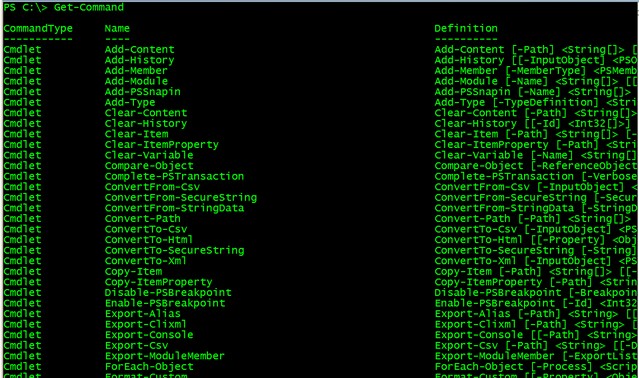
These two cmdlets will provide most, if not all, of the help we will need when working with Windows PowerShell. But, that's not all. In case you have forgotten about the exact name of the cmdlet but remember the first letter of the second part of the name, you can use the Tab key to use the auto-completion feature similar to how it works with DOS. Let's say you would like to display a list of cmdlets that start with Get-H, you can type the first part and use the Tab key to search for what you're looking for. This will display cmdlets such as Get-Help, Get-History and Get-Host..
So, what exactly is a cmdlet?
We have been talking about and using cmdlets in our examples but have not really defined what a cmdlet is. Cmdlets (pronounced as command-let) are miniature commands similar to those of command-line tools that perform specific tasks inside Windows PowerShell. They are named using a standard naming convention with the verb-noun format. This naming standard makes it easy to "guess" a cmdlet that performs a specific task, like the cmdlet to retrieve all the process running in Windows is named Get-Process. You can use the built-in PowerShell cmdlets or create your own that can be installed to extend its functionalities, similar to what Exchange Server 2007 and SQL Server 2008 have done.
Aliases
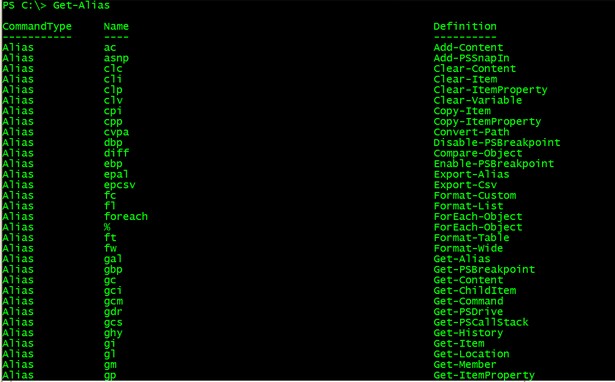
Aliases are alternative names assigned to a cmdlet which make it easy for us to type a cmdlet without entering its full name. PowerShell has its own list of built-in aliases, like the one we already used - dir and cd. The dir command (together with the ls alias which is similar to that of Unix) and cd command are aliases for the Get-ChildItem and Set-Location cmdlets, respectively. To list all of the available built-in aliases, run the Get-Alias cmdlet
You can also create your own aliases if you want to call other cmdlets a different name or maybe define your own functions and call them using your user-defined aliases.


To continue this series on Introduction to Windows PowerShell for the SQL Server DBA, this tip will look at the pipeline and output processing. In Part 1, we have introduced Windows PowerShell, the use of cmdlets and aliases and how we can take full advantage of the help available from the environment. We will build on what we have learned from the previous tip as we go along.
So, pipes are not just for plumbers
Pipes and piping are very common terms in any scripting language and it's no different in PowerShell. Think of it as a way to combine different commands (or in this case cmdlets) to do more complex operations. It works by directly connecting the output of the previous cmdlet to the input of the cmdlet that follows after it. As the output-input stream flows thru the pipe, they come in the form of objects and everything is being handled by the shell. As your operations become more complex, you can increase the number of pipes as necessary. To demonstrate, we will build on a few of the examples we have in part 1.
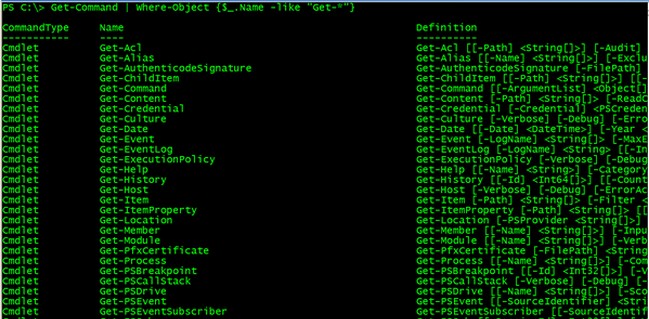
Let's use the Get-Command cmdlet to list all of the cmdlets available in Windows PowerShell that begin with the verb Get-. Since the Get-Command will list all of the cmdlets, we need to filter that list to only display what we need - cmdlets that start with the verb Get-. We will use the pipeline to connect this output to another cmdlet, Where-Object. The Where-Object cmdlet will act as our filter to display only those cmdlets we need. The syntax for this will be Get-Command | Where-Object {$_.Name -like "Get-*"}
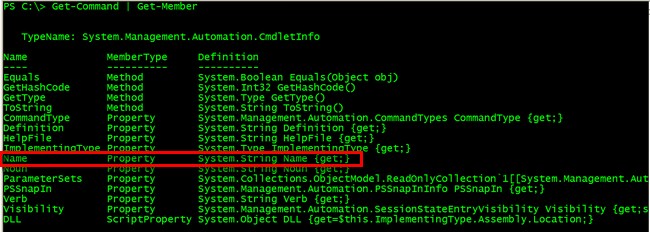
Now, don't be intimidated by the $_ you saw inside the curly brackets. Let me explain the contents of the script. You already know both the Get-Command and the Where-Object cmdlets so let me start with the $_. Basically, it is just a notation to represent the default object as it is being passed to the pipeline. Since we are passing a list of objects to the next cmdlet using the pipeline, the value of the $_ changes from one object being passed to another. The Name is an attribute/property of the object that we can access and query (or change depending on how the class was designed) as part of our processing. This could be anything depending on the objects that are being returned by the cmdlet but since we are dealing with the objects returned by the Get-Command cmdlet, we know there is a Name property. Now, I know you're starting to ask, "How do I remember all of the properties and methods of any objects that I will be using within PowerShell?" The answer is, you simply don't. You use the available help system we have talked about in part 1 and introduce a new cmdlet, Get-Member. The Get-Member cmdlet retrieves the properties and methods of objects passed to it. To use this cmdlet, just pipe the results of a cmdlet to Get-Member, like this:
| Get-Command | Get-Member |
The -likekeyword is an example of a comparison operator in Windows PowerShell. A list of these comparison operators is shown below
- -lt: Less than
- -le : Less than or equal to
- -gt: Greater than
- -ge : Greater than or equal to
- -eq : Equal to
- -ne : Not equal to
- -like : Like; uses wildcards for pattern matching
You can mix and match these comparison operators and piping to come up with more complex tasks. Sorting and grouping are also available using the Sort-Object and Group-Object cmdlets, respectively. In one particular case as a SQL Server DBA, you may want to restart all SQL Server services in a machine after maintenance. You might be thinking of manually restarting all of them but think about having like 10 or more instances in a server. Even a NET START/NET STOP wouldn't be that helpful especially if you don't know the instance names of the SQL Server instances. You can use Windows PowerShell to do the trick, where the -Force parameter simply does the same thing for dependent services.
| Get-Service | Where-Object {$_.Name -like "MSSQL$*"} | ReStart-Service -Force |
Getting more aesthetic results
Whether we like it or not, having any output formatted is one of the most common things we do in our daily tasks, especially when whatever you will be doing will be read or validated by somebody else. By default, PowerShell takes care of the formatting for us. We can, however, decide which formatting to use with our output results. To get a list of the available formatting options in PowerShell, you can run
| Get-Command Format-* |
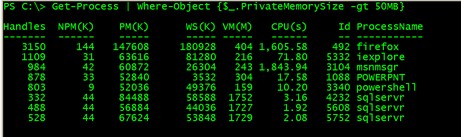
These available cmdlets allow us to format the results of our scripts depending on our needs. To illustrate, let's use the Format-Listcmdlet to display all the processes running in the local computer that are consuming more than 50MB of memory. Without formatting, this is how the results would look like running
| Get-Process | Where-Object {$_.PrivateMemorySize -gt 50MB} |
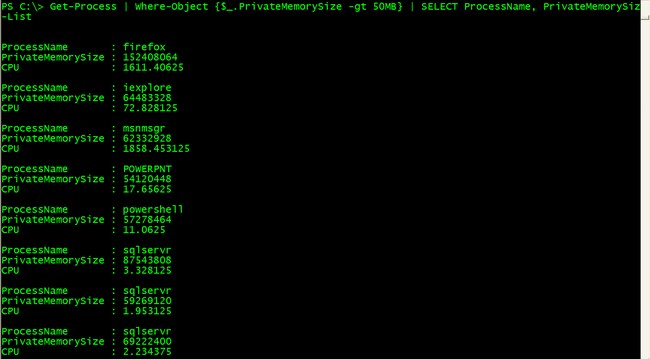
Using the Format-List cmdlet, we can just display the ProcessName and PM(K) and probably the CPU(s) columns in the output running
| Get-Process | Where-Object {$_.PrivateMemorySize -gt 50MB} | SELECT ProcessName, PrivateMemorySize, CPU | Format-List |
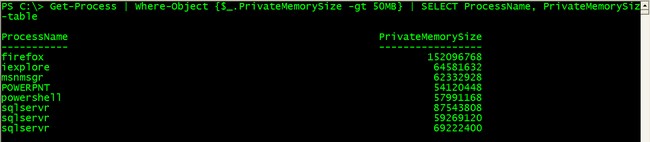
This is how the results would look like using the Format-Table cmdlet,
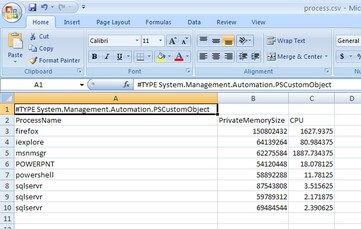
You can try playing around with the other formatting options available in Windows PowerShell to suit your needs. Now, there might be cases where you need to store these results in a file. I normally export results in a CSV format so I can open the file in Microsoft Excel and present it as a report to management. Windows PowerShell has the Export-CSV cmdlet that allow you to create a CSV file representation of the outputs of the script. You just have to pipe the results to the Export-CSV cmdlet and pass a filename as a parameter
| Get-Process | Where-Object {$_.PrivateMemorySize -gt 50MB} | SELECT ProcessName, PrivateMemorySize, CPU | Export-CSV c:\process.csv |
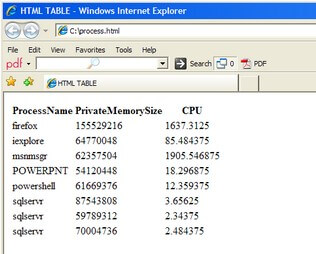
If you don't like to see the .NET object type in the first line, simply add the -notype parameter in the Export-CSV cmdlet. While others may say that CSV files are a thing of the past, you can easily save them as Excel files and generate graphs and charts which most management prefer. You can also output the results in HTML format by using the ConvertTo-HTML cmdlet. Like the Export-CSV cmdlet, it would make sense to output the results to an HTML file and pass the filename as a parameter in the Out-File cmdlet
| Get-Process | Where-Object {$_.PrivateMemorySize -gt 50MB} | SELECT ProcessName, PrivateMemorySize, CPU | ConvertTo-HTML | Out-File C:\process.htm |
To continue this series on Introduction to Windows PowerShell for the SQL Server DBA, this tip will look at writing and running PowerShell scripts. In Part 1, we have introduced Windows PowerShell, the use of cmdlets and aliases and how we can take full advantage of the help available from the environment. Part 2 talks about using the pipeline and formatting results in PowerShell. In this tip, we will start writing PowerShell scripts and introduce SQL Server Management Objects (SMO).
Writing and Running PowerShell scripts
Since you can now write a basic command by piping cmdlets in Windows PowerShell, it's time to write a script. A script is a sequence of commands and PowerShell cmdlets written together to create more complex tasks. PowerShell script files should have a .PS1extension. While you might be wondering about the "1" in the file extension, it was intended to be for script versioning. Since PowerShell v2.0 is still in CTP, we are still not sure whether the extension would change, but currently any script with a .PS1 extension will work in PowerShell v2.0.
You can write a script using any text editor like Notepad or TextPad although there are third-party scripting tools out there likePowerShell Plus from Idera and PowerGUI from Quest Software. PowerShell v2.0 CTP comes with a Graphical Windows PowerShell that you can use as your development environment for PowerShell. The choice of a development environment for Windows PowerShell is totally up to you.
You can start writing scripts by saving the commands you've learned in Part 1 and Part 2 on a PS1file. To run the script, you can call it from within Windows PowerShell by specifying either its full or relative path. By default, you wouldn't be able to execute scripts in Windows PowerShell due to the security policy.
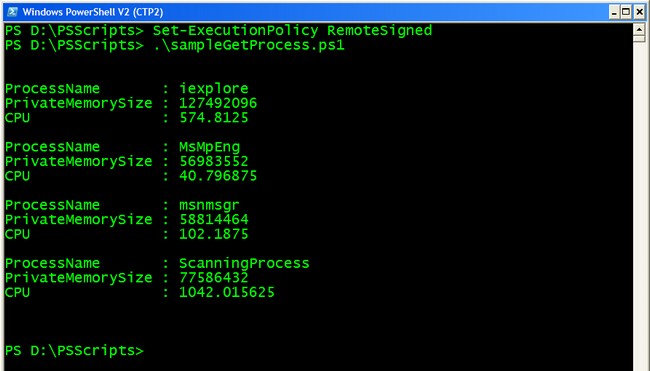
To enable a script to run, you have to modify the execution policy within Windows PowerShell by calling the Set-ExecutionPolicycmdlet and passing the execution policy as a parameter. Different execution policies are described here, but the recommended setting is to use RemoteSigned as this will allow you to run scripts locally but will require a digital signature from a trusted publisher on scripts that come from a remote source. After setting the execution policy, you can now run your scripts from the PowerShell console
Notice the period at the beginning of the script together with the backslash? That simply tells PowerShell to execute the script in the current scope. This only means that you have to type the complete file path in order for you to run a script or, in this particular case since the script is in the current directory, you can start it with the".\" notation
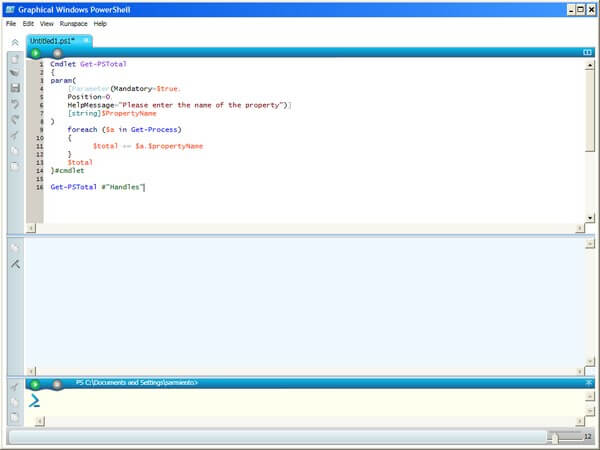
Passing Variable Parameters To A Script
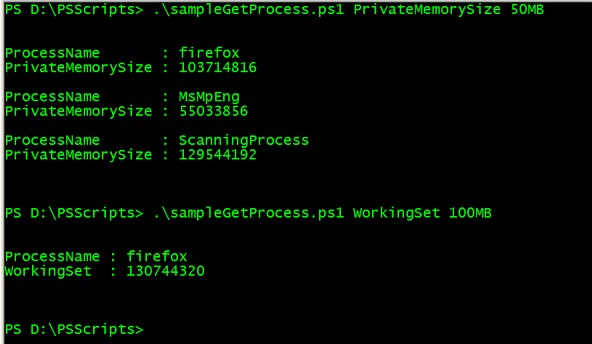
In order for your scripts to be dynamic, you have to find ways to pass different values to it. Using parameters with a script allow additional data to be passed to the script in a structured way. You use the $args[i] variable to refer to arguments that are passed to a script. The [i] simply means that you can use an array of values with an index of [0] in case you want to pass multiple parameters to your script. Translating this to the example we used in Part 2, let's say we want the script that returns all the processes with PrivateMemorySize greater than 50MB to be dynamic - a script that will return all the processes for which property and value we specify. We define variables that will contain the parameters that we will pass to the script and use that variable within the script
| #Variable $attrib will contain the values of the first parameter #Variable $valMB will contain the values of the second parameter $attrib = $args[0] $val = $args[1] Get-Process | Where-Object {$_.$attrib -gt $val} | SELECT ProcessName, $attrib | Format-List |
Notice the use of the pound/sharp (#) symbol to let PowerShell know that the current line is a comment. It is recommended to write as much comments in your scripts as possible. Also, the way to declare a variable in PowerShell starts with a $ sign. Bear in mind that PowerShell variables are objects, unlike in other scripting languages like VBScript where variables are simply containers for values. This means that you can pass objects to a script variable the same way you can pipe the results of a cmdlet to another cmdlet. The command in the script is exactly the same as what we had in Part 2 with a little variation. We used the variable $attribinstead of a fixed property like PrivateMemorySize and the variable $val instead of a fixed value
Calling the script and passing parameter values to it:
Notice how I used PrivateMemorySet and 50MB as the values for $attrib and $val, respectively, on the first call to the script while using WorkingSet and 100MB on the second call. This makes your script dynamic simply by using variables and parameters.
Server Management Objects (SMO): Your Gateway to SQL Server
SQL Server Management Objects (SMO) is a collection of objects that are designed for programming all aspects of managing SQL Server. Simply put, its a way to allow programmatic management of SQL Server instances. SQL Server client tools like Management Studio were created using SMO. You can use SMO with other scripting or programming languages that can (note that scripting languages like VBScript uses Component Object Model automation and will not be able to see SMO since it uses .NET) to build SQL Server management applications. While built for SQL Server 2005 using the .NET Framework 2.0, it is compatible with SQL Server 2000 and 2008, allowing you to manage multi-version instances across your enterprise. One thing that you should note though is that SMO does not support compatibility levels below 80. I've seen databases running on SQL Server 2005 but are still on compatibility 70. Hence, you will not be able to manage those databases using SMO.
The first thing you need to do is load the appropriate .NET assemblies used by SMO.
[System.Reflection.Assembly]::LoadWithPartialName('Microsoft.SqlServer.SMO')
You do have to check the versions of the SMO assemblies that you load into memory as this might cause confusion especially when you have multiple versions running on your machine. There are other assemblies that are associated with SMO for managing SQL Server, but most of the time this would suffice. After loading the SMO assemblies, you can now create an instance of the Serverobject to represent the SQL Server instance that you will be connecting to, passing the instance name. In the line below, I will be assigning the results to a variable $serverInstanc, so we can manipulate the results the way we have done in the previous examples.
$serverInstance = New-Object ('Microsoft.SqlServer.Management.Smo.Server') "InstanceName"
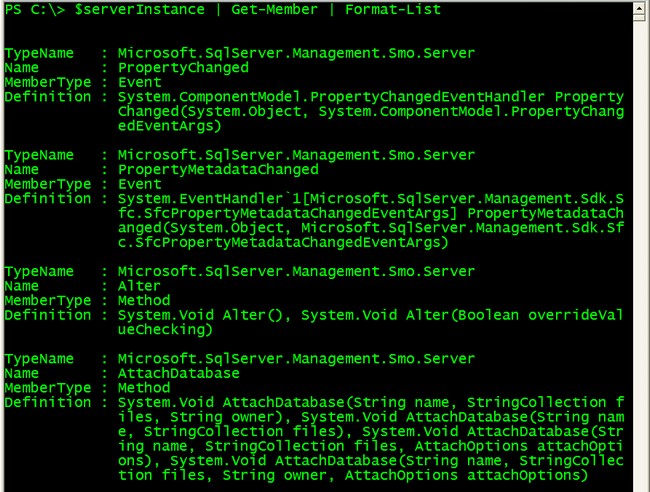
You can then pipe the results to the Get-Member cmdlet to see the different properties and methods for the Server object.
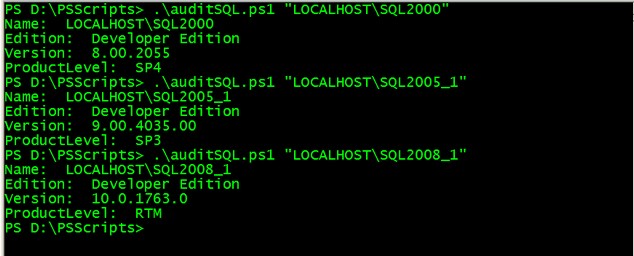
One of the most common task we do as SQL Server DBAs is to audit our SQL Server installations. We can apply what we have learned from this tip to write a script to audit our SQL Server installations, retrieving the instance name, the edition, the version and the service pack level.
$instance = $args[0]
[System.Reflection.Assembly]::LoadWithPartialName('Microsoft.SqlServer.SMO') | out-null $serverInstance = New-Object ('Microsoft.SqlServer.Management.Smo.Server') $instance
Write-Host "Name: " $serverInstance.Name
Write-Host "Edition: " $serverInstance.Edition Write-Host "Version: " $serverInstance.VersionString Write-Host "ProductLevel: " $serverInstance.ProductLevel |
I used a few cmdlets in this script for formatting purposes. The Out-Null cmdlet simply deletes the output instead of sending it to the console. We don't really need the output but rather we need the object returned by the first line so we just pipe it to the Out-Nullcmdlet. Next, I used the Write-Host cmdlet to display the results in the console window for demonstration purposes. You can use the formatting options mentioned in Part 2 to generate a report to be exported in either HTML or CSV. Notice how I used the same script to audit different versions of SQL Server, from 2000 to 2008.
You can also call the Information class to display all the non-configurable information about the instance you are connecting to. Since we only need a few of them, we just specify them explicitly in the script.
No comments:
Post a Comment