Counter of Festivals

Ashok Blog for SQL Learners and Beginners and Experts

Thursday, 5 August 2021

Installation influxdb on Ubuntu 20.04 LTS


Installation influxdb on Ubuntu


InfluxDB can be installed by directly querying the official repositories of this tool. First, add them to your list, by typing the following commands:


sudo curl -sL https://repos.influxdata.com/influxdb.key | sudo apt-key add -

sudo echo "deb https://repos.influxdata.com/ubuntu bionic stable" | sudo tee /etc/apt/sources.list.d/influxdb.list

sudo echo "deb https://repos.influxdata.com/ubuntu bionic stable" | sudo tee /etc/apt/sources.list.d/influxdb.list

sudo apt update


Once the list of repositories has been updated, proceed with the installation of InfluxDB using the command:

sudo apt install influxdb

Once installed, check the status of the service via:

sudo systemctl status influxdb


Error detail info:


sudo apt update
 
Ign:1 http://archive.canonical.com/ubuntu bionic InRelease
Err:2 http://archive.canonical.com/ubuntu bionic Release
  404  Not Found [IP: 91.189.92.191 80]
Ign:3 http://archive.ubuntu.com/ubuntu bionic InRelease
Ign:4 http://archive.ubuntu.com/ubuntu bionic-updates InRelease
Ign:5 http://archive.ubuntu.com/ubuntu bionic-backports InRelease
Ign:6 http://archive.ubuntu.com/ubuntu bionic-security InRelease
Err:7 http://archive.ubuntu.com/ubuntu bionic Release
  404  Not Found [IP: 91.189.88.174 80]
Err:8 http://archive.ubuntu.com/ubuntu bionic-updates Release
  404  Not Found [IP: 91.189.88.174 80]
Err:9 http://archive.ubuntu.com/ubuntu bionic-backports Release
  404  Not Found [IP: 91.189.88.174 80]
Err:10 http://archive.ubuntu.com/ubuntu bionic-security Release
  404  Not Found [IP: 91.189.88.174 80]
Reading package lists... Done
E: The repository 'http://archive.canonical.com/ubuntu bionic Release' no longer has a Release file.
N: Updating from such a repository can't be done securely, and is therefore disabled by default.
N: See apt-secure(8) manpage for repository creation and user configuration details.
E: The repository 'http://archive.ubuntu.com/ubuntu bionic Release' does not have a Release file.
N: Updating from such a repository can't be done securely, and is therefore disabled by default.
N: See apt-secure(8) manpage for repository creation and user configuration details.
E: The repository 'http://archive.ubuntu.com/ubuntu bionic-updates Release' does not have a Release file.
N: Updating from such a repository can't be done securely, and is therefore disabled by default.
N: See apt-secure(8) manpage for repository creation and user configuration details.
E: The repository 'http://archive.ubuntu.com/ubuntu bionic-backports Release' does not have a Release file.
N: Updating from such a repository can't be done securely, and is therefore disabled by default.
N: See apt-secure(8) manpage for repository creation and user configuration details.
E: The repository 'http://archive.ubuntu.com/ubuntu bionic-security Release' does not have a Release file.
N: Updating from such a repository can't be done securely, and is therefore disabled by default.
N: See apt-secure(8) manpage for repository creation and user configuration details.


Solutions:

·  For some reason APT can not find the Release file in the specified repositories list.

To fix this, I would suggest the following:

·         Check if your connection to the Internet is behind a firewall, limited in any way or behind a proxy and configure your system and connection accordingly or change to a different connection if available.

·         Check if there is an APT proxy configuration file by running the following command:

    ls /etc/apt/apt.conf.d/*proxy*

If the command returns back any results, move these files out of the /etc/apt/apt.conf.d/ directory or delete them.

  • Revert your repositories list to the original Ubuntu Bionic Beaver list by running the following command in the terminal:
sudo nano /etc/apt/sources.list

A file editor will be opened. Delete all the lines in it and then copy and paste the following in the file editor:

deb http://archive.ubuntu.com/ubuntu bionic main universe multiverse restricted
deb http://security.ubuntu.com/ubuntu/ bionic-security main multiverse universe restricted
deb http://archive.ubuntu.com/ubuntu bionic-updates main multiverse universe restricted

Then, save and close the file by pressing Ctrl + X then press Y then press Enter

To verify you saved the file correctly, please run the following command in the terminal:

cat /etc/apt/sources.list

The output should be exactly:

deb http://archive.ubuntu.com/ubuntu bionic main universe multiverse restricted
deb http://security.ubuntu.com/ubuntu/ bionic-security main multiverse universe restricted
deb http://archive.ubuntu.com/ubuntu bionic-updates main multiverse universe restricted

Ubuntu repositories have a defined format. They should be for example something like deb http://archive.ubuntu.com/ubuntu bionic main.

Explanation:

deb: These repositories contain binaries or precompiled packages. These repositories are required for most users.

http://archive.ubuntu.com/ubuntu: The URI (Uniform Resource Identifier), in this case a location on the internet.

bionic: is the release name of your Ubuntu installation.

main & restricted ...etc: are the section names or components. There can be several section names, separated by spaces.


After that, please update your repositories list by running the following command in the terminal:

sudo apt update

You should now be able to install packages and update your system again.


Notice:

If you still get errors, please first back up /etc/apt/sources.list.d/ to your home directory by running the following command in the terminal:

mkdir ~/old_sources_list_d && sudo cp -r /etc/apt/sources.list.d/* ~/old_sources_list_d/

After that, please clear all existing PPAs and repository lists in /etc/apt/sources.list.d/ by running the following command in the terminal:

sudo rm -r /etc/apt/sources.list.d/*

Then, please update your repositories list by running the following command again in the terminal:

sudo apt update


  To resolve this we need to run with sudo like below


                        $ sudo chmod +x /usr/lib/influxdb/scripts/influxd-systemd-start.sh


                    Useful commands:


                    To add portal in repository as see below

            $ sudo add-apt-repository 'deb [arch=amd64]              https://repo.mongodb.org/apt/ubuntu bionic/mongodb-org/4.0 multiverse'

                    The repository will be appended to sources.list file.

                    You can now install an   y of the packages from the newly enabled repository:

            $ sudo apt install mongodb-org

                    If for any reasons you want to remove a previously enabled repository, use the --remove option:

                    $ sudo add-apt-repository --remove 'deb [arch=amd64] https://repo.mongodb.org/apt/ubuntu             bionic/mongodb-org/4.0 multiverse'


                  To add repository manually

                      If you want to have more control over how your sources are organized you can manually edit the             /etc/apt/sources.list file and add the apt repository line to the file.

                    For demonstration, we will enable the CouchDB repository and install the software. CouchDB is a free                         and open-source fault-tolerant NoSQL database maintained by the Apache Software Foundation.

                    To add the repository open the sources.list file with your text editor :                              

                     $ sudo nano /etc/apt/sources.list

Add the repository line to the end of the file:

/etc/apt/sources.list

deb https://apache.bintray.com/couchdb-deb bionic main


Another option is to create a new the repository file under the /etc/apt/sources.list.d/ directory.

When manually configuring a repository you also need to manually import the public repository key to your system. To do that use either wget or curl :

curl -L https://couchdb.apache.org/repo/bintray-pubkey.asc | sudo apt-key add -

The command above should output OK which means that the GPG key has been successfully imported and packages from this repository will be considered trusted.

Before installing the packages from the newly added repository you must update the package index:

sudo apt update

Once the package index is updated you can install packages from the newly added repository:

sudo apt install couchdb


                        To remove swap file

                        $ rm .MERGE_MSG.swp

                        To remove mal function file

                       $ sudo rm /etc/apt/sources.list.d/file.list

                        To vi editor

                            Command                                                                Purpose

                                    i                                                                  Switch to Insert mode.


                                    Esc                                                             Switch to Command mode.


                                    :w                                                              Save and continue editing.


                                    :wq or ZZ                                                  Save and quit/exit vi.


                    To edit file on Nano editor and save

   $ sudo nano /etc/apt/sources.list


    Add file/modify file Then, save and close the file by pressing Ctrl + X then press Y then press Enter

                        To edit file on vi editor and save

  $ sudo vi /etc/apt/files.list


Type a colon (:) to move the cursor to the bottom of the screen.

This is where final commands can be made.

7            Type wq.

 wq is two individual commands: w for Write (or Save) and q for Quit. This command combination returns you to the command line.

(i.e) $ :wq


                            Commands:


                        Installation

    InfluxDB can be installed by directly querying the official repositories of this tool. First, add them to your list, by typing the following commands:


    sudo curl -sL https://repos.influxdata.com/influxdb.key | sudo apt-key add -


sudo echo " deb http://archive.ubuntu.com/ubuntu bionic main universe multiverse restricted" | sudo tee /etc/apt/sources.list.d/influxdb.list


sudo echo " deb http://security.ubuntu.com/ubuntu/ bionic-security main multiverse universe restricted" | sudo tee /etc/apt/sources.list.d/influxdb.list


sudo echo " deb http://archive.ubuntu.com/ubuntu bionic-updates main multiverse universe restricted" | sudo tee /etc/apt/sources.list.d/influxdb.list


                     (or)


  • Revert your repositories list to the original Ubuntu Bionic Beaver list by running the following command in the terminal:

sudo nano /etc/apt/sources.list

A file editor will be opened. Delete all the lines in it and then copy and paste the following in the file editor:

deb http://archive.ubuntu.com/ubuntu bionic main universe multiverse restricted

deb http://security.ubuntu.com/ubuntu/ bionic-security main multiverse universe restricted

deb http://archive.ubuntu.com/ubuntu bionic-updates main multiverse universe restricted

Then, save and close the file by pressing Ctrl + X then press Y then press Enter

To verify you saved the file correctly, please run the following command in the terminal:

cat /etc/apt/sources.list

The output should be exactly:

deb http://archive.ubuntu.com/ubuntu bionic main universe multiverse restricted

deb http://security.ubuntu.com/ubuntu/ bionic-security main multiverse universe restricted

deb http://archive.ubuntu.com/ubuntu bionic-updates main multiverse universe restricted


sudo apt update

Once the list of repositories has been updated, proceed with the installation of InfluxDB using the command:

sudo apt install influxdb

Once installed, check the status of the service via:

sudo systemctl status influxdb


If, when typing this command, a result similar to the one shown in the screenshot above appears, the tool has been correctly installed, but is not running yet.

To start it and make sure that the service is always available every time the machine is restarted, type the command:

sudo systemctl enable --now influxdb

In this way, not only will it start on the spot, but it will be reloaded every time the server is restarted. To start it manually, run, as an alternative to the command shown above, the following:

sudo systemctl start influxdb

To stop the execution of InfluxDB use the command:

sudo systemctl stop influxdb

Configuring InfluxDB

The InfluxDB configuration file is located by default in the /etc/influxdb/influxdb.conf folder.

Many features are commented out. To enable them, simply open the configuration file and delete the "#" symbols from the relevant line.

To modify the configuration file use the command:

sudo nano /etc/influxdb/influxdb.conf

For example, to access via HTTP request (enabling endpoints), uncomment the "enabled" item in the "http" section, as shown in the following screenshot:


When the necessary changes are made, close and exit using the key combination CTRL + X / Y / Enter.

To apply the changes, the service has to be restarted. This operation that can be carried out using the commands described above:

sudo systemctl stop influxdb && sudo systemctl start influxdb

As with any database, after the installation the first thing to do is to create an administrator account. This can be done using the following command: 

curl -XPOST "http://localhost:8086/query" --data-urlencode "q=CREATE USER admin WITH PASSWORD 'password' WITH ALL PRIVILEGES"

Clearly replace:

  • admin: with the user name;
  • password: with the password for the database login.

Once the account is created, access the InfluxDB shell by using the command:

influx -username 'admin' -password 'password'

N.B. also in this case, the “admin” and “password” parameters have to be replaced with those previously declared.


In addition to running queries directly from the shell, your queries can be submitted to InfluxDB by using
tools such as "curl". The syntax to respect is the following:

curl -G http://localhost:8086/query -u ADMIN_NAME:PASSWORD_NAME --data-urlencode "q=QUERY"

Again, replace:

  • "ADMIN_NAME" with the name of the user created;
  • "PASSWORD_NAME" with the password associated with that user;
  • “QUERY” with the query to be executed.

For example, to access with the data used in this tutorial and view all the databases present, the command to execute would be:

curl -G http://localhost:8086/query -u admin:password --data-urlencode "q=SHOW DATABASES"

N.B. If the InfluxDB database is queried from a machine other than the one where the server is installed, instead of ‘localhost’, enter the IP address of the machine to query.


Enabling the Firewall

Since InfluxDB can also be queried from the outside, it may be necessary to update the firewall rules to allow it to connect.

If your firewall is  UFW just type the following commands:

sudo ufw allow 8086/tcp

This will allow TCP traffic on port 8086 used by InfluxDB for querying the database from outside.


                  Useful links:

                    Install influx on ubuntu

                    1)https://www.arubacloud.com/tutorial/how-to-install-influxdb-on-ubuntu-20-04.aspx

Fix issue

                    2)https://itectec.com/ubuntu/ubuntu-unable-to-update-or-install-anything-after-moving-to-another-country/

                    permission denied issue

                            3) https://unix.stackexchange.com/questions/209097/systemd-failed-at-step-exec-spawning-script-       permission-denied


                        Add repository on Ubuntu source list

                    4) https://linuxize.com/post/how-to-add-apt-repository-in-                            ubuntu/#:~:text=Adding%20Repositories%20with%20add%2Dapt%2Drepository,-The%20basic%20syntax&text=list%20file%20like%20deb%20http,apt%2Drepository%20in%20your%20terminal.


                    Beginners commands

                    5) https://techlog360.com/basic-ubuntu-commands-terminal-shortcuts-linux-beginner/


                    How do I remove a malformed line from my sources.list?

                    6) https://www.youtube.com/watch?v=X0FApmuZw98

$ sudo rm /etc/apt/sources.list.d/file.list


useful commands  and links


1)Display the current Ubuntu hostname

$ hostname


2)To know the which ubuntu version installed


$ lsb_release -a


Note:

LSB (Linux Standard Base)information about your specific Linux distribution, including version number, release codename, and distributor ID.


3) Install net tools if not available

$ Install net tools

sudo apt install net-tools


4)$ netstat -n -l


5) cat /lib/systemd/system/influxdb.service


6)usermod -aG sudo username


To give permission to file


sudo chmod +x /usr/lib/influxdb/scripts/influxd-systemd-start.sh


To add repository via command line and remove file in repository

sudo add-apt-repository 'deb [arch=amd64] http://archive.ubuntu.com /ubuntu focal InRelease'

sudo add-apt-repository --remove 'deb [arch=amd64] https://repo.mongodb.org/apt/ubuntu bionic/mongodb-org/4.0 multiverse'

sudo service influxdb start

sudo systemctl enable --now influxdb

sudo systemctl status influxdb


To vi editor 


Command Purpose


i Switch to Insert mode.


Esc Switch to Command mode.


    :w Save and continue editing.


    :wq or ZZ Save and quit/exit vi.


To remove swap file


rm .MERGE_MSG.swp


To remove mal function file


sudo rm /etc/apt/sources.list.d/file.list


$ sudo nano /etc/apt/sources.list

cat /etc/apt/sources.list

deb http://archive.ubuntu.com/ubuntu bionic main universe multiverse restricted

deb http://security.ubuntu.com/ubuntu/ bionic-security main multiverse universe restricted

deb http://archive.ubuntu.com/ubuntu bionic-updates main multiverse universe restricted

Ctrl + X then press Y then press Enter


Linux links

https://www.cyberciti.biz/faq/ubuntu-change-hostname-command/

https://techlog360.com/basic-ubuntu-commands-terminal-shortcuts-linux-beginner/

https://www.howtogeek.com/50787/add-a-user-to-a-group-or-second-group-on-linux/

https://docs.influxdata.com/influxdb/v1.8/introduction/install/

https://www.arubacloud.com/tutorial/how-to-install-influxdb-on-ubuntu-20-04.aspx

https://linuxize.com/post/how-to-add-user-to-sudoers-in-ubuntu/

http://old-releases.ubuntu.com/releases/focal/

https://repos.influxdata.com/ubuntu/dists/focal/stable/binary-amd64/Packages

https://www.influxdata.com/blog/influxdb-shards-retention-policies/

https://www.codegrepper.com/code-examples/shell/grant+all+the+permission+to+the+user+ubuntu

https://linuxize.com/post/how-to-add-apt-repository-in-ubuntu/#:~:text=Adding%20Repositories%20with%20add%2Dapt%2Drepository,-The%20basic%20syntax&text=list%20file%20like%20deb%20http,apt%2Drepository%20in%20your%20terminal.

https://itectec.com/ubuntu/ubuntu-unable-to-update-or-install-anything-after-moving-to-another-country/

http://old-releases.ubuntu.com/releases/focal/ubuntu-20.04-desktop-amd64.iso

https://www.dummies.com/web-design-development/web-hosting/how-to-edit-files-with-vi/


Friday, 25 June 2021

Migrate an SQL Server database to an Azure SQL database

Migrate an on-premises SQL Server database to an Azure SQL database

Thanks to SQLHACK for this article

 In this article, we will discuss and understand a method to migrate an on-premises SQL Server database to the Azure SQL database.

This article will look at ways to modernize and transform applications and infrastructure by taking advantage of the agility and flexibility of the cloud.

Azure SQL Database currently resides in ~50 data centers around the world, with more data centers coming online regularly, enabling you to run your database in a data center near you. With so many on-premises implementations at customer sites, how do you migrate from the traditional on-premises SQL Server implementation to modern Azure SQL Database technologies and benefit from what cloud database services can offer?

This article will guide you through the process and steps required to migrate your database workloads from on-premises to Azure-based cloud services.

Introduction

Digital transformation plays a key role in every organization’s future. Dependencies on legacy systems and siloed processes act as major roadblocks to efforts towards digital transformation.

For many organizations, the upcoming Microsoft end of support (EOS) for Windows Server and SQL Server 2008 and SQL Server 2008 R2 brings in challenges in terms of innovation, cost, security, and regulatory compliance. Many traditional organizations are under tremendous pressure to upgrade their systems to the more recent versions of Windows and SQL Server.

If you look at the brighter side, though, this is a great opportunity for organizations to make up for the missed opportunities of the past to migrate, modernize and redefine their core to enhance performance, improve customer experience and drive a competitive edge. One of the options also available is to modernize by migrating their legacy estates to Azure SQL Database.

Why we may have to migrate on-premises SQL Server database to Azure SQL Database (PaaS—Platform as a Service)?

Microsoft’s enabling functions and cloud offerings have many advantages with Azure SQL Database that runs as a PaaS. On a high level, for instance, there is no need for you to create VMs or install the Windows Server operating system or SQL Server. They are all simply available to use. All you have to do is log into the Azure portal and pick the size and configuration that fits your needs.

  • Note: The PaaS offering from Microsoft provides you with everything required to support database services. Microsoft owns more than half of the administration overhead, which includes patching, software updates, system maintenance, etc. However, it is important to understand the underlying database service implications of this model. Azure SQL Database doesn’t in-house full feature parity when compared to the on-premise database versions of SQL Server like SQL Server 2014, SQL Server 2016, and SQL server 2017

    Some of the major notable omissions that include Database MailFILESTREAM data type, and CLR integration with SQL Server. You can refer to the Microsoft documentation for more about the features that are supported and not supported by SQL PaaS offering

How can you validate whether your database is compatible with Azure SQL Database?

This can be validated in multiple ways:

  1. Create a BACPAC file: If you can create the BACPAC file from your database that means your database can be migrated to Azure SQL Database
  2. Use a script: Generate a schema of the on-premises databases and create the same in the Azure SQL environment

What are some ways that data be migrated?

There are several ways to migrate the data. The following are some of the methods that can be used for data migration:

  1. Create BACPAC files and export them
  2. Use SQL Server Management Studio; generate scripts and use the import/export data methods
  3. Use the Data Migration Assistant Wizard
  4. Leverage Transactional Replication to port the data over to the cloud
  5. Use PowerShell and SQLPackage.exe, an SSDT tool
  • Note: You would need to study your situation and adopt any of the above-mentioned methods based on your requirements and the current environment. It is hard to say which of these methods would be better for you until you understand the migration process. In most cases, Data Migration Assistance and/or Replication is best-suited for data migration

In this guide, I will discuss the first method to migrate the database to Azure SQL Database.

Exporting database using export data-tier application

To migrate on-premises SQL Server database to Azure SQL Database Using Export Data-Tier Application:

Create BACPAC files using Management Studio

  1. Verify that you have the latest version of SQL Server Management Studio. New versions of Management Studio are updated monthly to remain in sync with updates to the Azure portal

    Note: It is recommended that you always use the latest version of Management Studio to remain synchronized with updates to Microsoft Azure and SQL Database.Update SQL Server Management Studio

  2. Open SQL Server Management Studio (SSMS) and connect to the source database in Object Explorer. In this case, the source database is AdventureWorks2016
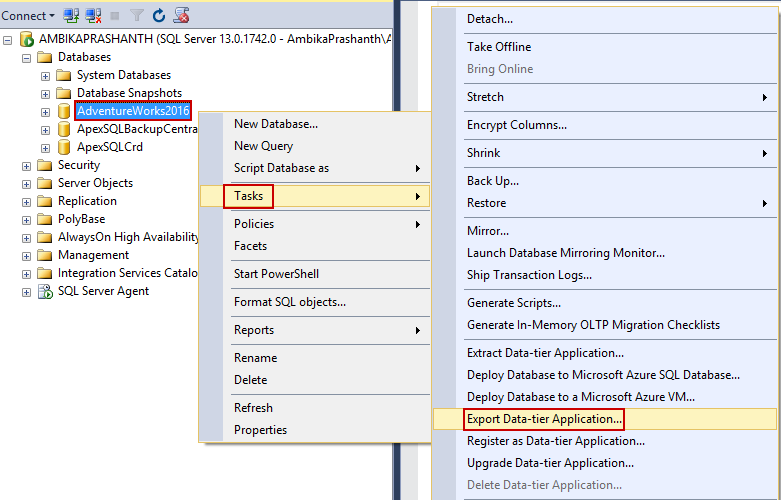
  3. Right-click AdventureWorks2016 database in Object Explorer, point to Tasks, and click Export Data-Tier Application…

    Migrate on-premises SQL Server database to Azure SQL Database Using Export Data-Tier Application…

  4. In the export wizard, click Next to bypass the default setting page
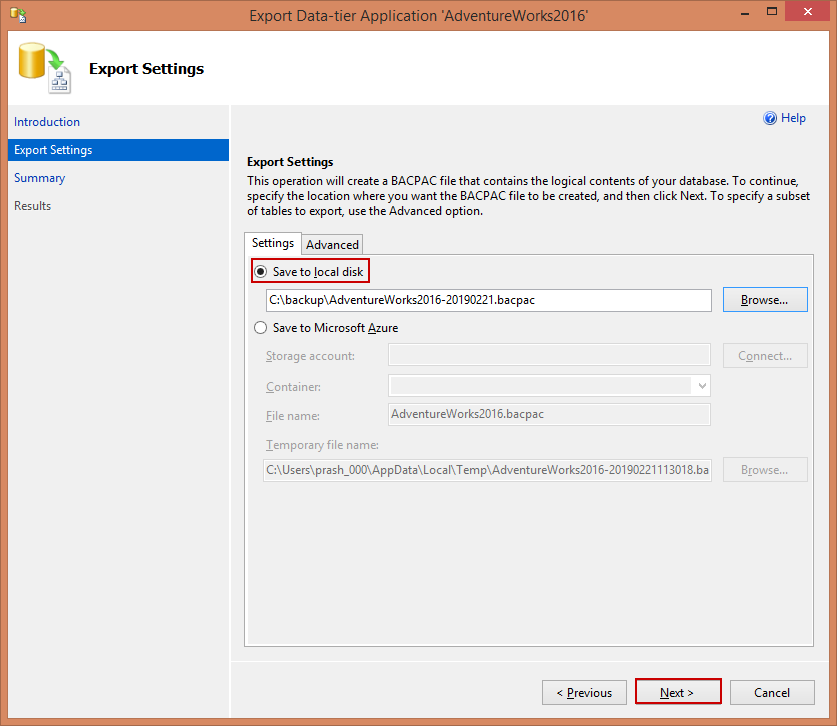
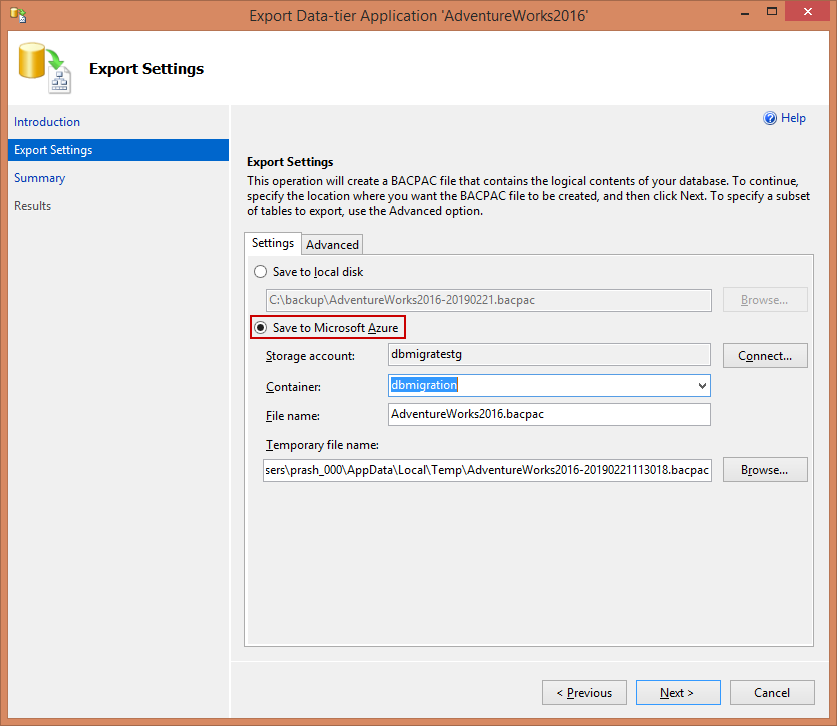
  5. In the Export Settings tab, configure the export to save the BACPAC file to either a local disk or to Azure blob storage and click Next

    • Note: A BACPAC file will only be saved if you have no database compatibility issues. If there are compatibility issues, then the error message will be displayed on the console

    Export Settings tab, configure the export to save the BACPAC file to ei-ther a local disk or to an Azure blob storage.

  6. In this case, let us follow the default settings
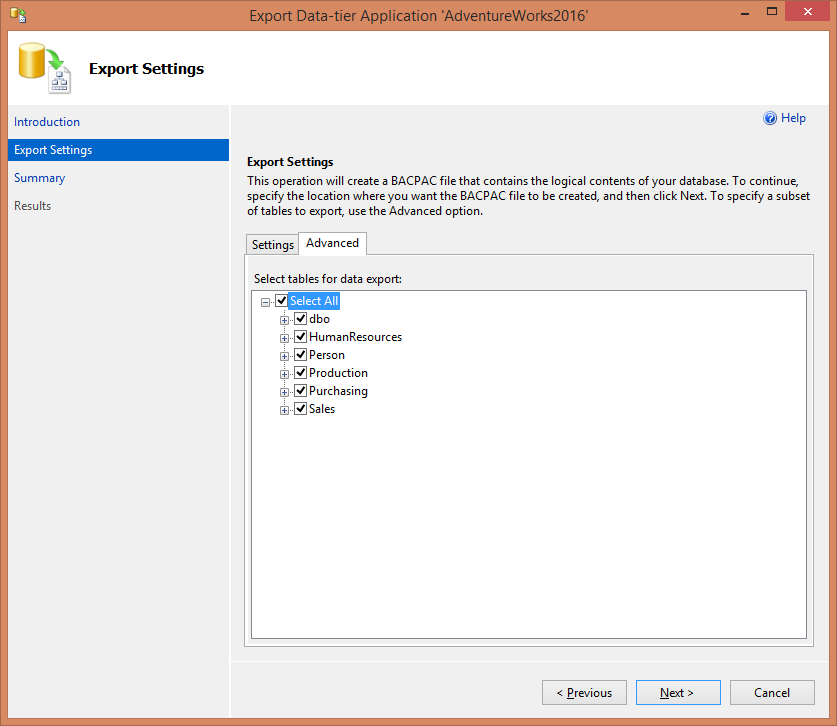
  7. Click the Advanced tab and clear the Select All checkbox to skip exporting the data. Our goal at this point is only to test for compatibility
  8. Select the Save to Microsoft Azure option to save the bacpac file to Azure Blob storage
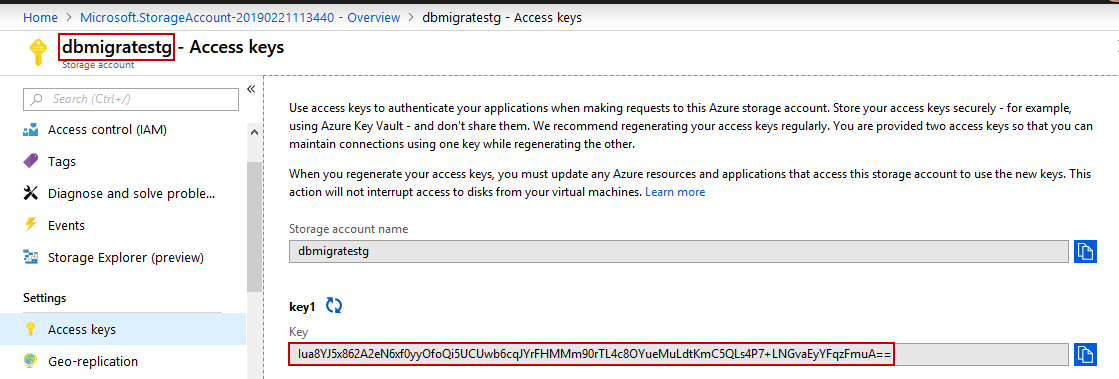
  9. Next, go to the Azure portal to get the storage account details. In this case, dbmigratestg is the storage account created for this exercise

    In this case, dbmigratestg is the storage account created for this exer-cise

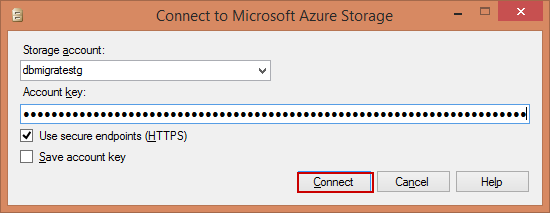
  10. Select the storage account and copy the access key. Paste the key in SQL Server Management Studio and click Connect

    Connect to Microsoft Azure Storage

  11. Now, you can access the Azure Blob storage

    Access Azure SQL Database Blog storage - Export data for tier application - Exprt settings

  12. Click Advanced. In this pane, you can select the intended objects that are going to be part of the migration

    SQL Server - Export data for tier application

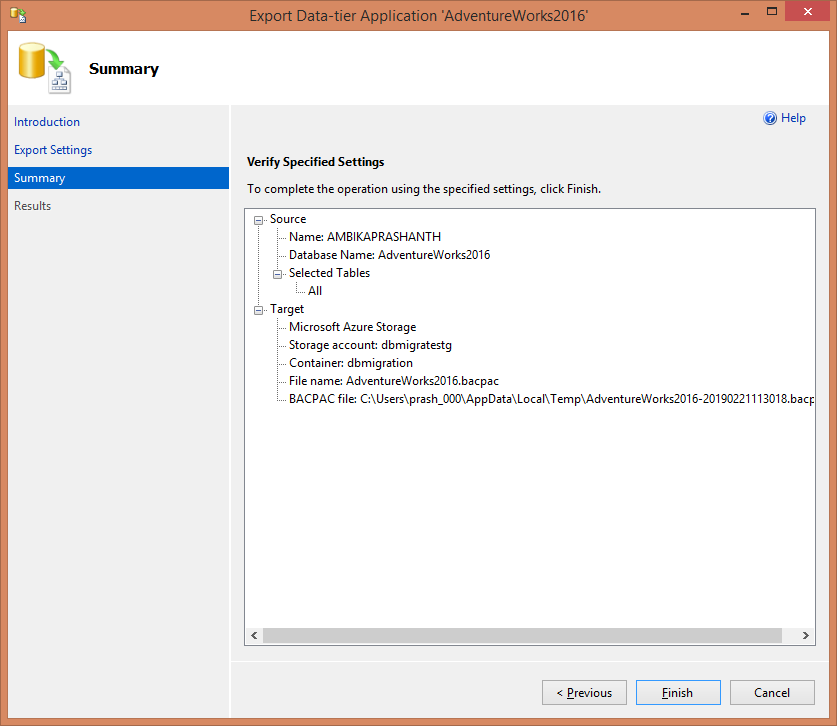
  13. Before you click the Finish button, let us validate the summary in detail

    SQL Server - Export data for tier application - validate summary

  14. Click Next and then click Finish
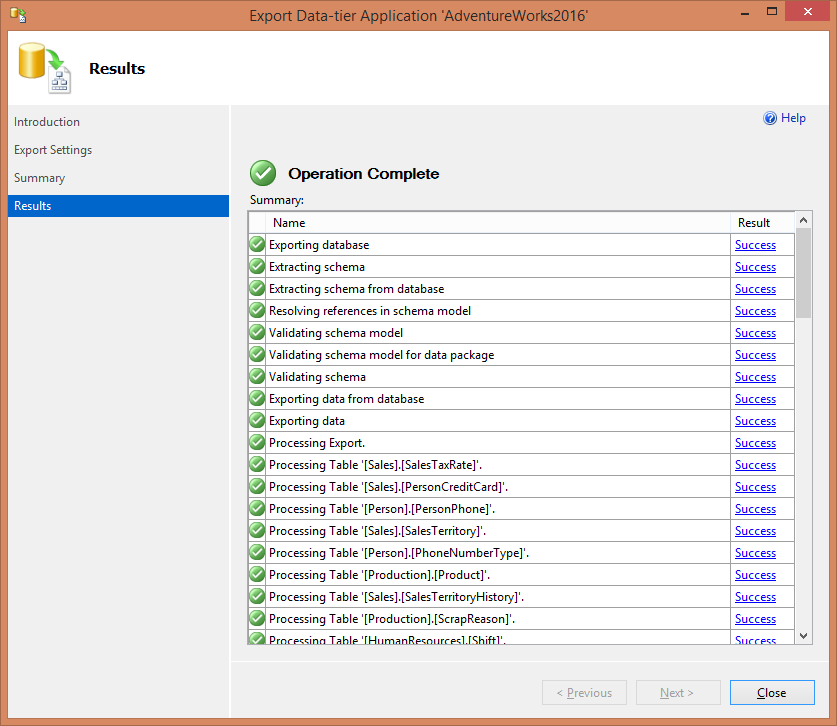
  15. The Export wizard performs the database compatibility checks. If any issues are found, they will appear after the wizard validates the schema

    SQL Server - Export data for tier application - see results

  16. If no errors appear, the database is compatible and it is ready to migrate. If you encounter errors then you will need to fix them before proceeding further. To see the errors, click Error for Validating schema
  17. Finally, the preparation phase to migrate on-premises SQL Server database to Azure SQL Database completed

Importing file using Import database option

In the process of migrating on-premises SQL Server database to Azure SQL Database, now we do the import of .bacpac file.

Importing the BACPAC file to Azure

Now that we have the BACPAC file ready, we can now use the same to migrate the data over to Azure. This BACPAC file could be stored locally, or on Azure Blob storage (standard).

For now, the Azure portal will allow you to only create a single database in Azure SQL Database, and this can be done only from a BACPAC file. Follow the steps below to import the BACPAC file you saved.

  1. Connect to Azure portal and open the SQL database page. Navigate into your resource group and create a new instance of an Azure Database (this is out of the scope of this article). The Assumption is that Azure PaaS SQL Database is available
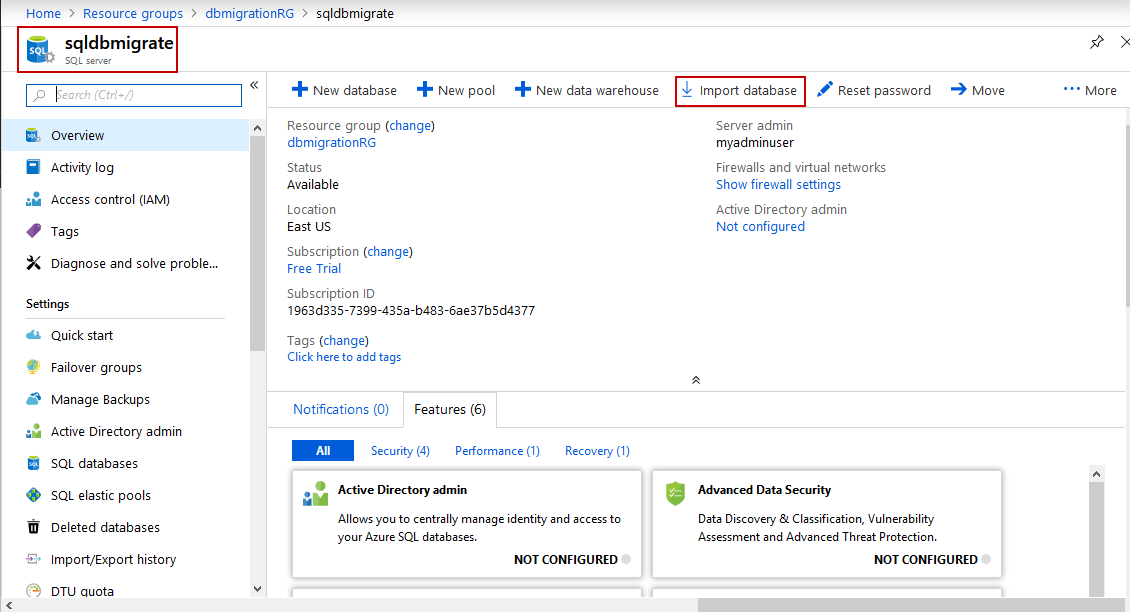
  2. Next, select the Import database on the toolbar

    To migrate on-premises SQL Server database to Azure SQL Database, Import BACPAC into Azure SQL Database

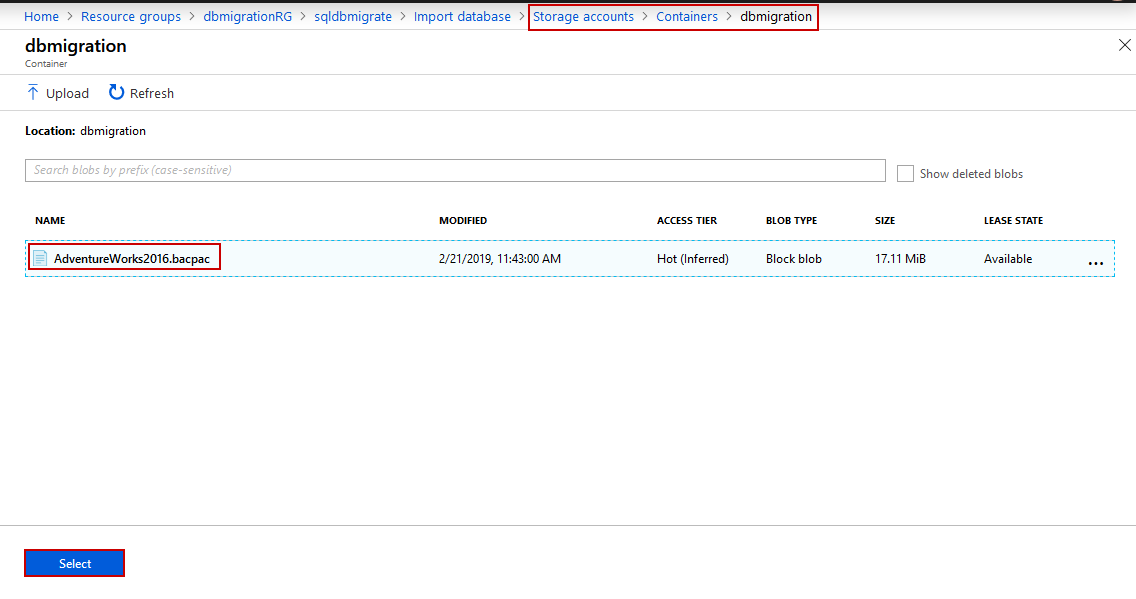
  3. Next, locate the Blob storage account and its respective container for the BACPAC file

    Azure SQL Database - Locate the Azure blob storage account and the respective container for the BACPAC file

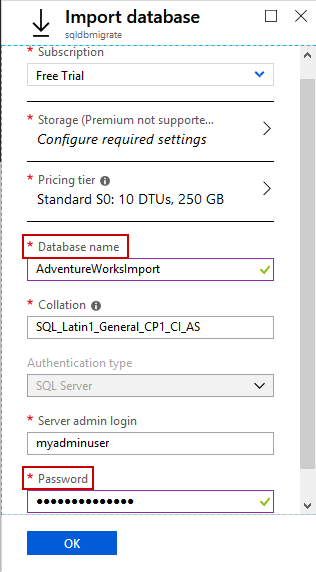
  4. Type in the new database name, size, and the SQL admin credentials

  5. Clicking OK will begin the process of importing the BACPAC file into the new Azure Database, and you should be good to go
  • Note: I recommend going for a higher DTU; higher DTU results in a higher speed of operation. Once you are set up with Azure Database, scaling the database to a higher service tier is rather simple. After the import is complete, you could even scale down to a lower tier to suit your needs

That’s all for now…

Summary

In this post, we saw one of the ways to migrate an on-premises SQL Server database to the Azure SQL Database. We discussed one of the methods – migration using a BACPAC file in detail. I will discuss more other options in my upcoming articles. Stay tuned for more updates.

Wednesday, 31 March 2021

process terminated unexpectedly. [0x8007042b]

 ----------------------process terminated unexpectedly. [0x8007042b]-------------------------------

When you restart SQL AGENT and SQL Service it will give error below likeThe process terminated unexpectedly. [0x8007042b]solution:create separate service account user like dbserviceuser add administrator group and gave sysadmin permissionsthen start SQL Agent will start automatically------------------------------------------------Internal Error occurred-------------------------------------while try to connect RDP You will get internal error occuredsolution:
ping command prompt as belowtracert IP2) when 2 users(maximum) logged in while another user trying to login via RDP they will get internal error occcuredsolution:we should ask any 1 of 2 users logged off their session to allow login other users via RDP

-----To get all DB role permission with object(sp/table/view) Details----------------------

 -----To get all DB role permission with object(sp/table/view) Details----------------------


SELECT DISTINCT rp.name, 

                ObjectType = rp.type_desc, 

                PermissionType = pm.class_desc, 

                pm.permission_name, 

                --pm.state_desc, 

                ObjectType = CASE 

                               WHEN obj.type_desc IS NULL 

                                     OR obj.type_desc = 'SYSTEM_TABLE' THEN 

                               pm.class_desc 

                               ELSE obj.type_desc 

                             END, 

                s.Name as SchemaName,

                [ObjectName] = Isnull(ss.name, Object_name(pm.major_id)),* 

FROM   sys.database_principals rp 

       INNER JOIN sys.database_permissions pm 

               ON pm.grantee_principal_id = rp.principal_id 

       LEFT JOIN sys.schemas ss 

              ON pm.major_id = ss.schema_id 

       LEFT JOIN sys.objects obj 

              ON pm.[major_id] = obj.[object_id] 

       LEFT JOIN sys.schemas s

              ON s.schema_id = obj.schema_id

WHERE  rp.type_desc = 'DATABASE_ROLE' 

       AND pm.class_desc <> 'DATABASE' 

--and obj.type_desc ='SQL_STORED_PROCEDURE'

--and rp.name='db_reader'

and Isnull(ss.name, Object_name(pm.major_id)) not like 'dt_%'

ORDER  BY rp.name, 

           pm.permission_name,

          pm.class_desc 


Tuesday, 9 March 2021

TSQL Query to Find all database users mapped to db_owner role

 ----------------------------------Find all database users mapped to db_owner role-----------------------


use master

Exec sp_MSforeachdb 'SELECT ''?'' AS [Database Name], su1.name AS [Database User Name], su2.name AS [Database Role]


FROM [?].sys.database_role_members r


INNER JOIN [?]..sysusers su1 ON su1.[uid] = r.member_principal_id


INNER JOIN [?]..sysusers su2 ON su2.[uid] = r.role_principal_id

WHERE su2.name IN(''db_owner'') AND su1.name NOT IN(''dbo'')'


--------------------------Find particular database users mapped to db_owner role-------------------


USE master-----change db name here


GO


SELECT  members.name as 'members_name', roles.name as 'roles_name',roles.type_desc as 'roles_desc',members.type_desc as 'members_desc'


FROM sys.database_role_members rolemem


INNER JOIN sys.database_principals roles


ON rolemem.role_principal_id = roles.principal_id


INNER JOIN sys.database_principals members


ON rolemem.member_principal_id = members.principal_id


where roles.name = 'db_owner' and members.name<>'dbo'


ORDER BY members.name


-------------------------------------------------------------sp_MSforeachdb--------------------------------------


CREATE PROCEDURE dbo.sp_MSforeachdb    

@command1 NVARCHAR(2000),   

@replacechar nchar(1) = N'?',   

@command2 NVARCHAR(2000) = NULL,  

@command3 NVARCHAR(2000) = NULL,    

@precommand NVARCHAR(2000) = NULL,   

@postcommand NVARCHAR(2000) = NULL    

AS    

    SET deadlock_priority low    


 /* This proc RETURNs one or more rows for each accessible db, with each db defaulting to its own result SET */    

 /* @precommand and @postcommand may be used to force a single result SET via a temp table. */    


 /* Preprocessor won't replace within quotes so have to use STR(). */    

 DECLARE @inaccessible NVARCHAR(12), @invalidlogin NVARCHAR(12), @dbinaccessible NVARCHAR(12)    

 SELECT @inaccessible = LTRIM(STR(CONVERT(INT, 0x03e0), 11))    

 SELECT @invalidlogin = LTRIM(STR(CONVERT(INT, 0x40000000), 11))    

 SELECT @dbinaccessible = N'0x80000000'  /* SQLDMODbUserProf_InaccessibleDb; the negative number doesn't work in CONVERT() */    


 IF (@precommand IS NOT NULL)    

  EXEC(@precommand)    


 DECLARE @origdb NVARCHAR(128)    

 SELECT @origdb = DB_NAME()    


 /* IF it's a single user db and there's an entry for it in sysprocesses who isn't us, we can't use it. */    

   /* CREATE the SELECT */    

 EXEC(N'DECLARE hCForEachDatabASe cursor global for SELECT name from mASter.dbo.sysdatabASes d ' +    

   N' where (d.status & ' + @inaccessible + N' = 0)' +    

   N' and (DATABASEPROPERTY(d.name, ''issingleuser'') = 0 and (hAS_dbaccess(d.name) = 1))' )    


 DECLARE @retval INT    

 SELECT @retval = @@error    

 IF (@retval = 0)    

  EXEC @retval = sys.sp_MSforeach_worker @command1, @replacechar, @command2, @command3, 1    


 IF (@retval = 0 and @postcommand IS NOT NULL)    

  EXEC(@postcommand)    


   DECLARE @tempdb NVARCHAR(258)    

   SELECT @tempdb = REPLACE(@origdb, N']', N']]')    

   EXEC (N'use ' + N'[' + @tempdb + N']')    


 RETURN @retval  


------------------------------------------------------------------------------------------------------------------------------------------------------------------------------------------

Friday, 26 February 2021

To get combine report of Server roles and DB roles in SQL Server

 Select * from 

(

select A.SQLloginame,Isnull(B.server_role,'Public') as ServerRole,A.createdate from (

select distinct name SQLloginame,* from sys.syslogins where hasaccess=1 and isntname=0 and name not in ('##MS_PolicyTsqlExecutionLogin##')

)as A

Left join (

SELECT @@SERVERNAME as SQLInstance, R.name AS server_role

, P.name AS role_member

FROM sys.server_role_members RM

INNER JOIN sys.server_principals P ON RM.member_principal_id = P.principal_id

INNER JOIN (SELECT principal_id, name FROM sys.server_principals WHERE type_desc = 'SERVER_ROLE') R

ON RM.role_principal_id = R.principal_id

) as B ON A.name=B.role_member

WHERE SQLloginame Not in ('##MS_AgentSigningCertificate##','##MS_PolicyEventProcessingLogin##')

--Order by SQLloginame

)as A

Left join

(

Select * from (

  select [servername],[dbname],[UserName],[PermissionLevel] from [DB].[dbo].[Serverroles] 

  ) src

  pivot

  (

 Max(PermissionLevel) 

  for [dbname] in (DB1,DB2,DB3,DB4,DB5,DB6))piv

--order by UserName

)as B

On A.SQLloginame=B.[UserName]

Order by A.SQLloginame

Tuesday, 5 January 2021

SQL SERVER – Cannot open backup device. Operating system error 1326 (Logon failure: unknown user name or bad password.)

SQL SERVER – Cannot open backup device. Operating system error 1326 (Logon failure: unknown user name or bad password.)

 ref:

https://blog.sqlauthority.com/2017/02/18/sql-server-cannot-open-backup-device-operating-system-error-1326-logon-failure-unknown-user-name-bad-password/


There might be various reasons for above error, but this case is very specific to a situation where SQL Server was installed on a machine which was in Workgroup whereas the backup destination was the server located in the domain.  Here is the error message seen in SQL Agent job history. Let us learn about how to fix Operating system error 1326.

Executed as user: NT Service\SQLSERVERAGENT. Microsoft (R) SQL Server Execute Package Utility Version 11.0.2100.60 for 64-bit Copyright (C) Microsoft Corporation. All rights reserved.
Started: 12:23:24 PM Progress: 2016-12-27 12:23:25.00 Source: {229AB1E3-E7E5-4185-B305-BF0F7657122A}
Executing query “DECLARE @Guid UNIQUEIDENTIFIER EXECUTE msdb..sp…”.: 100% complete End Progress Error: 2016-12-27 12:23:25.35 Code: 0xC002F210 Source: Back Up Database Task Execute SQL Task
Description: Executing the query “BACKUP DATABASE [master] TO DISK = N’\\192.168.3….” failed with the following error: “Cannot open backup device ‘\\192.168.3.55\backupShare\master_backup_2016_12_27_122325_2407734.bak’. Operating system error 1326(Logon failure: unknown user name or bad password.). BACKUP DATABASE is terminating abnormally.”. Possible failure reasons: Problems with the query, “ResultSet” property not set correctly, parameters not set correctly, or connection not established correctly. End Error

Generally, when the backup is taken SQL Agent Service account is used to take backup. In this case since SQL was on Workgroup, it was NT Service\SQLSERVERAGENT. This account is not a valid account to validate for a domain

VERIFICAITON

First, let’s verify that we are hitting the same issue which I experienced. From Workgroup machine, we would try to query remote share using xp_cmdshell. Here is the command.

1
xp_cmdshell 'dir \\192.168.3.55\backupShare'

This command should fail with below error.

Logon failure: unknown user name or bad password.

SOLUTION

Since we are talking about authentication issue. So, we need to make sure that we map a drive to SQL Server (not windows). As per SQL Server Books-On-Line:

“For a network share to be visible to SQL Server, the share must be mapped as a network drive in the session in which SQL Server is running”

Here is the command to map the drive.

1
EXEC XP_CMDSHELL 'net use Z: \\192.168.3.55\backupShare password@123 /User:domain\user'

Once the above is completely successful, we should be able to see content on the Z drive by running below command.

1
EXEC XP_CMDSHELL 'dir Z:\'

After this we should be able to take backup on the Z drive as its mapped within SQL Server as a drive.

1
Backup database master to disk = 'Z:\master.bak'

The above command should work and create the backup file in \\192.168.3.55\backupShare