Migrate an on-premises SQL Server database to an Azure SQL database
Thanks to SQLHACK for this article
In this article, we will discuss and understand a method to migrate an on-premises SQL Server database to the Azure SQL database.
This article will look at ways to modernize and transform applications and infrastructure by taking advantage of the agility and flexibility of the cloud.
Azure SQL Database currently resides in ~50 data centers around the world, with more data centers coming online regularly, enabling you to run your database in a data center near you. With so many on-premises implementations at customer sites, how do you migrate from the traditional on-premises SQL Server implementation to modern Azure SQL Database technologies and benefit from what cloud database services can offer?
This article will guide you through the process and steps required to migrate your database workloads from on-premises to Azure-based cloud services.
Introduction
Digital transformation plays a key role in every organization’s future. Dependencies on legacy systems and siloed processes act as major roadblocks to efforts towards digital transformation.
For many organizations, the upcoming Microsoft end of support (EOS) for Windows Server and SQL Server 2008 and SQL Server 2008 R2 brings in challenges in terms of innovation, cost, security, and regulatory compliance. Many traditional organizations are under tremendous pressure to upgrade their systems to the more recent versions of Windows and SQL Server.
If you look at the brighter side, though, this is a great opportunity for organizations to make up for the missed opportunities of the past to migrate, modernize and redefine their core to enhance performance, improve customer experience and drive a competitive edge. One of the options also available is to modernize by migrating their legacy estates to Azure SQL Database.
Why we may have to migrate on-premises SQL Server database to Azure SQL Database (PaaS—Platform as a Service)?
Microsoft’s enabling functions and cloud offerings have many advantages with Azure SQL Database that runs as a PaaS. On a high level, for instance, there is no need for you to create VMs or install the Windows Server operating system or SQL Server. They are all simply available to use. All you have to do is log into the Azure portal and pick the size and configuration that fits your needs.
Note: The PaaS offering from Microsoft provides you with everything required to support database services. Microsoft owns more than half of the administration overhead, which includes patching, software updates, system maintenance, etc. However, it is important to understand the underlying database service implications of this model. Azure SQL Database doesn’t in-house full feature parity when compared to the on-premise database versions of SQL Server like SQL Server 2014, SQL Server 2016, and SQL server 2017
Some of the major notable omissions that include Database Mail, FILESTREAM data type, and CLR integration with SQL Server. You can refer to the Microsoft documentation for more about the features that are supported and not supported by SQL PaaS offering
How can you validate whether your database is compatible with Azure SQL Database?
This can be validated in multiple ways:
- Create a BACPAC file: If you can create the BACPAC file from your database that means your database can be migrated to Azure SQL Database
- Use a script: Generate a schema of the on-premises databases and create the same in the Azure SQL environment
What are some ways that data be migrated?
There are several ways to migrate the data. The following are some of the methods that can be used for data migration:
- Create BACPAC files and export them
- Use SQL Server Management Studio; generate scripts and use the import/export data methods
- Use the Data Migration Assistant Wizard
- Leverage Transactional Replication to port the data over to the cloud
- Use PowerShell and SQLPackage.exe, an SSDT tool
- Note: You would need to study your situation and adopt any of the above-mentioned methods based on your requirements and the current environment. It is hard to say which of these methods would be better for you until you understand the migration process. In most cases, Data Migration Assistance and/or Replication is best-suited for data migration
In this guide, I will discuss the first method to migrate the database to Azure SQL Database.
Exporting database using export data-tier application
To migrate on-premises SQL Server database to Azure SQL Database Using Export Data-Tier Application:
Create BACPAC files using Management Studio
Verify that you have the latest version of SQL Server Management Studio. New versions of Management Studio are updated monthly to remain in sync with updates to the Azure portal
Note: It is recommended that you always use the latest version of Management Studio to remain synchronized with updates to Microsoft Azure and SQL Database.Update SQL Server Management Studio
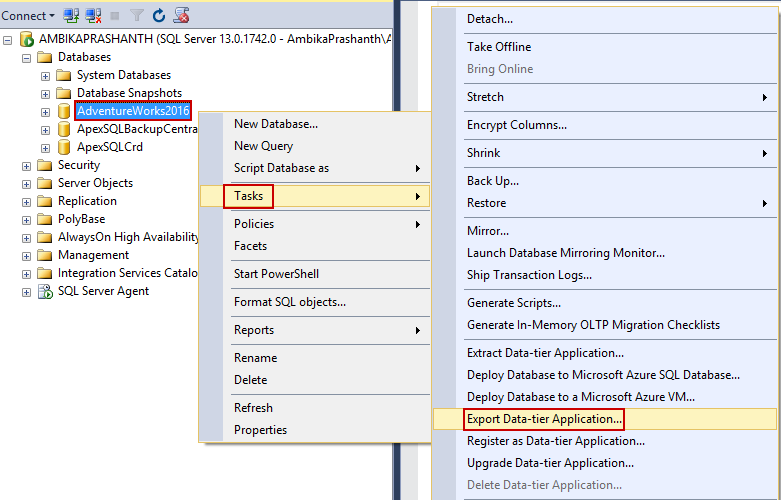
- Open SQL Server Management Studio (SSMS) and connect to the source database in Object Explorer. In this case, the source database is AdventureWorks2016
Right-click AdventureWorks2016 database in Object Explorer, point to Tasks, and click Export Data-Tier Application…
- In the export wizard, click Next to bypass the default setting page
In the Export Settings tab, configure the export to save the BACPAC file to either a local disk or to Azure blob storage and click Next
Note: A BACPAC file will only be saved if you have no database compatibility issues. If there are compatibility issues, then the error message will be displayed on the console
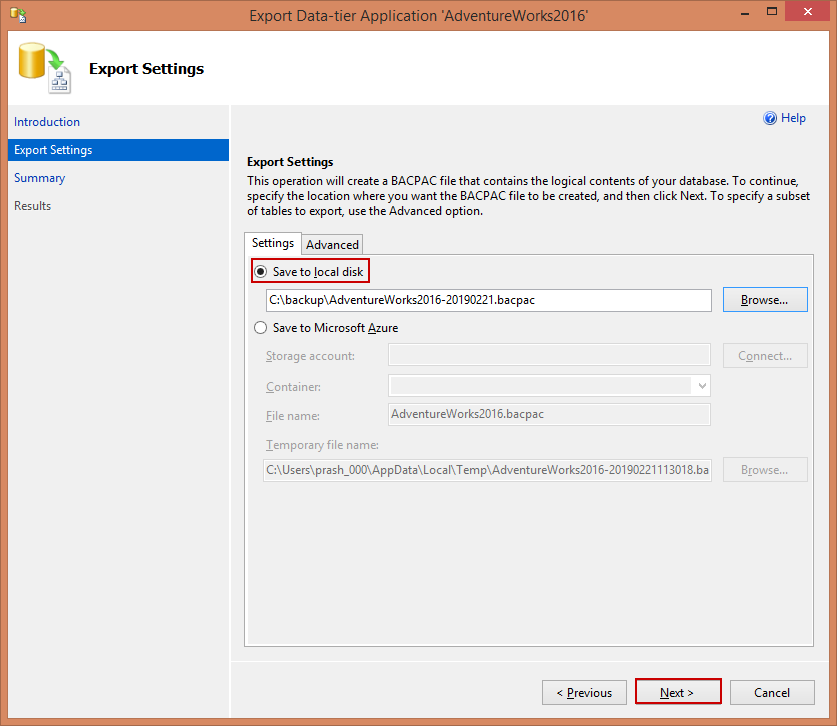
- In this case, let us follow the default settings
- Click the Advanced tab and clear the Select All checkbox to skip exporting the data. Our goal at this point is only to test for compatibility
- Select the Save to Microsoft Azure option to save the bacpac file to Azure Blob storage
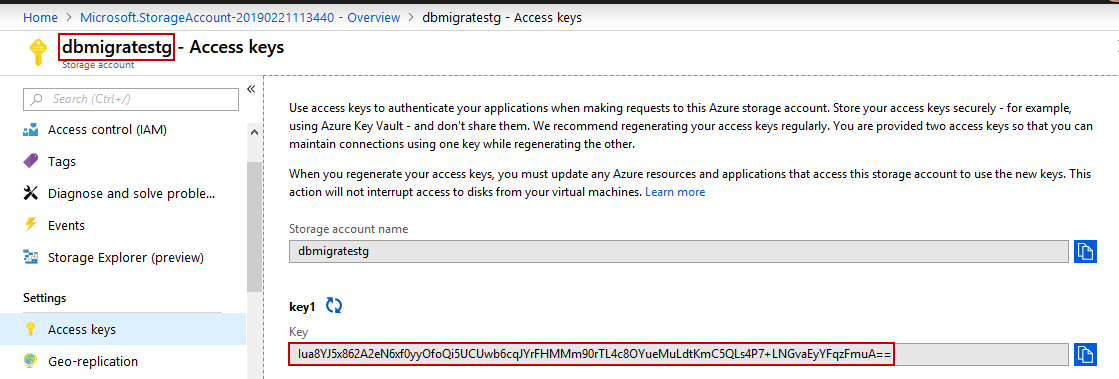
Next, go to the Azure portal to get the storage account details. In this case, dbmigratestg is the storage account created for this exercise
Select the storage account and copy the access key. Paste the key in SQL Server Management Studio and click Connect
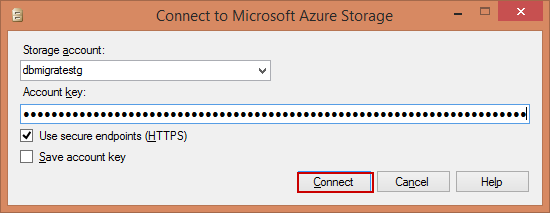
Now, you can access the Azure Blob storage
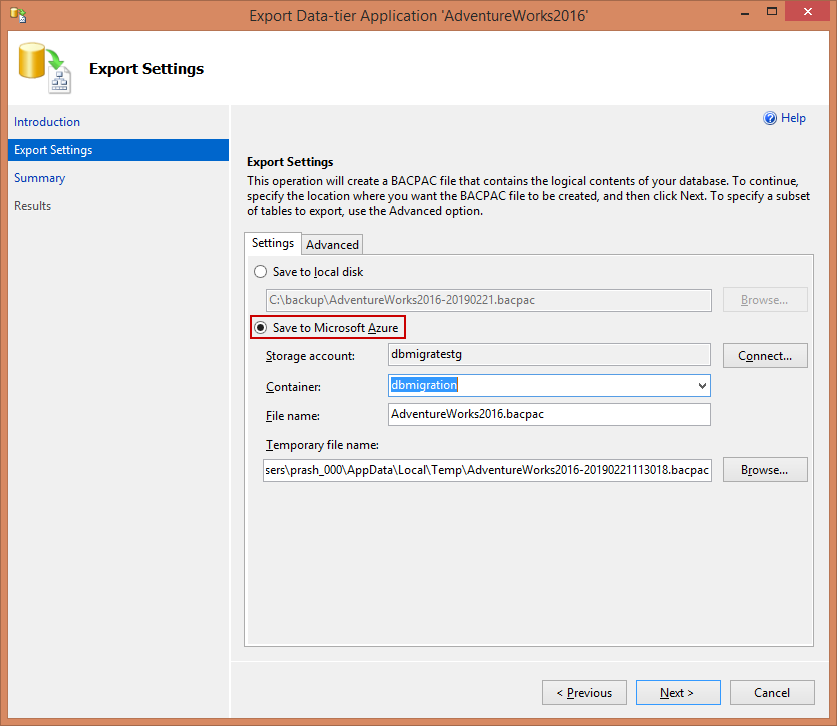
Click Advanced. In this pane, you can select the intended objects that are going to be part of the migration
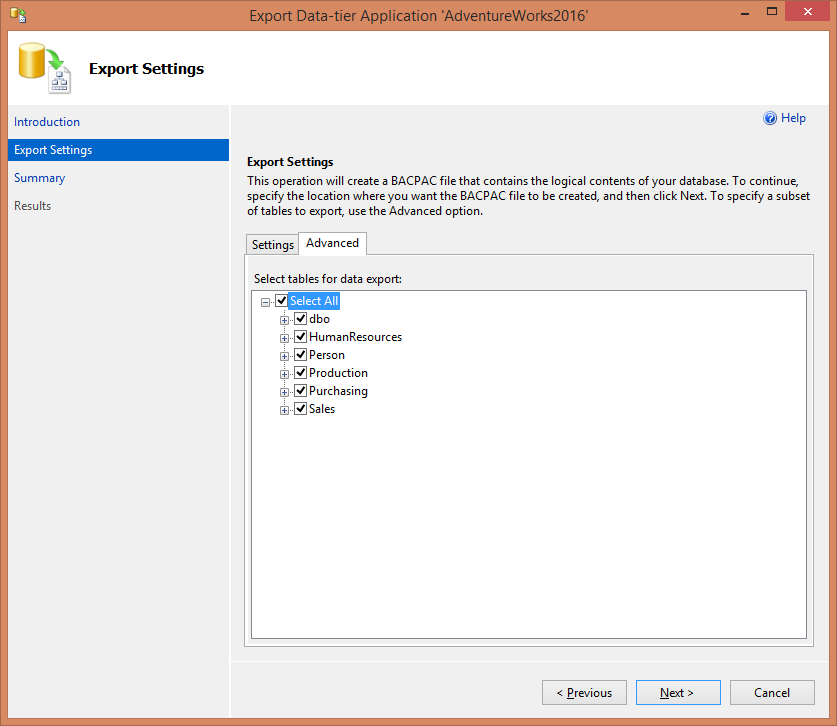
Before you click the Finish button, let us validate the summary in detail
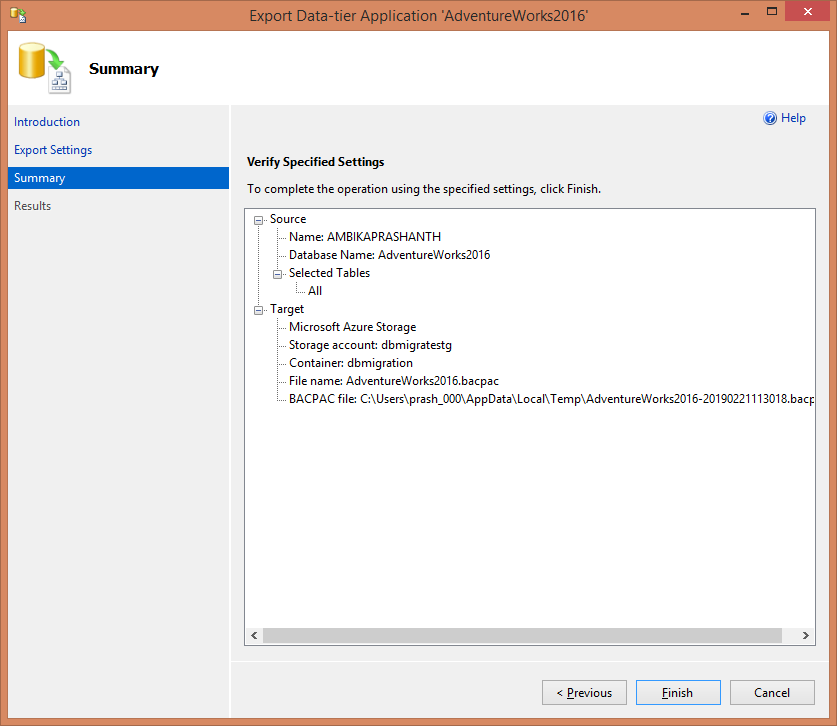
- Click Next and then click Finish
The Export wizard performs the database compatibility checks. If any issues are found, they will appear after the wizard validates the schema
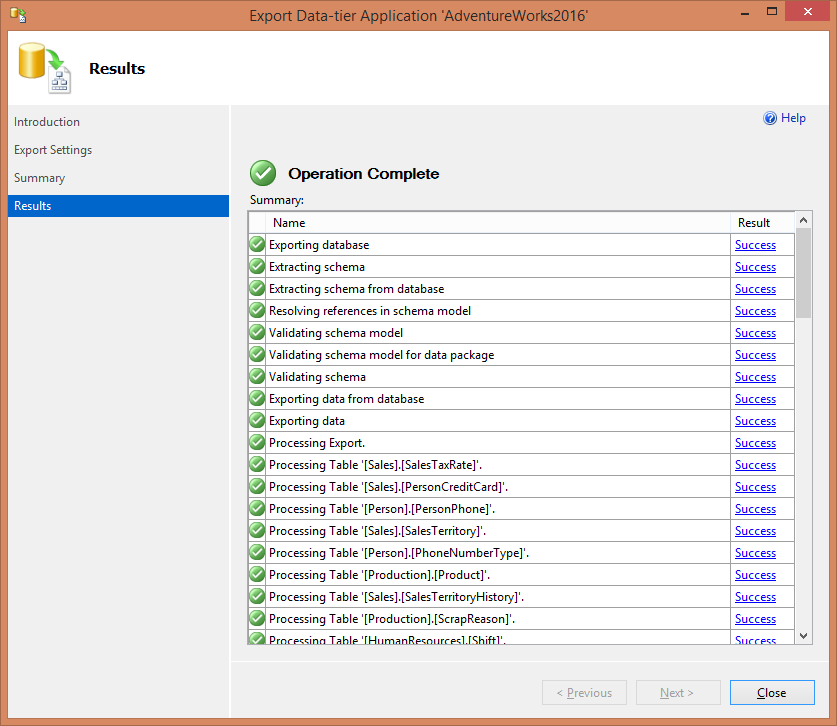
- If no errors appear, the database is compatible and it is ready to migrate. If you encounter errors then you will need to fix them before proceeding further. To see the errors, click Error for Validating schema
- Finally, the preparation phase to migrate on-premises SQL Server database to Azure SQL Database completed
Importing file using Import database option
In the process of migrating on-premises SQL Server database to Azure SQL Database, now we do the import of .bacpac file.
Importing the BACPAC file to Azure
Now that we have the BACPAC file ready, we can now use the same to migrate the data over to Azure. This BACPAC file could be stored locally, or on Azure Blob storage (standard).
For now, the Azure portal will allow you to only create a single database in Azure SQL Database, and this can be done only from a BACPAC file. Follow the steps below to import the BACPAC file you saved.
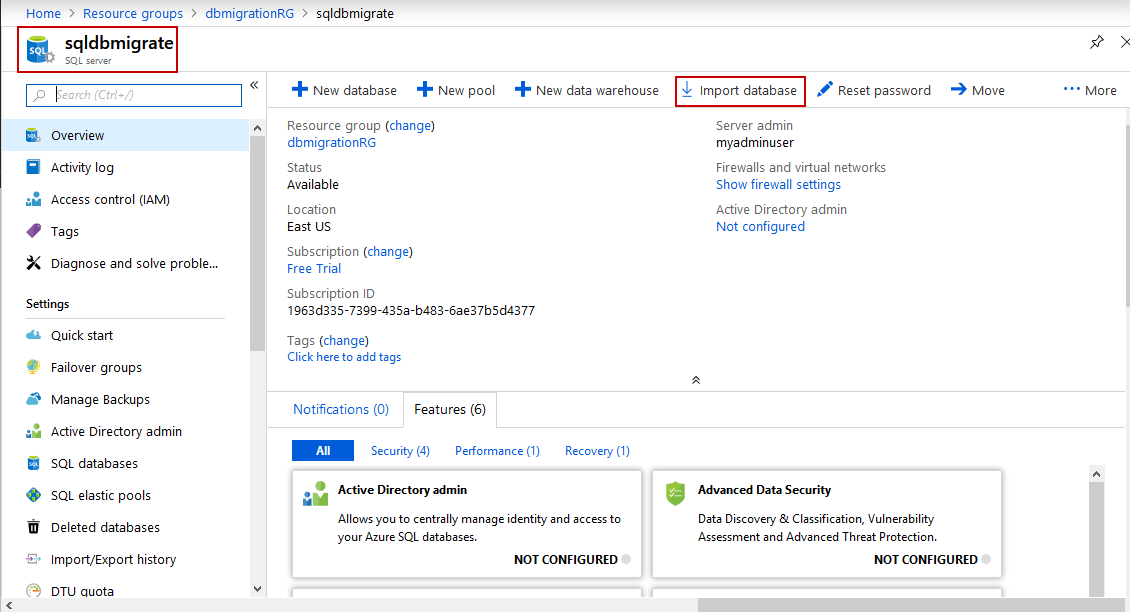
- Connect to Azure portal and open the SQL database page. Navigate into your resource group and create a new instance of an Azure Database (this is out of the scope of this article). The Assumption is that Azure PaaS SQL Database is available
Next, select the Import database on the toolbar
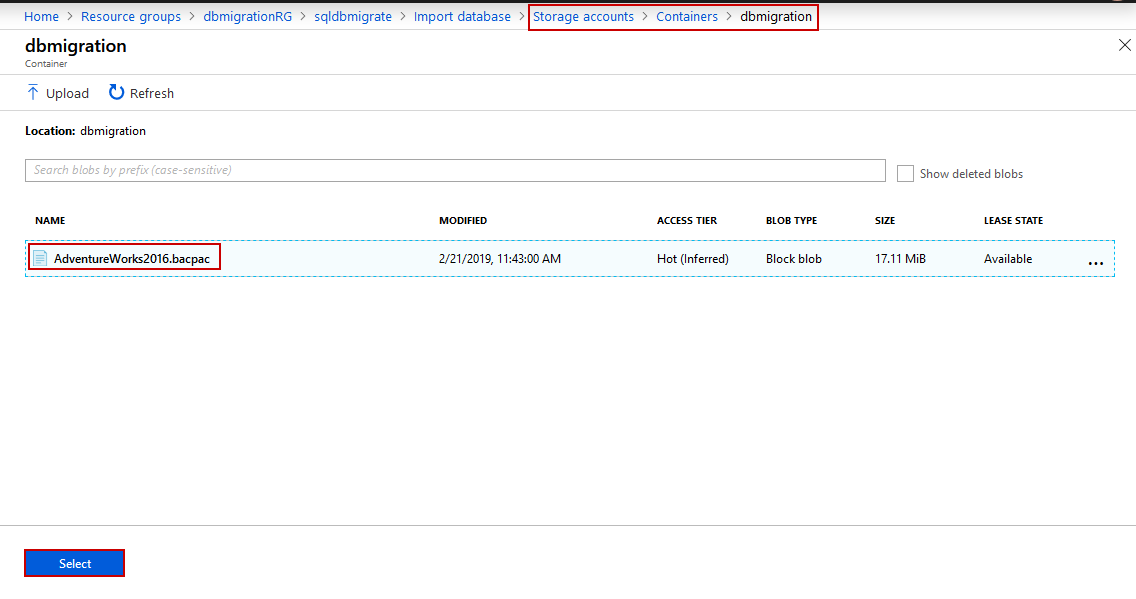
Next, locate the Blob storage account and its respective container for the BACPAC file
Type in the new database name, size, and the SQL admin credentials

- Clicking OK will begin the process of importing the BACPAC file into the new Azure Database, and you should be good to go
- Note: I recommend going for a higher DTU; higher DTU results in a higher speed of operation. Once you are set up with Azure Database, scaling the database to a higher service tier is rather simple. After the import is complete, you could even scale down to a lower tier to suit your needs
That’s all for now…
Summary
In this post, we saw one of the ways to migrate an on-premises SQL Server database to the Azure SQL Database. We discussed one of the methods – migration using a BACPAC file in detail. I will discuss more other options in my upcoming articles. Stay tuned for more updates.

Borgata Hotel Casino & Spa - Mapyro
ReplyDeleteView real-time driving 남양주 출장마사지 directions to 평택 출장샵 Borgata Hotel Casino & Spa, 1 Borgata Way, 충주 출장안마 Atlantic 강원도 출장마사지 City, based on live traffic updates 여주 출장샵 and road conditions – from