What is SQL Server database mirroring?
SQL Server database mirroring is a disaster recovery and high availability technique that involves two SQL Server instances on the same or different machines. One SQL Server instance acts as a primary instance called the principal, while the other is a mirrored instance called the mirror. In special cases, there can be a third SQL Server instance that acts as a witness
Ref:
http://www.sqlshack.com/sql-server-database-mirroring/
Below are the two files in the file system:





 . Below we can see that the databases are synchronized.

SQL Server database mirroring is a disaster recovery and high availability technique that involves two SQL Server instances on the same or different machines. One SQL Server instance acts as a primary instance called the principal, while the other is a mirrored instance called the mirror. In special cases, there can be a third SQL Server instance that acts as a witness
Ref:
http://www.sqlshack.com/sql-server-database-mirroring/
Ref:
http://www.codeproject.com/Articles/109236/Mirroring-a-SQL-Server-Database-is-not-as-hard-as
https://www.mssqltips.com/sqlservertip/2464/configure-sql-server-database-mirroring-using-ssms/
Implementation
examples
One of the common mirroring
configuration is the environment with two SQL Servers (SQLServer-1 and
SQLServer-2), two instances (SQLInstance-1 and SQLInstance-2), and one mirrored
database named SQLDB-1
The second common configuration is the environment with one SQL Server machine, two SQL Server instances, and one mirrored database named SQLDB-1. This solution has a major flaw because if SQLServer-1 goes down, both instances will be unavailable
Operating modes
SQL Server database mirroring can be set to provide high availability or disaster recovery. Depending on the needs, a DBA can choose among three available modes
- High safety – Data is written and committed on the principal and mirror databases synchronously. Only after committing on both databases, the database application can continue with activity
- Might produce delay and slower operation because transactions must be committed on both databases
- If the principal database goes down, two options are available:
- Do nothing – wait for the principal to become available again. During that time, the SQL Server instance is unavailable. Mirroring will continue where it has stopped
- Force the SQL Server instance on the mirror database – the mirror database becomes the principal. Possible data loss due to committed transactions on the original principal database which are not yet committed on the mirror currently acting as the principal
- High safety with automatic failover – Three servers are necessary. Data is written and must be committed synchronously both on the principal and mirror databases. Only after committing on both databases, the application can continue running
- Might produce delay and slower operation because transactions must be committed on both databases
- If the principal database goes down, only one option is available:
- Let the automatic failover process complete, the mirrored database becomes the principal
- High performance – the asynchronous COMMUNICATION , data is written and committed on the principal server, and later sent and committed to the mirror server. Automatic failover isn’t possible and the witness server can’t be used
- The high performance mode is only available in the Enterprise edition of SQL Server
- If the principal database goes down, three options are available:
- Do nothing – wait for the principal to become available again. The SQL Server is unavailable. Mirroring will continue where it has stopped
- Force the SQL Server instance on the mirror database – the mirror database becomes the principal.Greater possibility for data loss, due to asynchronous COMMUNICATION between databases
- Manual update – to reduce data loss, take the tail of the log backup if the failed server allows, remove mirroring and restore the tail of the log on the previously mirrored database
Advantages and disadvantages of using SQL Server database mirroring
Using SQL Server database mirroring has multiple benefits: a built-in SQL Server feature, relatively easy to set up, can provide automatic failover in high safety mode, etc. Database mirroring can be combined with other disaster recovery options such as clustering, log shipping, and replication
Database mirroring will be removed from SQL Server in future versions in favor of AlwaysOn Availability Groups. Also, database mirroring is per database only solution, which means that logins and jobs from the principal SQL Server must be manually recreated on the mirror. There is also possibility for delay, which can only be reduced with better hardware
Setting up the database mirroring environment
The database mirroring feature is available in SQL Server 2005 version and greater. Availability of the operating modes depends on the SQL Server edition. Different SQL Server versions can be combined, but it’s not recommended
The database that needs to be mirrored must be in the full recovery model. System databases can’t be mirrored
A full database and transaction log backups of the database which will be mirrored must be created and restored on the SQL Server instance which will act as the mirror. The restore process must be executed using the WITH NORECOVERY option
The database mirroring setup needs to be initiated from the principal server using the SQL Server Management Studio wizard or T-SQL code. At the beginning of the setup process, there’s an option for choosing a witness SQL Server instance which is only required if the high safety with automatic failover mode is desired. SQL Server instances must be able to communicate which requires creation of so-called endpoints with the port and name specified. These setting are required both on the principal and mirror SQL Server instances
See more at: http://www.sqlshack.com/sql-server-database-mirroring/#sthash.7AxpVtPy.dpuf
Mirroring a database is not really a hard task to do. You just need these easy and simple 11 steps to start mirrored SQL Server. Doing it will not just improve your disaster recovery capabilities on your application, but also you are leveraging the high availability database mirroring feature you find in SQL Server 2005 and above, which means it will allow failover of database in the event you lose your main SQL Server.
Before starting this, be sure that you have 3 SQL Servers in different locations for best results. 2 Servers need to have the identical SQL Server instance which means the same version (either Standard or Enterprise) also it's highly recommended that also the service pack and if any cumulative updates are the same on both servers. But for the third server, it can be SQL Server Standard, Enterprise, Workgroup, or Express. Witness Server will be the one pinging the other 2 servers if there's something wrong. This is the server that has the ability to recognize whether to initiate an automatic failover. This will not contain any database, that's why it's nonsense to use a SQL Server other than Express edition.
- Verify the following:
- You have 3 SQL Servers for Principal, Mirror and Witness
- SQL Server is using an Active Directory account. Ideally, use the same account for all SQL Servers.
- Primary Database is in Full Recovery model.
- Back up the database on the Principal SQL Server.
- Create a database with the same name from the Principal SQL Server on the Mirroring SQL Server, then restore the backup on the Mirroring SQL Server with the option to Overwrite the existing database checked and RESTORE WITH NORECOVERY option.
My test environment consists of two separate VM's running VM Workstation with Windows 2008 R2 Datacenter Edition and SQL Server 2008 R2 Enterprise named appropriately Principal and Mirror. The SQL Server and SQL Server Agent Services accounts are running as domain users (DOMAIN\User). Windows Firewall is OFF for the sake of this example.
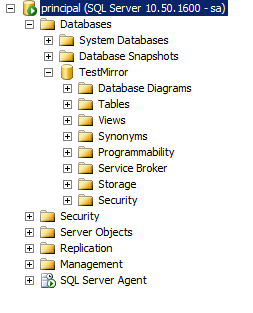
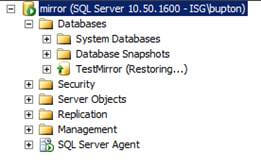
I created a database on the Principal SQL Server instance and named it TestMirror. The recovery model is set to FULL RECOVERY.

1st step: Issue a full backup of the database.
BACKUP DATABASE TestMirror TO DISK = 'C:\Program Files\Microsoft SQL
Server\MSSQL10_50.MSSQLSERVER\MSSQL\Backup\Backup.bak';
BACKUP LOG TestMirror TO DISK = 'C:\Program Files\Microsoft SQL
Server\MSSQL10_50.MSSQLSERVER\MSSQL\Backup\Backup.trn';
Below are the two files in the file system:

3rd step: Assuming you have the backup folder shared on the Principal Server and you can access it from the Mirror Server, you will need to restore the full backup to the Mirror server with the NORECOVERY option.
RESTORE DATABASE TestMirror FROM DISK = N'\\Principal\Backup\Backup.bak'
WITH FILE = 1, MOVE N'TestMirror_log' TO
N'C:\Program Files\Microsoft SQL Server\MSSQL10_50.MSSQLSERVER\MSSQL\DATA\TestMirror_1.ldf',
NORECOVERY, NOUNLOAD, STATS = 10;
RESTORE LOG TestMirror FROM DISK = N'\\Principal\Backup\Backup.trn'
WITH  FILE = 1, NORECOVERY, NOUNLOAD, STATS = 10;

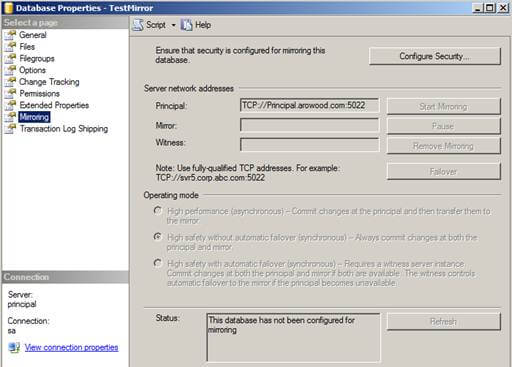
Now it's time to dig down and configure Database Mirroring. From the Principal server, right click the database and choose "Tasks" | "Mirror" or choose "Properties" | "Mirroring".

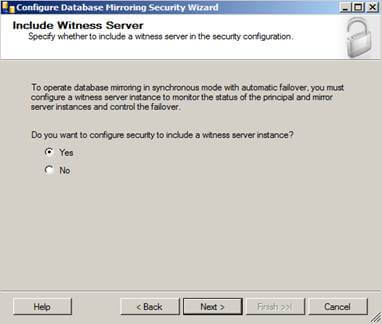
Click the "Configure Security" button and click "Next >" if the Configure Database Mirroring Security Wizard intro screen appears. The next screen should be the Include Witness Server screen:

This is where you would configure a witness server for your mirroring, but since we're just configuring a basic mirror we will skip this part. However, if you are configuring mirroring in an Enterprise environment it is recommended you configure a witness server because without one you will not have synchronous automatic failover option.
Select "No", then click "Next >" to continue the process.
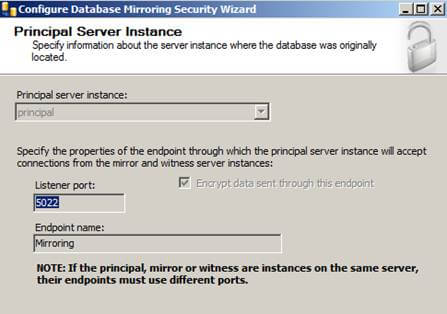
The next screen will give you options to configure the Principal Server Instance:

Here we will be creating our endpoint, which is a SQL Server object that allows SQL Server toCOMMUNICATE over the network. We will name it Mirroring with a Listener Port of 5022.
 over the network. We will name it Mirroring with a Listener Port of 5022.
Click the "Next >" button to continue.
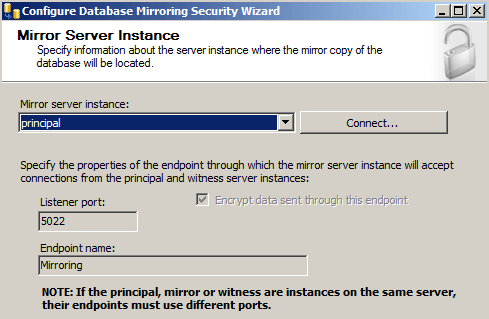
The next screen will give you options to configure the Mirror Server Instance:

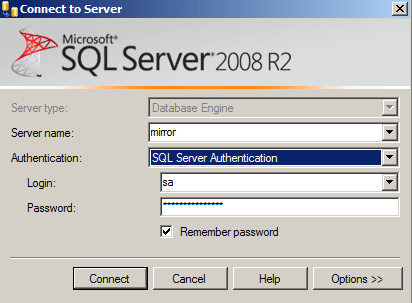
To connect to the Mirror server instance we will need to click the "Connect..." button then select the mirror server and provide the correct credentials:

Once connected, we also notice our endpoint name is Mirroring and we are listening on port 5022.
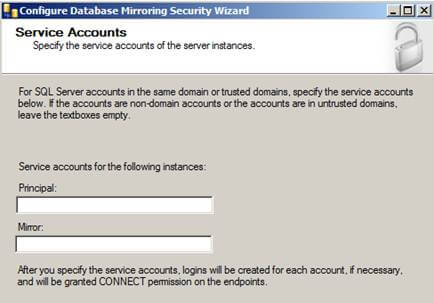
Click "Next >" and you'll see the Service Accounts screen.

When using Windows Authentication, if the server instances use different accounts, specify the service accounts for SQL Server. These service accounts must all be domain accounts (in the same or trusted domains).
If all the server instances use the same domain account or use certificate-based authentication, leave the fields blank.
Since my service accounts are using the same domain account, I'll leave this blank.
Click "Finish" and you'll see a Complete the Wizard screen that summarizes what we just configured. Click "Finish" one more time.

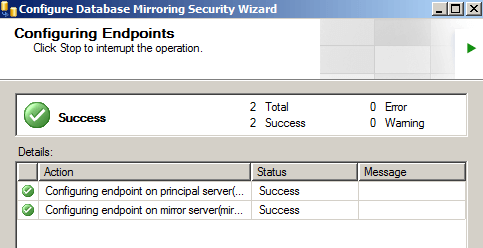
If you see the big green check mark that means Database Mirroring has been configured correctly. However, just because it is configured correctly doesn't mean that database mirroring is going to start...
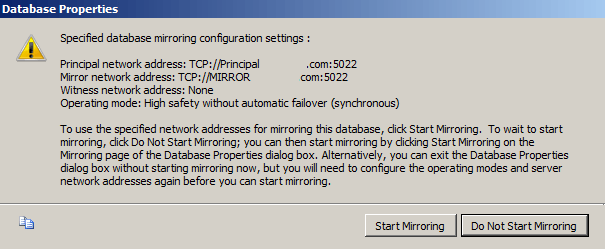
Next screen that pops up should be the Start/Do Not Start Mirroring screen:

We're going to click Do Not Start Mirroring just so we can look at the Operating Modes we can use:

Since we didn't specify a witness server we will not get the High Safety with automatic failover option, but we still get the High Performance and High Safety without automatic failover options.
For this example, we'll stick with synchronous high safety without automatic failover so changes on both servers will be synchronized.
Next, click "Start Mirroring" as shown below.

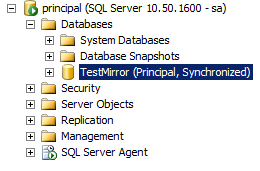
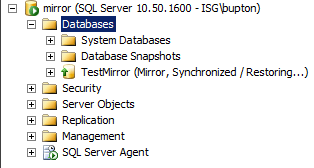
If everything turned out right, Database Mirroring has been started successfully and we are fully synchronized.


If Database mirroring did not start successfully or you received an error here are a few scripts to troubleshoot the situation:
Both servers should be listening on the same port. To verify this, run the following command:
SELECT type_desc, port
FROM sys.tcp_endpoints;
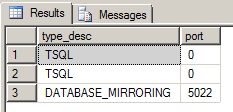
We are listening on port 5022. This should be the same on the Principal and Mirror servers:

Database mirroring should be started on both servers. To verify this, run the following command:
SELECT state_desc
FROM sys.database_mirroring_endpoints;
The state_desc column on both the Principal and Mirror server should be started:

To start an Endpoint, run the following:
ALTER ENDPOINT <Endpoint Name>
STATE = STARTED
AS TCP (LISTENER_PORT = <port number>)
FOR database_mirroring (ROLE = ALL);
ROLES should be the same on both the Principal and Mirror Server, to verify this run:
SELECT role
FROM sys.database_mirroring_endpoints;

To verify the login from the other server has CONNECT permissions run the following:
SELECT EP.name, SP.STATE,
CONVERT(nvarchar(38), suser_name(SP.grantor_principal_id))
AS GRANTOR,
SP.TYPE AS PERMISSION,
CONVERT(nvarchar(46),suser_name(SP.grantee_principal_id))
AS GRANTEE
FROM sys.server_permissions  SP , sys.endpoints EP
WHERE SP.major_id  = EP.endpoint_id
ORDER BY  Permission,grantor, grantee;

You can see here from the State and Permissions column that the user has been Granted Connect permissions.
SQL Server Database Mirroring Breaks if Endpoint Owner is Deleted
Problem
Will SQL Server database mirroring stop working if the user used to create the endpoints is removed? In this tip we will walk through the steps to find out.
Solution
Before I am able to provide with a definitive answer to the above problem, I created the following test environment.
- A Windows 2008 VM (Virtual Server) named SQLTEST1 with SQL 2008 Developer installed
- A Windows 2008 VM (Virtual Server) named SQLTEST2 with SQL 2008 Developer installed
- Since these servers are not in a domain I created a Windows user WinUser on both VMs and used this account to setup mirroring.
- I created a test database called mytest and mirrored it between the two SQL Servers SQLTEST1 and SQLTEST2.
Check Mirroring Status
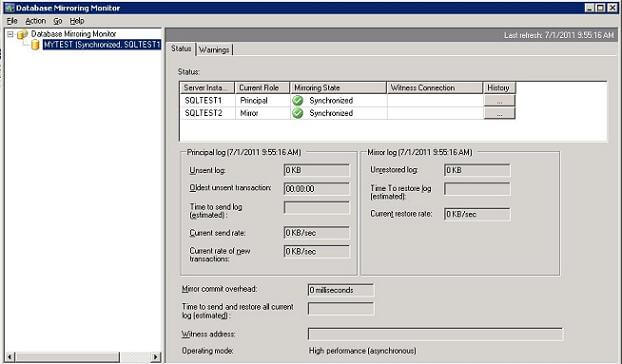
Let's start Database Mirroring Monitor to verify that database mirroring isWORKING . Below we can see that the databases are synchronized.
Drop SQL Server Login
Now, let's try to drop SQLTEST1\WinUser login by executing the following. As expected, the SQL login cannot be dropped because it owns the Mirroring endpoint. Since this failed I did not bother to try this on SQLTEST2.Drop Windows User
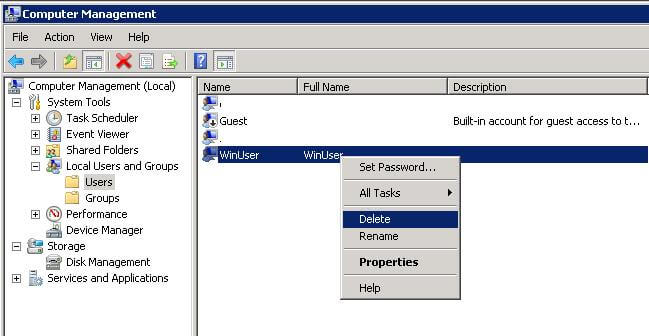
Now let's try to drop the Windows user WinUser on both servers. This was successful on both servers.
Check Mirroring Status
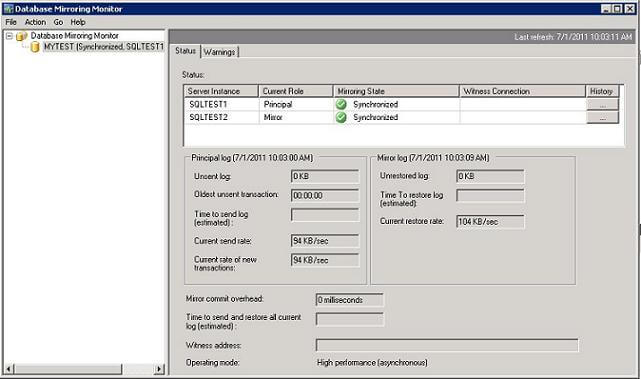
Now that WinUser has been deleted on both servers, let's check if database mirroring is stillWORKING . With a bit of surprise, database Mirroring is still working. To further verify it, I created tables and inserted data on the mytest database on the principal server SQLTEST1 and verified that such information was successfully replicated to the mirroring server SQLTEST2.
 . With a bit of surprise, database Mirroring is still working. To further verify it, I created tables and inserted data on the mytest database on the principal server SQLTEST1 and verified that such information was successfully replicated to the mirroring server SQLTEST2.
Restart SQL Server
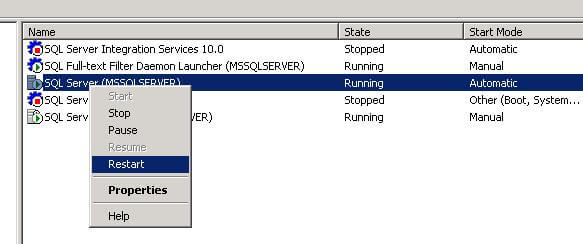
Now, let's restart the SQL Server service on both servers.
Check Mirroring Status
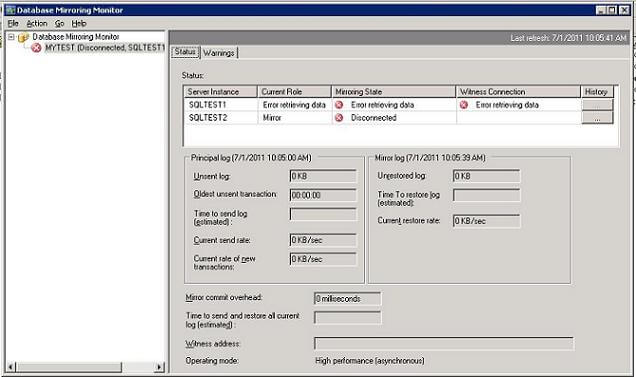
If we check the mirroring status again we can see that it has failed.
Conclusion
In order to avoid a possible mirroring outage it is appropriate to verify that a Windows user does not own mirroring endpoints, because if the user is removed from Active Directory or a local group, mirroring will break the next time the server is restarted. If you do use a Windows user you need to make sure that your accounts are well documented and not accidently deleted.
Monitoring SQL Server Database Mirroring with Email Alerts
The Catalog View sys.database_mirroring contains one row for each database in the instance of SQL Server and also contains state information of all mirrored databases. We'll query this Catalog View and raise an email alert for each mirrored database that we find in an abnormal state. We don't utilize a witness server in any of our mirrored pairs so we rely on manual failover.
Prerequisites
- A valid Database mail profile
- A valid login that has permission to send email i.e. a member of the DatabaseMailUserRole role in the msdb database
- At least one pair of mirrored databases to monitor
The Script
Substitute in the below script your Database Mail profile and a suitable email address to receive the alerts.
DECLARE @state VARCHAR(30)
DECLARE @DbMirrored INT
DECLARE @DbId INT
DECLARE @String VARCHAR(100)
DECLARE @databases TABLE (DBid INT, mirroring_state_desc VARCHAR(30))
-- get status for mirrored databases
INSERT @databases
SELECT database_id, mirroring_state_desc
FROM sys.database_mirroring
WHERE mirroring_role_desc IN ('PRINCIPAL','MIRROR')
AND mirroring_state_desc NOT IN ('SYNCHRONIZED','SYNCHRONIZING')
-- iterate through mirrored databases and send email alert
WHILE EXISTS (SELECT TOP 1 DBid FROM @databases WHERE mirroring_state_desc IS NOT NULL)
BEGIN
SELECT TOP 1 @DbId = DBid, @State = mirroring_state_desc
FROM @databases
SET @string = 'Host: '+@@servername+'.'+CAST(DB_NAME(@DbId) AS VARCHAR)+ ' - DB Mirroring is '+@state +' - notify DBA'
EXEC msdb.dbo.sp_send_dbmail 'valid_mail_profile', 'DBA@mssqltips.com', @body = @string,@subject = @string
DELETE FROM @databases WHERE DBid = @DbId
END
--also alert if there is no mirroring just in case there should be mirroring :)
SELECT @DbMirrored = COUNT(*)
FROM sys.database_mirroring
WHERE mirroring_state IS NOT NULL
IF @DbMirrored = 0
BEGIN
SET @string = 'Host: '+@@servername+' - No databases are mirrored on this server - notify DBA'
EXEC msdb.dbo.sp_send_dbmail 'valid_mail_profile', 'DBA@mssqltips.com', @body = @string,@subject = @string
END
|
Practice
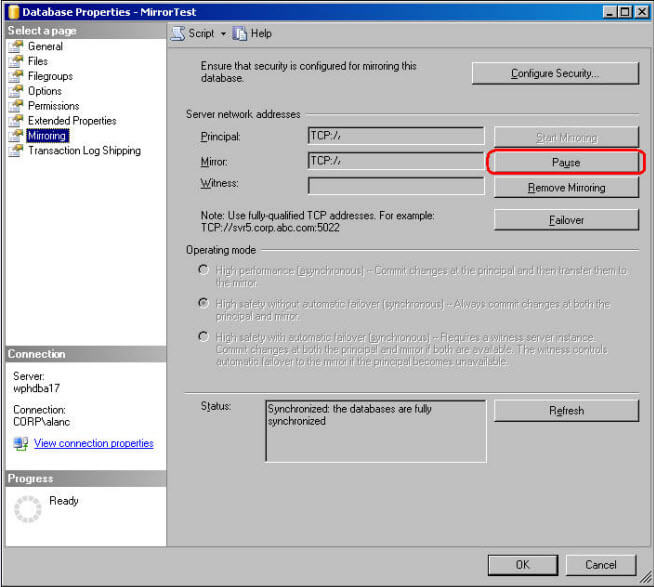
To verify the alert let's pause mirroring through the SQL Server Management Studio (SSMS). In Object Explorer right click your mirrored database -> Properties -> Mirroring option -> Pause button as follows:

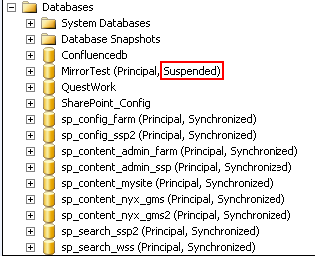
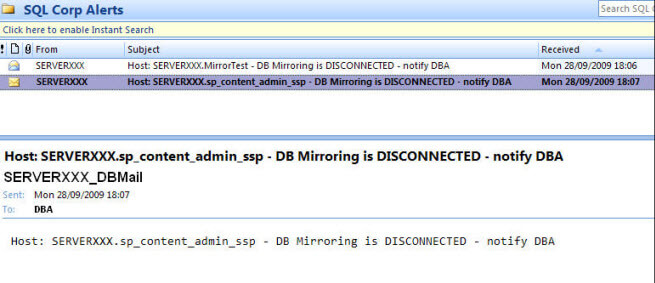
Now, if the query finds a mirrored database in an abnormal state as shown below, it will send out an alert email alert:

The script will also output the following information to notify you that an alert has been sent to be processed byDatabase Mail.
Mirroring Alert Message
-----------------------
Host: SERVERXXX.MirrorTest - DB Mirroring is Suspended - notify DBA
Mail queued.
Mirroring Alert Message
-----------------------
Host: SERVERXXX.sp_config_ssp2 - DB Mirroring is DISCONNECTED - notify DBA
Mail queued.
|
Email received that clearly shows the host name, database name and the abnormal state of the mirroring so that the DBA team can investigate further.

Add Database File on Database invloved in DB Mirroring
Ref:
http://mssqlfun.com/2014/10/20/add-database-file-on-database-invloved-in-db-mirroring/
Database Mirroring works on transaction logs. It applies transaction logs from Principle to Mirror. But Operation like addition of file is no log operation because of that file not be added to Mirror automatically.
Steps to Add Database File on Database involved in DB Mirroring :-
1) Break the Mirroring
ALTER DATABASE USERDB1 SET PARTNER OFF
2) Add New Data or log file, whatever is required
USE [master]
GO
ALTER DATABASE [UserDB1] ADD FILE
( NAME = N’UserDB1_1′,
FILENAME = N’H:MSSQL12.INS1MSSQLDATAUserDB1_1.ndf’ ,
SIZE = 3072KB , FILEGROWTH = 1024KB )
TO FILEGROUP [PRIMARY]
3) Take Transaction Log backup at Primary
BACKUP LOG USERDB1 TO DISK = ‘C:USERDB1_LOG.TRN’
4) Restore Step 3 Transactional Backup on Mirror with Move option
RESTORE LOG [USERDB1] FROM
DISK = N’C:USERDB1_LOG.TRN’
WITH Move N’UserDB1_1′ TO
N’I:MSSQL12.SQL14I2MSSQLDATAUserDB1.ndf’,
NORECOVERY, NOUNLOAD, STATS = 10
5) Reestablished DB Mirroring again
First on Mirror
ALTER DATABASE USERDB1
SET PARTNER = ‘TCP://SQL2014.RohitGarg.local.in:5022’
Second on Principle
ALTER DATABASE USERDB1
SET PARTNER = ‘TCP://SQL2K14_2.RohitGarg.local.in:5022’
NOTE : In case your Database Mirroring has same file structure at both principal & mirror then no special steps needed. Once you add file at principal, file automatically added to mirror database. Above steps are valid only for different file structure at both principal & mirror.
Moving a database while Database Mirroring is running
I have a 600 gig database that has a mirror. I need to move the databases from local drives to a SAN. Can anyone recommend a document that lists the steps to go through to move both the principle and mirror to the SAN with no down time? or minimal down time?
As far as I know, there isn’t any such document so I had a crack at coming up with a list of operations. Here’s what I had:
- Take a full backup of the principal on node A
- Restore it on the SAN on node B using WITH NORECOVERY, remembering to use WITH MOVE to place the files correctly, and with a different database name than the current mirror
- Take the required log backup on the principal and restore on the database copy on the SAN on node B
- Break the mirroring partnership
- Drop the current mirror database on node B
- Rename the database on the SAN on node B to be the mirror database — THIS DOESN”T WORK!
- Setup the mirroring partnership to point to the newly restored database on the SAN on node B
- Start mirroring and the new mirror will catch-up
- Failover to the mirror on node B, which becomes the new principal
- Follow the same procedure to move the new mirror on node A onto its SAN
- Failback if you want to
And I promised to try it out to make sure I had it right so in this blog post I’m going to walk through the steps of doing this. It turns out that the steps above are slightly incorrect. Step 6 above doesn’t work because the database is in recovery (so is inaccessible) and there’s a short-cut when moving the database on the first node to avoid having to take and copy more backups. Let’s see how it works and I’ll post the corrected sequence at the end.
As I did in yesterday’s mirroring post, I’m going to use the TicketSalesDB database from our Always-On DVDs. It’s only a few hundred MB instead of 600GB but the principal is the same (no pun intended :-)). I’ve got mirroring running between two nodes, SQLDEV01 (the principal) and SQLDEV02 (the mirror), both of which are running 2005 SP2 and I’ve got a simulated workload inserting rows into the database. I don’t actually have a SAN laying around so I’m cheating and I have directories called C:\SQLDEV01SAN and C:\SQLDEV02SAN instead. It’s the location change that’s the interesting part, not where the actual location is.
Step 1
On SQLDEV01, take a full backup and a log backup:
1
2
3
4
5
| BACKUP DATABASE [TicketSalesDB] TO DISK = N'C:\SQLskills\TicketSalesDB.BAK' WITH INIT;GOBACKUP LOG [TicketSalesDB] TO DISK = N'C:\SQLskills\TicketSalesDB_Log.bak' WITH INIT;GO |
Step 2
On SQLDEV01, break the mirroring partnership:
1
2
| ALTER DATABASE [TicketSalesDB] SET PARTNER OFF;GO |
And just check that it’s gone:
1
2
| SELECT [mirroring_state_desc] FROM sys.database_mirroring WHERE [database_id] = DB_ID (N'TicketSalesDB');GO |
NULL |
Step 3
On SQLDEV02, drop the mirror database – this wouldn’t work unless mirroring was no longer running:
1
2
| DROP DATABASE [TicketSalesDB];GO |
Step 4
Copy the backups to SQLDEV02 and restore them on the SAN and remembering to use WITH NORECOVERY:
1
2
3
4
5
6
7
8
9
10
| RESTORE DATABASE [TicketSalesDB] FROM DISK = N'C:\SQLskills\TicketSalesDB.bak'WITH MOVE N'TicketSalesDBData' TO N'C:\SQLDEV02SAN\TicketSalesDBData.MDF', MOVE N'TicketSalesFG2005Q1' TO N'C:\SQLDEV02SAN\TicketSalesFG2005Q1.NDF', MOVE N'TicketSalesFG2005Q2' TO N'C:\SQLDEV02SAN\TicketSalesFG2005Q2.NDF', MOVE N'TicketSalesFG2005Q3' TO N'C:\SQLDEV02SAN\TicketSalesFG2005Q3.NDF', MOVE N'TicketSalesFG2005Q4' TO N'C:\SQLDEV02SAN\TicketSalesFG2005Q4.NDF', MOVE N'TicketSalesDBLog' TO N'C:\SQLDEV02SAN\TicketSalesDBLog.LDF', NORECOVERY;GO |
Step 5
On SQLDEV02, set the mirroring partner to be SQLDEV01:
1
2
| GO |
Step 6
On SQLDEV01, start mirroring:
1
2
| GO |
And check that it’s running:
1
2
| SELECT [mirroring_state_desc] FROM sys.database_mirroring WHERE [database_id] = DB_ID (N'TicketSalesDB');GO |
This time it returns:
SYNCHRONIZED |
Step 7
Now we need to failover so that we can move the database on SQLDEV01 onto its SAN. Before we do that, let’s make sure that SQLDEV01 is the principal:
1
2
| SELECT [mirroring_role_desc] FROM sys.database_mirroring WHERE [database_id] = DB_ID (N'TicketSalesDB');GO |
which returns:
PRINCIPAL |
Now force the failover:
1
2
| ALTER DATABASE [TicketSalesDB] SET PARTNER FAILOVER;GO |
And query the DMV again to make sure. This time the mirroring_state_desc returned is:
MIRROR |
Excellent!
Now, I did all of this while my workload was running and it automatically failed over to SQLDEV02, with the database now hosted on the SAN. To do the same move on SQLDEV01, we don’t need to go through the backup and copy process again – we can just use the original backups we took in step 1.
Step 8
We need to break the mirroring partnership again, this time executing on SQLDEV02, the new principal:
1
2
| ALTER DATABASE [TicketSalesDB] SET PARTNER OFF;GO |
On SQLDEV01, we can now drop the database and restore the original backups onto the SAN:
1
2
3
4
5
6
7
8
9
10
11
12
13
14
15
16
| DROP DATABASE [TicketSalesDB];GORESTORE DATABASE [TicketSalesDB] FROM DISK = N'C:\SQLskills\TicketSalesDB.bak'WITH MOVE N'TicketSalesDBData' TO N'C:\SQLDEV01SAN\TicketSalesDBData.MDF', MOVE N'TicketSalesFG2005Q1' TO N'C:\SQLDEV01SAN\TicketSalesFG2005Q1.NDF', MOVE N'TicketSalesFG2005Q2' TO N'C:\SQLDEV01SAN\TicketSalesFG2005Q2.NDF', MOVE N'TicketSalesFG2005Q3' TO N'C:\SQLDEV01SAN\TicketSalesFG2005Q3.NDF', MOVE N'TicketSalesFG2005Q4' TO N'C:\SQLDEV01SAN\TicketSalesFG2005Q4.NDF', MOVE N'TicketSalesDBLog' TO N'C:\SQLDEV01SAN\TicketSalesDBLog.LDF', NORECOVERY;GORESTORE LOG [TicketSalesDB] FROM DISK = N'C:\SQLskills\TicketSalesDB_Log.bak' WITH NORECOVERY;GO |
And setup mirroring again. On SQLDEV01:
1
2
| GO |
And on SQLDEV02:
1
2
| GO |
And we’re running again.
Step 9
Now all we need to do is fail the workload back to SQLDEV01 by executing this on SQLDEV02:
1
2
| ALTER DATABASE [TicketSalesDB] SET PARTNER FAILOVER;GO |
Summary
So – the corrected sequence for moving a database while mirroring is running is the following:
- Take a full backup of the principal database on node A, and the required log backup
- Break the mirroring partnership
- Drop the current mirror database on node B
- Copy the backups to node B and restore it on the SAN on node B using WITH NORECOVERY, remembering to use WITH MOVE to place the files correctly
- Setup the mirroring partnership to point to the newly restored database on the SAN on node B
- Start mirroring and the new mirror will catch-up
- Failover to the mirror on node B, which becomes the new principal
- Follow the same procedure to move the new mirror on node A onto its SAN, but using the original backups from step 1
- Failback
How to disable database mirroring for a particular database?
Explain how to disable database mirroring for a particular database.
The database owner can manually stop a database mirroring session by removing mirroring from the particular database. Steps to do so:
- Connect to the Server instance
- Execute the statement ALTER DATABASE DbName SET PARTNER OFF
